Visual Aid
13 Pages

Preview
Page 1
Accutome A-scan Plus® Visual Aid
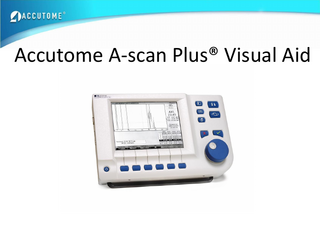
The Knob is the centerpiece of the user interface. Turn it to navigate screen objects, select list items, or modify numeric data fields. Press it to activate or deactivate screen objects. Selects the Measure screen where ultrasound waveforms are captured, reviewed, analyzed, and anatomical features are measured. Selects the Calculate IOL screen where IOL powers are calculated, lens lists are maintained, and lens constants are entered and personalized. Context sensitive Print. Produces a printout appropriate for the current screen. Selects the Patient Records screen where patient data records are saved, recalled, and selected for batch printing. Selects the Preferences screen where Eye Types, Materials, and ultrasound velocities are customized. Default settings, configurations, time and date are also setup here. The Check button always performs the same action a pressing the Knob. The X button is used to delete waveforms, patient data, numeric or alphanumeric data.
Probe Placement 1. Insert probe through the hole on the top of the immersion shell. Do not extend the probe past the scored line. 2. Twist the screw on the side of the shell, locking the probe into position. Do not over tighten.
2.
1.
Image Credit: Rhonda G. Waldron, Eye Scan Consulting
Aligned (good) Scan Check: 5 clear spikes Leading edge of spike rises at 90°
All 5 spikes reach maximum height and are clearly separated
Misaligned (Bad) Scans
Poor Retina Spike
Poor Posterior Lens Spike
To fix misalignment errors, adjust the shell on the eye moving it superior, inferior, nasal, and temporal until the proper waveform is displayed.
Misaligned (Bad) Scans Missing sclera spike
The A-scan measures from the Corneal Epithelium to the Macula. A sclera spike must be present to ensure you are not measuring to the optic nerve.
An optic nerve shot will result in a longer than actual axial length.
Optic Nerve Shot
Probe Placement Error Check: If probe is placed too close to the eye, the front layer of the cornea is eliminated shortening the axial length.
Gain
Gain shortcut: Ctrl + G Increasing the gain amplifies the echoes on the display screen. More gain is required for denser cataracts.
Gain too High; Resolution is lost
When gain is too high, the scan becomes oversaturated resulting in a shorter than actual axial length.
Gates
Gates tell the A-scan when to start looking for different events in the waveform. Events are detected to the right of the gate and above the threshold.
Check: Horizontal Threshold
Solid black triangles indicate the events from which the A-scan is measuring Should be under the first 4 key spikes. There is no sclera gate.
Gates
Error: Machine assumes a cataract spike is the posterior lens. An erroneously thin lens and long VCD is a giveaway of this. The average lens is between 4-6mm.
Gates
Fix: Hit Ctrl + P on keyboard to select the Posterior lens gate. Spin wheel to the right until the gate moves immediately to the left of the posterior lens spike (always the last spike before vitreous chamber). The third black marker along the ruler should jump to the right beneath the posterior lens spike and your measurements will update automatically.
Contact Vs. Immersion
On average, a contact scan will result in .2mm shorter axial length due to corneal compression. A contact scan does not show a split cornea spike because the probe comes in contact with the eye.