Accutome
B Scan Plus Quick Reference Guide
Quick Reference Guide
3 Pages

Preview
Page 1
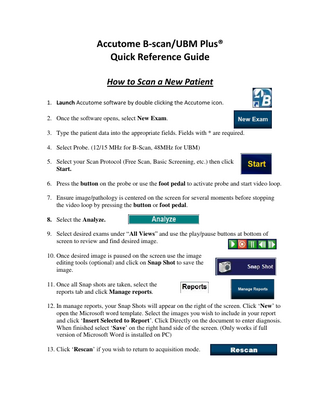
Accutome B-scan/UBM Plus® Quick Reference Guide How to Scan a New Patient 1. Launch Accutome software by double clicking the Accutome icon. 2. Once the software opens, select New Exam. 3. Type the patient data into the appropriate fields. Fields with * are required. 4. Select Probe. (12/15 MHz for B-Scan, 48MHz for UBM) 5. Select your Scan Protocol (Free Scan, Basic Screening, etc.) then click Start. 6. Press the button on the probe or use the foot pedal to activate probe and start video loop. 7. Ensure image/pathology is centered on the screen for several moments before stopping the video loop by pressing the button or foot pedal. 8. Select the Analyze. 9. Select desired exams under “All Views” and use the play/pause buttons at bottom of screen to review and find desired image. 10. Once desired image is paused on the screen use the image editing tools (optional) and click on Snap Shot to save the image. 11. Once all Snap shots are taken, select the reports tab and click Manage reports. 12. In manage reports, your Snap Shots will appear on the right of the screen. Click ‘New’ to open the Microsoft word template. Select the images you wish to include in your report and click ‘Insert Selected to Report’. Click Directly on the document to enter diagnosis. When finished select ‘Save’ on the right hand side of the screen. (Only works if full version of Microsoft Word is installed on PC) 13. Click ‘Rescan’ if you wish to return to acquisition mode.
Probe Set-Up B-Scan Plus 1.) For ‘closed lid’ scan: a. Cover the top of the B-Scan probe generously with Genteal Gel. (Ultrasound Gel) b. Instruct patient in which direction to gaze. c. Applanate the probe to patients closed eye to begin scan. 2.) For ‘open lid’ scan: a. Apply anesthetic to patient’s eye. b. Cover the top of B-Scan probe generously with Genteal Gel. (Ultrasound Gel). c. Instruct patient in which direction to set gaze. d. Applanate the probe to patients open eye to begin scan.
UBM Plus 1.) Scanning with Scleral Shell: a. Recline patient and anesthetize the eye. b. Place Scleral Shell in patient’s eye. c. Fill shell with distilled water. d. Immerse probe in distilled water to begin scan. 2.) Scanning with Clear Scan Cover: a. Anesthetize patient’s eye. b. Fill Clear Scan Cover to top with distilled water. c. Insert probe into Clear Scan Cover. d. Apply Genteal to the tip of the Clear Scan Cover.
e. Instruct patient in which direction to set gaze. f. Applanate probe to patients open eye to begin scan.