Aesculap
ScalpFix scalp clip system Instructions for Use/Technical Description
3 Pages
Preview
Page 1
Aesculap® 4
5
Aesculap Neurosurgery
3
9
2
Instructions for use/Technical description ScalpFix scalp clip system
1 6
4
Aesculap AG | Am Aesculap-Platz | 78532 Tuttlingen | Germany Phone +49 (0) 7461 95-0 | Fax +49 (0) 7461 95-26 00 | www.aesculap.com
7
Aesculap – a B. Braun company SOP-AIC-5000530 (TA010579)
4 Rev. 03
0718
V6
8 - DIR 93/42/EEC
60°
3
2
A 5
4
1
B 4
3 2
C
5
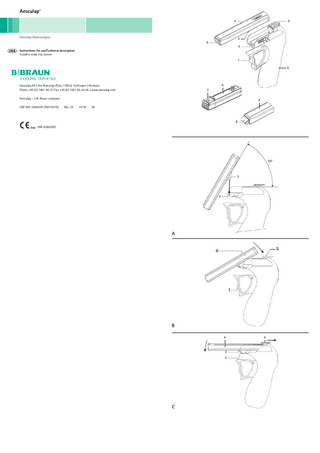
Assembling ► Mount hook 3 at an angle of approx. 60° in the magazine connection bar 2, see Fig. A. ► Rotate the magazine 4 with the rear part in the direction of the arrow against the safety lock switch 5, see
Aesculap® ScalpFix scalp clip system
Fig. B. ► Slide the safety lock switch 5 towards the magazine 4. When doing this, make certain that you do not press the
trigger 1. The magazine snaps into place and is now mounted.
Legend 1 2 3 4 5 6 7 8 9
Disassembling
Trigger Magazine connection bar Hook Magazine Safety lock switch Handle Transport protection Scalp clip Magazine opening
► Slide the safety lock switch 5 in the direction of the arrow. ► Grasp the front of the magazine 4 and rotate the magazine in the direction of the arrow. ► Loosen the hook 3 from the magazine connection bar 2 and lift out the magazine, see Fig. C.
Validated reprocessing procedure for the US market General information
Symbols on product and packages Sterilization using ethylene oxide Not for reuse in intended applications as defined by the manufacturer
Instructions in this document are based on validation testing by Aesculap in a medical device testing laboratory using worst case soiling methods. Each facility should verify that their processing system/s provide similar results. Personnel training and competency is required to perform all phases of processing hand held/manual instruments. Equipment, water supply, and practices all contribute to providing an effective reprocessing system and should be monitored by the facility. ► Clean the product using either the manual or the automatic washer cleaning process. Note Service life of instruments is determined by correct use, maintenance, and processing. Mixing metal during cleaning or sterilization can result in instrument discoloration or surface damage. All cleaning solutions should be mixed using the label instructions.
Use by
Point of use care ► Remove gross debris with a disposable low or non-linting wipe moistened with water and flush lumens with
water.
Caution, general warning symbol Caution, see documentation supplied with the product
Note Use of saline moistened wipes can shorten the service life of the instruments. ► Contain and transport used instruments in a labeled, closed, puncture proof device per facility procedure. ► Transport to processing area as soon as possible.
– Separate heavy instruments from delicate instruments. – Do not put heavy instruments on top of delicate instruments. – Keep instruments moist between point of use and decontamination.
Indication Aesculap's Scalpfix is indicated for use in temporary hemostasis of the scalp edge.
Manual cleaning process
Intended use
Pre-rinse
The scalp clip system consists of handle FF007P or FF012R, magazine FF013P and removal forceps FF014R. The scalp clip system is used in cranial surgery to insert sterile scalp clips on scalp skin incisions. This temporarily avoids bleeding at the margins of the wound.
► Use unheated utility/tap water to rinse instrument/s (pre-rinse may be part of washer program) for 1.5 minutes
or more to remove gross debris. ► Continue rinse with the unheated utility/tap water until gross debris is removed.
Soak
Safe handling and preparation ► Read, follow, and keep the instructions for use. ► Use the product only in accordance with its intended use, see Intended use. ► Remove the transport packaging and clean the new product prior to its initial sterilization. ► Store any new or unused products in a dry, clean, and safe place. ► Prior to each use, inspect the product for loose, bent, broken, cracked, worn, or fractured components. ► Do not use the product if it is damaged or defective. Set aside the product if it is damaged. ► Replace any damaged components immediately with original spare parts. ► Inspect the handle after each cleaning and disinfecting cycle to be sure it is clean, functioning properly, not dam-
aged, has intact insulation and does not have any loose, bent, broken, cracked, worn, or fractured components. Material intolerances against polyoxymethylene Using the scalp clip system with opened cranium is not recommended because it is possible for a clip to fall into the surgical site. WARNING
Single-use product (FF013P)
DANGER
Infection hazard for patients and/or users and impairment of product functionality due to reuse. Risk of injury, illness or death due to contamination and/or impaired functionality of the product! ► Do not reprocess the product.
The magazine FF013P is supplied EO-sterilized in sterile packaging. The magazine must not be reused. ► Use magazine once only. ► Do not use a magazine from open or damaged sterile packaging. ► Do not resterilize magazine. ► Do not use magazines that are past their expiration dates.
Safe operation
► Open, disassemble and/or flush instrument if applicable, so cleaning solution can reach all instrument surfaces. ► Tube (lumen) portion of instrument must be filled with cleaning solution during soak. ► Soak in cleaning solution for a minimum of 4 minutes.
Brushing & flushing ► Use unheated utility/tap water for cleaning solution. ► Open, disassemble and/or flush instrument if applicable, so cleaning solution can reach all instrument surfaces. ► Place instruments under the surface of the cleaning solution. ► Use a soft or medium non-metal bristle brush. ► Brush all surfaces until visibly clean. Brush difficult to reach areas such as lumens/cannulas, special rotating
areas and hidden surfaces 4 times (back & forth action = 1 time). Note During validation testing, brush strokes for individual instruments varied from 5 to 75 strokes depending on size and number of surfaces. ► Moving parts should be moved during cleaning to reach all surfaces. ► Flush lumens 4 times with a minimum of 20cc cleaning solution using a syringe or a jet pistol type flusher. ► Repeat flushing with utility water a minimum of 3 times.
Final rinse ► Use critical/treated water. ► Rinse by placing instruments under the water, exposing all surfaces of the device under the water flow for a min-
imum of 3 times. ► Move parts during the rinsing if needed to expose all surfaces. ► Rinse lumens, tubes, or cannulas 4 times with at least 20cc or critical/treated water using a syringe or pistol type
flush device.
Dry ► Use heat or low-linting or non-linting cloth to dry instruments following final rinse.
Automatic washer cleaning process Pre-rinse ► Use unheated utility/tap water to rinse instrument/s (pre-rinse may be part of washer program) for 1.5 minutes
Risk of injury and/or malfunction! ► Always carry out a function check prior to using the product.
or more to remove gross debris. ► Continue rinse with the unheated utility/tap water until gross debris is removed.
Soak
WARNING If you squeeze and release the trigger, a scalp clip will be ejected from the magazine! ► Squeeze the trigger only when a scalp clip is actually needed. CAUTION The magazine 4 is fitted with a transport protection 7 for the scalp clips. The transport protection 7 must be removed in the direction of the arrow before magazine 4 can be mounted. ► Squeeze the trigger 1 all the way in and hold it. The scalp clip 8 opens as it is pushed out of the magazine 4. ► Place open scalp clip 8 in position on the margins of the wound. ► Then release the trigger 1 slowly. The scalp clip 8 closes and is released from the magazine.
► Open, disassemble and/or flush instrument if applicable, so cleaning solution can reach all instrument surfaces. ► Tube (lumen) portion of instrument must be filled with cleaning solution during soak. ► Soak in cleaning solution for a minimum of 4 minutes.
Brushing & flushing ► Use unheated utility/tap water for cleaning solution. ► Open, disassemble and/or flush instrument if applicable, so cleaning solution can reach all instrument surfaces. ► Place instruments under the surface of the cleaning solution. ► Use a soft or medium non-metal bristle brush. ► Brush all surfaces until visibly clean. Brush difficult to reach areas such as lumens/cannulas, special rotating
areas and hidden surfaces 4 times (back & forth action = 1 time).
Note During validation testing, brush strokes for individual instruments varied from 5 to 75 strokes depending on size and number of surfaces. ► Moving parts should be moved during cleaning to reach all surfaces. ► Flush lumens 4 times with a minimum of 20cc cleaning solution using a syringe or a jet pistol type flusher. ► Repeat flushing with utility water a minimum of 3 times.
Automatic washer ► Use cleaning agent instructions for recommended dilution in washer. ► Open or disassemble instrument/s, as needed, to allow cleaning solution to reach all instrument surfaces. ► Use normal washer cycle (see below for specific parameters used during validation). ► Final rinse should be critical/treated water.
Automatic washer validation parameters a. Wash cycle - 6 minutes (total time, longer may be used) b. Final rinse - Critical/treated water for 2 minutes at 194 °F. (longer time may be used) c. Dry – 8 minutes at 194 °F. (longer time and/or higher temperature may be used) Note Automatic washer parameters intended for use on medical devices (instruments) not used during Aesculap’s testing should perform similarly. Verify facility specific equipment by using information provided by the manufacturer and physical testing.
Inspection ► Allow the instrument to cool down to room temperature. ► Inspect in a well-lit area and/or use a lighted magnifier. ► Check that the instrument is clean and dry. If not, repeat cleaning and/or drying. ► Lubricate instruments with moving parts as needed; unless otherwise indicated. Use a lubricant intended for use
on surgical instruments such as, Aesculap JG598 or JG600. ► Check if instrument is operational and free of damage (e.g. broken insulation or corroded, loose, bent, broken,
cracked, worn, or fractured components). ► Remove damaged or inoperative products from service
Note Titanium may discolor during processing.
Sterilization Steam Sterilization Parameters Sterilization Method
Min. temperature
Min. exposure time
Dry time*
Sterilization Dynamic air removal (PreVac), WITH dry time
270 °F (132 °C)
4 minutes
20 minutes
Sterilization Dynamic air removal (PreVac), WITHOUT dry time*
270 °F (132 °C)
4 minutes
0 minutes
* Dry time can vary based on load, sterilizer functionality and other local factors.
Sterilization validation a. Exposure temperature – 270 °F b. Exposure time – 4 minutes c. Packaged set load – 25 lbs total (container + instruments)
Technical Service ► For service and repairs, please contact your national B. Braun/Aesculap agency.
Modifications carried out on medical technical equipment may result in loss of guarantee/warranty rights and forfeiture of applicable licenses. Service addresses Aesculap Technischer Service Am Aesculap-Platz 78532 Tuttlingen / Germany Phone: +49 (7461) 95-1602 Fax: +49 (7461) 16-5621 E-Mail: ats@aesculap.de Or in the US: Attn. Aesculap Technical Services 615 Lambert Pointe Drive Hazelwood MO, 63042 Aesculap Repair Hotline Phone: +1 (800) 214-3392 Fax: +1 (314) 895-4420 Other service addresses can be obtained from the address indicated above.
Disposal ► Adhere to national regulations when disposing of or recycling the product, its components and its packaging!
Distributor in the US/Contact in Canada for product information and complaints Aesculap Inc. 3773 Corporate Parkway Center Valley, PA, 18034, USA