Allen Medical Systems
C-prone Head Positioner A-70300 Instructions for Use Rev A5 Nov 2015
Instructions for Use
30 Pages

Preview
Page 1
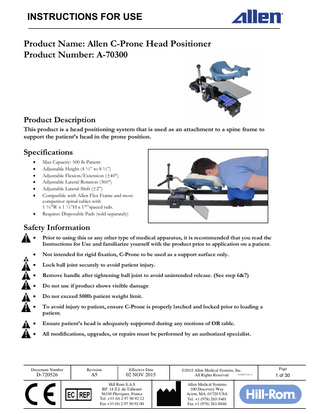
INSTRUCTIONS FOR USE Product Name: Allen C-Prone Head Positioner Product Number: A-70300
Product Description This product is a head positioning system that is used as an attachment to a spine frame to support the patient’s head in the prone position.
Specifications
Max Capacity: 500 lb Patient Adjustable Height (4 ½” to 8 ½”) Adjustable Flexion/Extension (±40°) Adjustable Lateral Rotation (360°) Adjustable Lateral Shift (±2”) Compatible with Allen Flex Frame and most competitor spinal tables with 1 ¼”W x 1 ½”H x 17”spaced rails. Requires Disposable Pads (sold separately)
Safety Information
Prior to using this or any other type of medical apparatus, it is recommended that you read the Instructions for Use and familiarize yourself with the product prior to application on a patient.
Not intended for rigid fixation, C-Prone to be used as a support surface only.
Lock ball joint securely to avoid patient injury.
Remove handle after tightening ball joint to avoid unintended release. (See step 6&7)
Do not use if product shows visible damage
Do not exceed 500lb patient weight limit.
To avoid injury to patient, ensure C-Prone is properly latched and locked prior to loading a patient.
Ensure patient’s head is adequately supported during any motions of OR table.
All modifications, upgrades, or repairs must be performed by an authorized specialist.
Document Number
Revision
Effective Date
D-720526
A5
02 NOV 2015 Hill Rom S.A.S BP. 14 Z.I. du Talhouet 56330 Pluvigner, France Tel. +33 (0) 2 97 50 92 12 Fax +33 (0) 2 97 50 92 00
©2015 Allen Medical Systems, Inc. D-FACT-722-11 All Rights Reserved Allen Medical Systems 100 Discovery Way Acton, MA, 01720 USA Tel. +1 (978) 263-5401 Fax +1 (978) 263-8846
Page
1 of 30
INSTRUCTIONS FOR USE Set-Up and Use Step 1:
Installation
Place C-prone on Flex-Frame approximately 12” from chest supports.
Step 2: Push down firmly on the clamp latch to lock the Supine Top into place. Pull outward on the clamp latch to ensure the clamp is locked
Step 3: Attach disposable pad
Step 4: Ensure lateral slide is locked.
Step 5: Adjust height to same level as Wing Set pads.
Document Number
Revision
Effective Date
D-720526
A5
02 NOV 2015 Hill Rom S.A.S BP. 14 Z.I. du Talhouet 56330 Pluvigner, France Tel. +33 (0) 2 97 50 92 12 Fax +33 (0) 2 97 50 92 00
©2015 Allen Medical Systems, Inc. D-FACT-722-11 All Rights Reserved Allen Medical Systems 100 Discovery Way Acton, MA, 01720 USA Tel. +1 (978) 263-5401 Fax +1 (978) 263-8846
Page
2 of 30
INSTRUCTIONS FOR USE
Step 6: Lock ball joint securely.
Step 7: Remove handle.
Patient Transfer
Step 8:
Place the disposable mask on the patient, while in the supine position on a stretcher.
Step 9: Guide intubation tubes into the chin cradle during patient transfer.
Operational Adjustment
Step 10:
Rotate mirror up to visualize patient’s face
Step 11: Adjust position on patient’s face. Unlatch and slide c-prone along frame. Ensure patient’s eyes are free from any contact and chin is adequately supported. Press down latch after repositioning.
Eyes Free
Chin Supported
Document Number
Revision
Effective Date
D-720526
A5
02 NOV 2015 Hill Rom S.A.S BP. 14 Z.I. du Talhouet 56330 Pluvigner, France Tel. +33 (0) 2 97 50 92 12 Fax +33 (0) 2 97 50 92 00
©2015 Allen Medical Systems, Inc. D-FACT-722-11 All Rights Reserved Allen Medical Systems 100 Discovery Way Acton, MA, 01720 USA Tel. +1 (978) 263-5401 Fax +1 (978) 263-8846
Page
3 of 30
INSTRUCTIONS FOR USE
Step 12: Adjust lateral shift. Unlock Lever. (See step 4) Support head and adjust slide block. Lock lever.
Step 13: Adjust neck to neutral position (2 person operation) First person must support patient’s head while second person releases ball joint. Position as desired. Lock ball joint securely.
Step 14: Interoperative adjustments Disconnect intubation tube and feed through opening in mask and C-prone. Fold mirror down for suction. Release latches and shift C-Prone after Flex-Frame articulations.
Step 15:
Removal
Push the white clamp locks down to unlock. Pull up firmly on the clamp latches to release. Ensure both latches are released during removal.
Document Number
Revision
Effective Date
D-720526
A5
02 NOV 2015 Hill Rom S.A.S BP. 14 Z.I. du Talhouet 56330 Pluvigner, France Tel. +33 (0) 2 97 50 92 12 Fax +33 (0) 2 97 50 92 00
©2015 Allen Medical Systems, Inc. D-FACT-722-11 All Rights Reserved Allen Medical Systems 100 Discovery Way Acton, MA, 01720 USA Tel. +1 (978) 263-5401 Fax +1 (978) 263-8846
Page
4 of 30
INSTRUCTIONS FOR USE
Cleaning and Maintenance 1. To achieve low-level Disinfection, use a quaternary ammonium disinfecting/cleaning solution following the manufacturer’s recommendation for achieving low-level disinfection. 2. After each use or Disinfection, clean the device with alcohol-based disinfectant wipes. 3. Wipe device with a clean, dry cloth. 4. Make certain the product is dry prior to reinstalling to avoid damage. 5. Do Not Autoclave. 6. Damage may result if product is cleaned with bleach. 7. Do Not use tape on this product. 8. Flex-Frame should be clean and dry prior to attaching C-Prone.
Suggested Accessories
C-Prone Comfort Mask Allen Wing Set System Allen Flex Frame
A-70310 A-70200 A-70100
North America: Customer Service.
International Customer Service
(800) 433-5774
+001 978 635 0511
(978) 263-8846
+001 978 635 0761
Document Number
Revision
Effective Date
D-720526
A5
02 NOV 2015 Hill Rom S.A.S BP. 14 Z.I. du Talhouet 56330 Pluvigner, France Tel. +33 (0) 2 97 50 92 12 Fax +33 (0) 2 97 50 92 00
©2015 Allen Medical Systems, Inc. D-FACT-722-11 All Rights Reserved Allen Medical Systems 100 Discovery Way Acton, MA, 01720 USA Tel. +1 (978) 263-5401 Fax +1 (978) 263-8846
Page
5 of 30