Quick Reference Guide
3 Pages

Preview
Page 1
Enterprise 9000
Quick Reference Guide
ENTERPRISE® 9000
QUICK REFERENCE GUIDE IMPORTANT! This Quick Reference Guide (QRG) is intended to assist the user in understanding the basic functions of this product. The QRG does not replace the safety warnings, cautions and other important information provided in the Instructions for Use (IFU) supplied with the equipment; copies of the IFU are available on request from ArjoHuntleigh. Some of the functions should only be used by clinically-qualified personnel. The carer should make sure they have read and understood the IFU before using this equipment. This product is intended for patients over 12 years of age. A clinically-qualified person should assess the age, height and medical condition of the patient to ensure they can use the product safely. Place the mattress platform in the low height position when the patient is unattended.
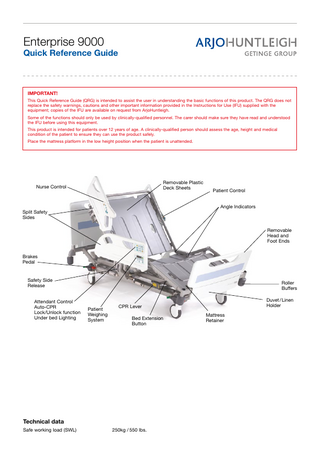
Removable Plastic Deck Sheets
Nurse Control
Patient Control Angle Indicators
Split Safety Sides
Removable Head and Foot Ends Brakes Pedal
Safety Side Release Attendant Control Auto-CPR Lock/Unlock function Under bed Lighting
Roller Buffers
Patient Weighing System
Bed Extension Button
Technical data Safe working load (SWL)
Duvet / Linen Holder
CPR Lever
250kg / 550 lbs.
Mattress Retainer
Backrest
Nurse control
Knee-break
1. Select one of the function buttons. Bio-Contour, Backrest, Bio-Contour raises Height or Knee-break. backrestand 2. The indicator light on the knee-break simultaneously selected function will turn green. If the indicator light is yellow, that means the function has been locked out at the Attendant Control Panel. 3. Press Lower or Raise button to adjust that function.
• Yellow light indicates function is locked out • Green light indicates function selected
Raise button
HEIGHT BUTTON For Standard low height – select the function button then press the lower button. For Extra low height – press and hold the function button and lower button simultaneously.
Attendant Control Panel (ACP) Height button. For Standard low height – select the function button then press the lower button. For Extra low height – press and hold the function button and lower button simultaneously.
CPR – Hold down button to return the bed to a flat position. CPR button works even if functions are locked out.
Under bed lighting ON / OFF
Lower button
Calf section selection buttons – One of these two buttons will be selected at all times. Whichever button is selected will determine the position the calf section profiles into. Fowler position
Vascular position
Power Indicator
Backrest
Battery Indicator
Calf section
Underbed Entrapment indicator
Lock / Unlock Function button. Press the lock button then the function(s) you want to lock out. To unlock use the same sequence.
Raise button Lower button Tilt
• Yellow light indicates function is locked out • Green light indicates function selected
Knee-break
Function selection buttons – select the function you want then press the raise or lower button to adjust that function
To lock all functions at once, press and hold down the lock button for five seconds.
Raise button
Patient control
Backrest
1. Select one of the function buttons. Bio-Contour, Backrest or Knee-break. 2. The indicator light on the selected function will turn green. If the indicator light is yellow, that means the function has been locked out at the Attendant Control Panel. 3. Press Lower or Raise button to adjust that function.
• Yellow light indicates function is locked out • Green light indicates function selected
Bio-Contour raises backrest and knee-break simultaneously
Lower button Knee-break
Weighing and egress detection The controls for the weighing system and patient egress detection are located on the foot end safety side panel. Enable button
Weight Display
Auto Compensation button Weight Resolution button Weigh button Bed Egress button Volume control for bed egress alarm
Zero button
Weighing system operating instructions Initialisation When the bed is first connected to the electricity supply, the display will indicate COLD for approximately two minutes until the weighing system stabilises. Before using the weighing system it must be initialised as follows: Place the mattress, bed linen and all necessary accessories on the bed. Press the Enable key followed by the Zero key.
+ The indicator above the Zero key will light green for a few seconds before the display reads zero (0.0). Place the patient on the bed. Weighing Press the Enable key followed by the Weigh key. The patient’s weight will be displayed for ten seconds then the display will go blank.
+
=
The weight is displayed rounded to the nearest 500g; this can be temporarily changed to 100g by pressing the Select Weight Resolution key. The display will revert to 500g next time the Weigh key is pressed.
Auto Compensation This facility allows weight to be added to or removed from the bed, without affecting the indicated patient weight. To use Auto Compensation: With the patient lying on the bed, press the Enable key
+ followed by the Auto Compensation key. The display will indicate AUTO. Add or remove accessories or bed linen as required. Press the Enable key followed by the Auto Compensation key. The indicators above the keys will go out and the display will show the patient’s weight unaffected by the removal/addition of accessories or bed linen.