Quick Guide
2 Pages

Preview
Page 1
Quick guide
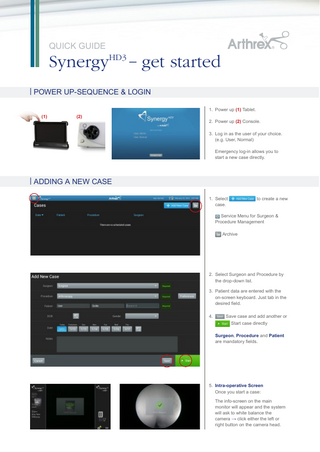
SynergyHD3 – get started | Power up-Sequence & Login 1. Power up (1) Tablet. (1)
(2)
2. Power up (2) Console. 3. Log in as the user of your choice. (e.g. User, Normal) Emergency log-in allows you to start a new case directly.
| Adding a new Case 1. Select case.
to create a new
Service Menu for Surgeon & Procedure Management Archive
2. Select Surgeon and Procedure by the drop-down list. 3. Patient data are entered with the on-screen keyboard. Just tab in the desired field. 4.
Save case and add another or Start case directly Surgeon, Procedure and Patient are mandatory fields.
5. Intra-operative Screen Once you start a case: The info-screen on the main monitor will appear and the system will ask to white balance the camera → click either the left or right button on the camera head.
(1) 6. The intra-operative screen on the tablet will appear: (1) Image and video roll (2) Case information Status Information (e.g. Auto Print – Printer not detected; network Connection is up; Streaming is off) Change settings during operation Will prompt you to end the case. The display on the tablet will switch to the “Case Review” mode.
(2)
Button Settings
Camera Settings
Display Settings
Printer Settings
(1) 7. The “Case Review” mode: Select/Deselect images/videos to be exported Number of selected images/ videos for export Printer Settings Start print Export to selected location Exit case review mode
Arthrex GmbH
|
fon + 49 / 8131 / 5957-0
|
fax + 49 / 8131 / 5957-245
|
|
www.arthrex.de
© Copyright: Arthrex GmbH, 2013. All rights reserved. LIT2-529-EN_A