Arthrex
DrillSaw Sports 400 Battery-Powered System Instructions for Use
13 Pages

Preview
Page 1
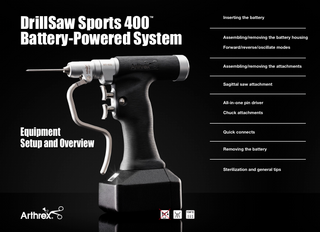
DrillSaw Sports 400 Battery-Powered System ™
Inserting the battery
Assembling/removing the battery housing Forward/reverse/oscillate modes
Assembling/removing the attachments
Sagittal saw attachment
All-in-one pin driver Chuck attachments
Equipment Setup and Overview
Quick connects
Removing the battery
Sterilization and general tips
134˚C
Inserting the battery
Press
Sterile
1
2
3
Open the battery housing.
Place the sterile plate on top as far
Align the rails of the battery and battery housing and push
as it will go.
the unsterile, fully charged battery as far as it will go into the battery housing. Ensure the metal tab on the battery lays flat.
4
5
Remove the transfer plate.
Close the battery housing until it audibly snaps into place.
This document is not intended to replace or supercede the Instructions For Use for the DrillSaw Sports 400™ power system. It is only a tool to reference common questions related to these products. For a full listing of instructions and warnings, please refer to the Instructions For Use: www.arthrex.com.
Assembling/removing the battery housing
1
Slide
2
3
„ “Click
Assemble
Align the rails on the battery housing to the rails on the handpiece.
Slide the battery housing in a straight line onto the handpiece as shown.
Press
1
Slide
2 Removal
Depress the plastic tab on the battery housing.
Slide the handpiece away from the tab.
When the battery housing is fully seated, „ it will audibly “click into place.
Switching forward and reverse modes
1
2
3
Safe/Off position. S
Forward-only mode. F Reverse will not operate. Depress bottom trigger to run the device in forward.
Forward/Reverse/Oscillate mode. FR Depress bottom trigger to run the device in forward, the top trigger to run the device in reverse, and both triggers at the same time to oscillate the device.
Assembling/removing the attachments Assemble
1
2
3
Attachments can be inserted in 45˚ increments. Align the attachments to the collet and insert until the attachment audibly snaps into place.
Removal
1
press
2
To remove, depress the button and pull the attachment away from the collet. Depressing this button is not necessary in order to attach the device.
Sagittal saw attachment AR-400SAG
Press
Press
1
2
3
Press the button located on the top of the attachment.
Insert the hub of the saw blade into the attachment until fully seated.
The saw blade will audibly snap into place. Pull the saw blade in an axial direction to ensure the blade is fully seated.
Pin/All-in-one driver attachments AR-400PD
1
2
Insert the wire.
Pins may be inserted by pressing the pin into the collet of the pin driver or pushing the lever forward to open the collet completely.
3
TIP: Lever pulled = wire not fixed. Lever not pulled = wire fixed.
Chuck attachment AR-400DJ74
AR-400RJ74
1
2
Insert the drill bit into the open drilling chuck.
Fix the drill bit in the drilling chuck and tighten the connection until secure. Keyed chucks will require the use of a key to fully tighten. Keyless chucks must be tightened by hand.
Note: May use 4 in × 4 in sterile cloth to prevent glove damage.
Quick connects AR-400DAO
Insert
1
Pull back on the collet of the quick connect.
2
3
Insert the rotating instrument and keep turning it until you can feel it snap into place.
Release the collar and check that the connection is secure by pulling in an axial direction.
Release
Removing the battery
Unsterile
1
Press
Open the battery housing by pressing the locking device.
2
3
Remove the battery by pulling on the handle in an axial direction.
Sterilization
1
2
3 AR-300C AR-400AC
AR-400AC
Do not wash or sterilize the batteries.
Only wash or sterilize the battery housing when open and empty.
Use only Arthrex instrument trays for processing.
134˚C Arthrex recommends sterilization in accordance with EN 285/EN 13060, class B sterilization holding time a minimum of 4 minutes at 273°F (134°C) (drying time of at least 15 minutes). Follow your country-specific directives, standards, and guidelines. No lubrication necessary after processing. Sterilization guidelines for the DrillSaw Sports 400™ battery-powered handpiece, accessories, and attachments, individually or in the AR-400AC, AR-400AC-2, or AR-400T instrument tray, wrapped or unwrapped.
Sterilization Type
Minimum Temperature
Minimum Exposure Time
Dry Cycle
Steam Prevacuum
270˚F (132˚C)
4 minutes
15 minutes
Steam Gravity
270˚F (132˚C)
10 minutes
15 minutes
Steam Gravity
250˚F (121˚C)
40 minutes
15 minutes
General tips Li-Ion Battery The batteries can remain in the charging station until the next surgery. They can also be stored fully charged next to the charging station. Batteries for the DrillSaw Sports 400™ system will only charge with the AR-400UBC battery charger.
Maintenance-free – DO NOT OIL! Cleaning, disinfection, and drying • All system components with this symbol can be cleaned and disinfected in a thermo washer disinfector. • Only place the attachment in the thermo washer disinfector in an upright position. • Do not place the handpiece, the battery housing, or the attachments in the ultrasonic bath. • Arrange for sufficient drying after the thermo disinfection.
Please refer to the Arthrex 400™ Power System Instructions For Use for a full list of warnings prior to using the product.
This description of technique is provided as an educational tool and clinical aid to assist properly licensed medical professionals in the usage of specific Arthrex products. As part of this professional usage, the medical professional must use their professional judgment in making any final determinations in product usage and technique. In doing so, the medical professional should rely on their own training and experience and should conduct a thorough review of pertinent medical literature and the product’s Directions For Use. Postoperative management is patient specific and dependent on the treating professional’s assessment. Individual results will vary and not all patients will experience the same postoperative activity level or outcomes.
View U.S. Patent information at www.arthrex.com/corporate/virtual-patent-marking © 2018 Arthrex, Inc. All rights reserved. LI1-00049-EN_B