Quick Guide
2 Pages

Preview
Page 1
Quick GuideExam Management
Navigating the Touchscreen
Transducer
Current User
Settings
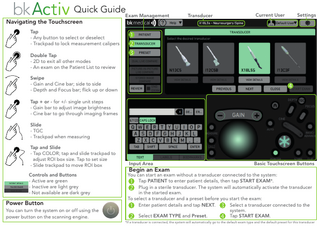
Tap - Any button to select or deselect - Trackpad to lock measurement calipers Double Tap - 2D to exit all other modes - An exam on the Patient List to review Swipe - Gain and Cine bar; side to side - Depth and Focus bar; flick up or down Tap + or - for +/- single unit steps - Gain bar to adjust image brightness - Cine bar to go through imaging frames Slide - TGC - Trackpad when measuring Tap and Slide - Tap COLOR; tap and slide trackpad to adjust ROI box size. Tap to set size - Slide trackpad to move ROI box Controls and Buttons - Active are green - Inactive are light grey - Not available are dark grey
Power Button You can turn the system on or off using the power button on the scanning engine.
Input Area
Begin an Exam
Basic Touchscreen Buttons
You can start an exam without a transducer connected to the system: Tap PATIENT to enter patient details, then tap START EXAM*. Plug in a sterile transducer. The system will automatically activate the transducer in the started exam. To select a transducer and a preset before you start the exam: Select a transducer connected to the Enter patient details and tap NEXT. system. Tap START EXAM. Select EXAM TYPE and Preset. *If a transducer is connected, the system will automatically go to the default exam type and the default preset for this transducer
1
Begin an Exam Follow Steps 1-2 on page 1.
2
Color Mode Tap COLOR to activate. Tap POWER to toggle Power Doppler on/off.
3
4
5
PW Doppler Mode Tap PW to activate Pulsed Wave Doppler mode. Tap AUTO to optimize PW Doppler. Tap PW to turn off.
7
Picture-in-Picture Live Compare Tap Picture-in-Picture Live Compare to compare live image to stored images or clips. *Available with license AUTO
Needle Guide for Biopsy Tap BIOPSY button to activate/deactivate. Capture Tap STORE to capture still frame. Or tap Freeze, select Cine Frame, then tap STORE. Tap CLIP to capture a clip. STORE
6
Compare Modes* Dual Live Compare Tap Dual Live Compare to compare live image with previously saved images (active when images were saved during the exam).
Review Exam 1. Tap REVIEW. Current exam images will appear. 2. If no exam is open then double-tap on desired exam from the list. End an Exam Tap END EXAM. Refer to the User Guide 16-126278 for full instructions.
Helpful Tips Gain Tap -/+ or slide on the Gain bar to adjust. Depth/Focus Flick up or down on the Depth/Focus bar to adjust. Home Tap Home to bring image back to default settings.
CLIP
Measure and Calculate Tap Freeze. Tap CALC for calculations. Tap MEASURE for Generic measurements. Use tap and slide to position calipers.
CALC
Label an exam Tap LABEL. Then tap desired entry type: LABEL
Needle Enhance Locate and tap Needle Enhance. Select RIGHT or LEFT to indicate needle entry point. [REF] 2300 16-129030-EN-01 2021-03