Quick Guide
4 Pages

Preview
Page 1
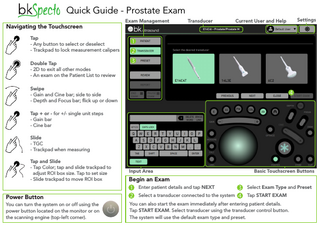
Quick Guide - Prostate Exam Navigating the Touchscreen
Exam Management
Transducer
Current User and Help
Settings
Tap - Any button to select or deselect - Trackpad to lock measurement calipers Double Tap - 2D to exit all other modes - An exam on the Patient List to review Swipe - Gain and Cine bar; side to side - Depth and Focus bar; flick up or down Tap + or - for +/- single unit steps - Gain bar - Cine bar Slide - TGC - Trackpad when measuring Tap and Slide - Tap Color; tap and slide trackpad to adjust ROI box size. Tap to set size - Slide trackpad to move ROI box
Power Button You can turn the system on or off using the power button located on the monitor or on the scanning engine (top-left corner).
Input Area
Basic Touchscreen Buttons
Begin an Exam Enter patient details and tap NEXT
Select Exam Type and Preset
Select a transducer connected to the system
Tap START EXAM
You can also start the exam immediately after entering patient details. Tap START EXAM. Select transducer using the transducer control button. The system will use the default exam type and preset.
1
Begin a Prostate Exam Follow Steps 1-4 on page 1. Enter PSA in step 1.
2
Dual Tap DUAL to activate. The image splits into two views: A and B. Tap the dual view button to toggle between views.
3
Switch Planes on Biplane/Triplane transducer Tap T or S/T, S or E on the touch screen to switch planes. *Or use appropriate button on transducer
4a Calculate Volume
Tap Freeze.* Tap CALC and desired calculation (Prostate Volume). Use tap and slide to position calipers. You can also enter PSA here.
7
Needle Guide for Biopsy Tap BIOPSY button to activate/deactivate.
8
Review Exam 1. Tap REVIEW. Current exam images will appear. 2. If no exam is open then double-tap on desired exam from the list.
9
Create Report Tap REPORT to create, preview, print and store a report. Images are automatically added to the report.
CALC
10 Pause an Exam
*CALC can be auto-selected on FREEZE
Tap PAUSE EXAM.
10 End an Exam
Tap END EXAM.
4b Measure
1. Tap MEASURE for all other generic measurements. 2. Select desired measurement. 3. Use tap and slide to position calipers. 5
6
Capture Tap STORE to capture still frame. Or tap Freeze, select Cine Frame, then tap STORE. Tap CLIP to capture a clip.
Helpful Image Adjustments
MEASURE
Gain Tap -/+ or slide on the Gain bar to adjust. Depth/Focus Flick up or down on the Depth/Focus bar to adjust. STORE
CLIP
Label an Exam 1. Tap LABEL. Then tap desired entry type: LABEL
Home Tap home to bring image back to default settings.
16-01692-EN-02 Oktober 2018
Quick Guide - Abdominal and Small Parts Exam Navigating the Touchscreen
Exam Management
Transducer
Current User and Help
Settings
Tap - Any button to select or deselect - Trackpad to lock measurement calipers Double Tap - 2D to exit all other modes - An exam on the Patient List to review Swipe - Gain and Cine bar; side to side - Depth and Focus bar; flick up or down Tap + or - for +/- single unit steps - Gain bar - Cine bar Slide - TGC - Trackpad when measuring Tap and Slide - Tap Color; tap and slide trackpad to adjust ROI box size. Tap to set size - Slide trackpad to move ROI box
Power Button You can turn the system on or off using the power button located on the monitor or on the scanning engine (top-left corner).
Input Area
Basic Touchscreen Buttons
Begin an Exam Enter patient details and tap NEXT
Select Exam Type and Preset
Select a transducer connected to the system
Tap START EXAM
You can also start the exam immediately after entering patient details. Tap START EXAM. Select transducer using the transducer control button. The system will use the default exam type and preset.
1
Begin an Abdominal or Small Parts Exam Follow Steps 1-4 on page 1.
2
Color Mode Tap COL to activate. Tap POWER DOPPLER to toggle Power Doppler on/off.
3
PW Doppler Mode Tap PW to activate. Tap TRIPLEX to toggle Triplex off/on.
4a Calculate Volume
Tap Freeze.* Tap CALC and desired calculation (Kidney Volume). Use tap and slide to position calipers. *CALC can be auto-selected on FREEZE
CALC
8
Review Exam 1. Tap REVIEW. Current exam images will appear. 2. If no exam is open then double-tap on desired exam from the list.
9
Create Report Tap REPORT to create, preview, print and store a report. Images are automatically added to the report.
Tap PAUSE EXAM.
1. Tap MEASURE for all other generic measurements. 2. Select desired measurement. 3. Use tap and slide to position calipers.
MEASURE
10 End an Exam
Tap END EXAM.
Helpful Image Adjustments Gain Tap -/+ or slide on the Gain bar to adjust.
Capture Tap STORE to capture still frame. Or tap Freeze, select Cine Frame, then tap STORE. Tap CLIP to capture a clip. STORE
6
Needle Guide for Biopsy Tap BIOPSY button to activate/deactivate.
10 Pause an Exam
4b Measure
5
7
Depth/Focus Flick up or down on the Depth/Focus bar to adjust. CLIP
Label an Exam 1. Tap LABEL. Then tap desired entry type: LABEL
Home Tap home to bring image back to default settings.
16-01692-EN-02 Oktober 2018