BRAINLAB
CONTENT MANAGER 2.1, PATIENT BROWSER 4.1 and DICOM VIEWER 2.1 Getting Started Ver 2.0 Rev 1.0
Getting Started Guide
8 Pages

Preview
Page 1
GETTING STARTED
...
Software Versions: Content Manager 2.x, Patient Browser 4.x, DICOM Viewer 2.x
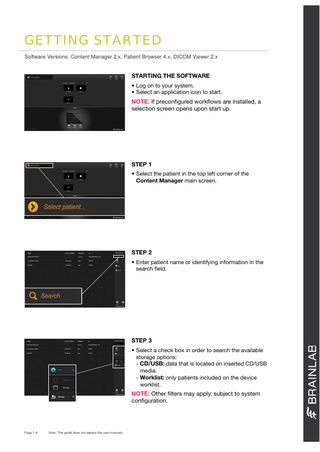
STARTING THE SOFTWARE • Log on to your system. • Select an application icon to start.
NOTE: If preconfigured workflows are installed, a selection screen opens upon start up.
STEP 1 • Select the patient in the top left corner of the Content Manager main screen.
STEP 2 • Enter patient name or identifying information in the search field.
STEP 3 • Select a check box in order to search the available storage options: - CD/USB: data that is located on inserted CD/USB media. - Worklist: only patients included on the device worklist.
NOTE: Other filters may apply, subject to system configuration.
Page 1-8
Note: This guide does not replace the user manuals.
STEP 4 • Select the desired patient from the patient list. The patient is highlighted. • Choose Select. The patient data loads.
VIEWING PATIENT DATA • DICOM Viewer displays all available images for the existing patient from either: - A plan or - A study
LOADING A STUDY FOR VIEWING • A study outlined in light gray is DICOM data from imaging sources. • Select the required images from the left. • The images are displayed in the Selected Data area, outlined in orange. • Select OK.
LOADING A PLAN FOR VIEWING • A plan outlined in dark gray is image data prepared or planned using Brainlab software. • Select the required images from the left. The images are displayed in the Selected Data area, outlined in orange. • Select OK.
NOTE: The entire plan is displayed on the right when selecting an image on the left.
Page 2-8
Note: This guide does not replace the user manuals.
DATA SELECTION/ DESELECTION
...
Software Versions: Content Manager 2.x, Patient Browser 4.x, DICOM Viewer 2.x
DESELECTING IMAGES • Deselect all images of the plan by selecting Deselect from the left. • Alternatively, deselect individual images from the Selected Data area.
SELECTED DATA - OVERVIEW • Data sets in the Selected Data area, outlined in orange, will be opened automatically when the software application is opened. • Press the outlined data set to deactivate it. It remains in the Selected Data area, but will not be automatically opened in the software. • Press X to remove a selected data set.
SELECTED DATA - ADDITIONAL INFORMATION • If you are prompted to select patient data after selecting a patient, the same selection rules as described above apply, but the data on the right is never outlined in orange.
Page 3-8
Note: This guide does not replace the user manuals.
Page 4-8
Note: This guide does not replace the user manuals.
ADDING NEW PATIENTS
...
Software Versions: Content Manager 2.x, Patient Browser 4.x, DICOM Viewer 2.x
STEP 1 • Select the patient in the top left corner of the Content Manager main screen.
STEP 2 • Select New from the menu.
STEP 3 • Enter patient name, date of birth, gender and ID. • Select Done. The new patient is saved and selected.
Page 5-8
Note: This guide does not replace the user manuals.
Page 6-8
Note: This guide does not replace the user manuals.
EXPORTING & EXITING
...
Software Versions: Content Manager 2.x, Patient Browser 4.x, DICOM Viewer 2.x
EXPORTING DATA - STEP 1 • Select Export on the main screen.
EXPORTING DATA - STEP 2 • Select the data you wish to export. • Select Export at the bottom of the screen.
EXPORT DESTINATION • Possible export destinations are: - CD/DVD storage - USB storage - Upload to Quentry account - Brainlab Network storage for treatment plans
NOTE: Other destinations may be available, subject to system configuration.
EXPORTING PLANNED CONTENT • Content created using Brainlab planning software is automatically converted to Brainlab Advanced File format upon export to allow for further planning with iPlan software. • Objects selected for export are re-sampled to the original resolution and orientation of the original image set used to outline the structures. • Review exported structures carefully, as volume and/ or shape may change.
Page 7-8
Note: This guide does not replace the user manuals.
EXITING THE SOFTWARE • Select Exit on the main screen. • Depending on your system, pressing Exit will either: - Close the software, or - Open Exit options
EXIT OPTIONS • New treatment: logs off the current user and opens a new treatment. • Shut down: shuts down the system. • Cancel: returns to the current treatment.
NOTE: Buzz systems contain a restart option here. NOTE: Selecting Exit on planning stations and 3rd party systems closes the software without dialog.
Page 8-8
MANUFACTURER INFORMATION:
COPYRIGHT:
LIABILITY:
Brainlab AG Kapellenstr. 12, 85622 Feldkirchen, Germany
This guide contains proprietary information protected by copyright. No part of this guide may be reproduced or translated without the express written permission of Brainlab.
This guide is subject to change without notice and does not represent a commitment on the part of Brainlab.
Europe, Africa, Asia, Australia: +49 89 99 15 68 44 USA and Canada: +1 800 597 5911 Japan: +81 3 3769 6900 Latin America: +55 11 33 55 33 70 France: +33-800-67-60-30 E-mail: support@brainlab.com
Document Revision: 1.0 Article Number:60910-88EN
For further information, please refer to the “Limitations of Liability” section in the Brainlab Standard Terms and Conditions of Sale.
*60910-88EN*