BRAINLAB
CURVED System Setup Rev 1.0
System Setup
4 Pages

Preview
Page 1
CURVE SYSTEM SETUP
...
Hardware: Curve 1.1
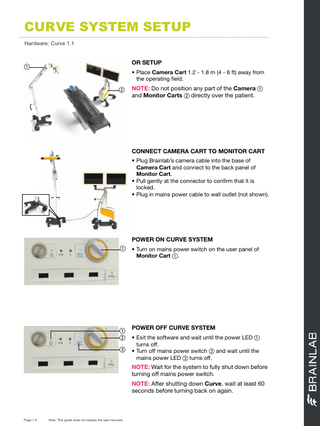
OR SETUP
a
• Place Camera Cart 1.2 - 1.8 m (4 - 6 ft) away from the operating field.
s
NOTE: Do not position any part of the Camera a and Monitor Carts s directly over the patient.
CONNECT CAMERA CART TO MONITOR CART • Plug Brainlab’s camera cable into the base of Camera Cart and connect to the back panel of Monitor Cart. • Pull gently at the connector to confirm that it is locked. • Plug in mains power cable to wall outlet (not shown).
POWER ON CURVE SYSTEM a
a s d
• Turn on mains power switch on the user panel of Monitor Cart a.
POWER OFF CURVE SYSTEM • Exit the software and wait until the power LED a turns off. • Turn off mains power switch s and wait until the mains power LED d turns off.
NOTE: Wait for the system to fully shut down before turning off mains power switch. NOTE: After shutting down Curve, wait at least 60 seconds before turning back on again.
Page 1-4
Note: This guide does not replace the user manuals.
LOCK AND UNLOCK MONITOR POSITION • Lock each joint by tightening the locking knob a so that the monitor does not move when touched. • To unlock, loosen the locking knob a until the joint moves easily.
a
ADJUST CAMERA MANUALLY • Press the laser button on the back of the camera handle to activate the positioning laser. • Position the camera using the laser beam so that the operating field is in the center of the camera field of view.
NOTE: Instruments must be in the camera field of view to be tracked.
ADJUST CAMERA WITH CONTROLS • Ensure the camera monitor switch is turned on. • Use the controls in the software to adjust the camera. A beep sounds while the camera is moving.
Page 2-4
Note: This guide does not replace the user manuals.
DOCKING AND TRANSPORT
...
Hardware: Curve 1.1
POSITION MONITOR CART: STEP 1
a
• Place protection covers over monitors and camera. • Loosen all locking knobs. • Rotate the lower arm to the position indicated until the park symbols align a. • Tighten the locking knob (insert shows the view from the other side).
NOTE: You may need to move the upper arm out of the way of the lower arm.
POSITION MONITOR CART: STEP 2 • Raise the lower arm up as high as possible. • Rotate the inner joint of the lower arm until the park symbols align. • Tighten the locking knob.
POSITION MONITOR CART: STEP 3 • Rotate the monitor joint a until the park symbols align. • Tighten the locking knob.
a POSITION MONITOR CART: STEP 4 • Repeat steps 1 and 2 for the upper arm until Monitor Cart is in its final position.
Page 3-4
Note: This guide does not replace the user manuals.
POSITION CAMERA CART: STEP 1 • Locate the park symbol on the camera post. You may need to raise the camera to see the park symbol. • Press the button on the telescopic post handle to move the post into park position.
a
POSITION CAMERA CART: STEP 2
s
• Fold the camera arm down with the camera handle until firmly aligned to the post a. • Rotate the camera to the side with the camera handle s.
POSITION CAMERA CART: STEP 3 • Fix the camera to the post with the Velcro protection cover strap.
a
DOCK AND UNDOCK CURVE • After positioning Monitor Cart and Camera Cart for docking, engage the Monitor Cart brakes. • Push the docking pedal down if popped up a. • Push Camera Cart into Monitor Cart quickly until the docking pedal pops up a. To undock, push down docking pedal and pull apart.
Page 4-4 Brainlab AG Olof-Palme-Str. 9 81829 Munich Germany Europe, Africa, Asia, Australia: +49 89 99 15 68 44 USA and Canada: +1 800 597 5911 Japan: +81 3 3769 6900 Latin America: +55 11 33 55 33 70 France: +33-800-67-60-30 E-mail: [email protected]
COPYRIGHT:
LIABILITY:
This guide contains proprietary information protected by copyright. No part of this guide may be reproduced or translated without the express written permission of Brainlab.
This guide is subject to change without notice and does not represent a commitment on the part of Brainlab.
Document Revision: 1.0 Article Number: 60917-17EN
For further information, please refer to the “Limitations of Liability” section in the Brainlab Standard Terms and Conditions of Sale.
*60917-17EN*