Guide
3 Pages

Preview
Page 1
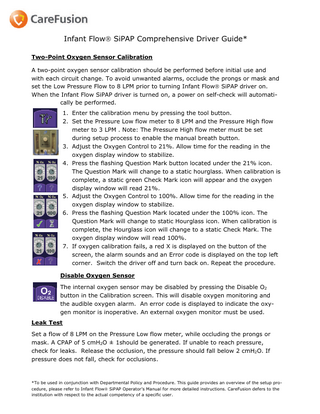
Infant Flow SiPAP Comprehensive Driver Guide* Two-Point Oxygen Sensor Calibration A two-point oxygen sensor calibration should be performed before initial use and with each circuit change. To avoid unwanted alarms, occlude the prongs or mask and set the Low Pressure Flow to 8 LPM prior to turning Infant Flow SiPAP driver on. When the Infant Flow SiPAP driver is turned on, a power on self-check will automatically be performed. 1. Enter the calibration menu by pressing the tool button. 2. Set the Pressure Low flow meter to 8 LPM and the Pressure High flow meter to 3 LPM . Note: The Pressure High flow meter must be set during setup process to enable the manual breath button. 3. Adjust the Oxygen Control to 21%. Allow time for the reading in the oxygen display window to stabilize. 4. Press the flashing Question Mark button located under the 21% icon. The Question Mark will change to a static hourglass. When calibration is complete, a static green Check Mark icon will appear and the oxygen display window will read 21%. 5. Adjust the Oxygen Control to 100%. Allow time for the reading in the oxygen display window to stabilize. 6. Press the flashing Question Mark located under the 100% icon. The Question Mark will change to static Hourglass icon. When calibration is complete, the Hourglass icon will change to a static Check Mark. The oxygen display window will read 100%. 7. If oxygen calibration fails, a red X is displayed on the button of the screen, the alarm sounds and an Error code is displayed on the top left corner. Switch the driver off and turn back on. Repeat the procedure. Disable Oxygen Sensor The internal oxygen sensor may be disabled by pressing the Disable O2 button in the Calibration screen. This will disable oxygen monitoring and the audible oxygen alarm. An error code is displayed to indicate the oxygen monitor is inoperative. An external oxygen monitor must be used. Leak Test Set a flow of 8 LPM on the Pressure Low flow meter, while occluding the prongs or mask. A CPAP of 5 cmH2O ± 1should be generated. If unable to reach pressure, check for leaks. Release the occlusion, the pressure should fall below 2 cmH2O. If pressure does not fall, check for occlusions.
*To be used in conjunction with Departmental Policy and Procedure. This guide provides an overview of the setup procedure, please refer to Infant Flow SiPAP Operator’s Manual for more detailed instructions. CareFusion defers to the institution with respect to the actual competency of a specific user.
Infant Flow SiPAP Comprehensive Driver Setup Guide* Startup Menu 1. Adjust the Pressure Low flow meter until the desired nCPAP pressure is displayed on the screen. Press the flashing Question Mark icon. This will change to a static Check Mark to confirm setting. 2. Adjust the Oxygen Control dial to set the desire FiO2%. Press the flashing Question Mark icon. A Check Mark will appear to confirm setting. 3. Adjust the Pressure High flow meter until the pressure in the display window is 2 to 3 cmH2O above the set nCPAP pressure. Press the flashing Question Mark icon. A static Check Mark appears to confirm setting. 4. To use the low breathing rate monitor connect the transducer interface to the Infant Flow SiPAP driver. Press the flashing Question Mark under the Baby Respiratory Sensor icon. This will change to a static check mark to confirm setting. This does not confirm that you want to use the respiratory monitoring option, but ensures that all modes are available for later use. 5. After completing the above steps, the screen will change and display nCPAP. Alarm Set/Confirm Screen 1. Press the nCPAP button or Alarm bar for three seconds to set the alarm limits and move to next screen. If no button is pressed within 2 minutes, the alarms limits will automatically set and screen will change to the Mode Select screen. Mode Select Screen 1. All available modes will be displayed at the bottom of the screen. 2. For Apnea modes, the abdominal respiratory sensor must attached to the transducer and properly placed on the infant’s abdomen. 3. Select the desired mode of operation and the Parameter Select screen will display. 4. Make desired setting changes and press the selected mode to confirm settings and activate new mode. 5. If no selection is made within 2 minutes and there are no alarms, the screen will lock to prevent entries. The mode buttons will go blank, except for the last button on the right. To unlock the screen, press the lock icon. 2
Infant Flow SiPAP Comprehensive Driver Setup Guide* Parameter Adjust Screen 1. During setup and normal operation, to make setting changes touch the desired Parameter button. 2. Press the up or down arrows to adjust parameter to desired setting. 3. Confirm change by repressing the Parameter button. The Main Screen will be displayed. Note: nCPAP and BiPhasic pressure levels are set by adjusting the flow. Main Screen and Monitored Parameter Screen 1. To monitor therapy use either the Main Screen or Monitored Parameter Screen. The main screen provides a graphical display of the delivered pressure. The Parameter Screen displays numerical values for the delivered pressure. 2. Press the Screen button to change the screen.
Main Screen
Monitored Parameter Screen
Alarm Reset/Silence 1. Press the alarm bar for 3 seconds to clear resolved and low priority alarms, and to reset alarm limits. 2. Press the alarm bar to silence active alarms for 30 seconds.
Note: Refer to the Infant Flow SIPAP Operator’s manual for additional instructions on setup, operation, and maintenance of the Infant Flow SIPAP driver.
3