Carl Zeiss
OPMI pico technoscope with table console Quick Guide Issue 1.5 July 2021
Quick Guide
2 Pages

Preview
Page 1
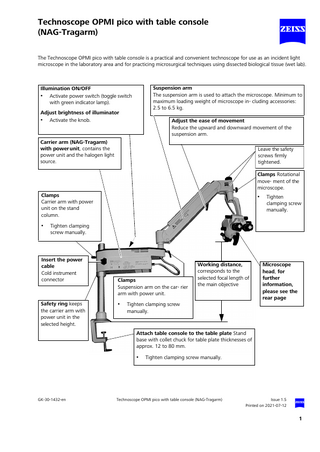
Technoscope OPMI pico with table console (NAG-Tragarm) The Technoscope OPMI pico with table console is a practical and convenient technoscope for use as an incident light microscope in the laboratory area and for practicing microsurgical techniques using dissected biological tissue (wet lab).
Suspension arm The suspension arm is used to attach the microscope. Minimum to maximum loading weight of microscope in- cluding accessories: 2.5 to 6.5 kg.
Illumination ON/OFF • Activate power switch (toggle switch with green indicator lamp). Adjust brightness of illuminator • Activate the knob.
Adjust the ease of movement Reduce the upward and downward movement of the suspension arm.
Carrier arm (NAG-Tragarm) with power unit, contains the power unit and the halogen light source.
Leave the safety screws firmly tightened. Clamps Rotational move- ment of the microscope.
Clamps Carrier arm with power unit on the stand column.
•
•
Tighten clamping screw manually.
Tighten clamping screw manually.
Insert the power cable Cold instrument connector
Safety ring keeps the carrier arm with power unit in the selected height.
Clamps Suspension arm on the car- rier arm with power unit.
•
Working distance, corresponds to the selected focal length of the main objective
Microscope head, for further information, please see the rear page
Tighten clamping screw manually.
Attach table console to the table plate Stand base with collet chuck for table plate thicknesses of approx. 12 to 80 mm.
•
GK-30-1432-en
Tighten clamping screw manually.
Technoscope OPMI pico with table console (NAG-Tragarm)
Issue 1.5 Printed on 2021-07-12
1
Microsope head Light guide Insert S light guide into the mount.
Friction tilt Turn adjusting element: • Adjust friction in such a way that the microscope body stops in the required work position.
Manual magnification setting: • Turn knob in one of the five stop positions (γ= 0.4x to γ= 2.5x). • Select magnification in accordance with the required detail recognition.
Filter selector Turn the knurled ring into one of the three stop no filter / green filter / orange filter
Cover Remove it and attach handgrip.
Accessories or handgrips Optional attachment
Ametropia When not using spectacles, turn the upper part of the eyepiece in accordance with the scale. Correct position: Set the prescription of your eyeglass lenses on the right and left (in dioptres). Emmetropes set the value "0".
Interpupillary distance Depending on version: Activate the knob or
Distance between eye and eyepiece For spectacle wearers, depending on version: Fold back the eyecup or
Pull eyepieces apart. Correct position: Both eyepiece images melt into one image.
"Screw in" the eyecup. Correct position: Boundaries of the edge of the field of views become clearly visible in the eyepiece.
Caution: These brief instructions roughly describe the Technoscope OPMI pico with table console. The brief instructions cannot replace the user manual “G-30-2165 Technoscope OPMI pico”. For this reason, make yourself familiar with the comments and warning notes included in this user manual. Do not use on humans. Carl Zeiss Meditec AG
Goeschwitzer Strasse 51-52 E-Mail: [email protected]
07745 Jena Germany Internet: www.meditec.zeiss.com
According to Directive 2014/35/EU Meets EMC requirement according to EN 61326-1, Table 1, Class B.
GK-30-1432-en
2
Technoscope OPMI pico with table console (NAG-Tragarm)
Issue 1.5 Printed on 2021-07-12