Quickguide
4 Pages

Preview
Page 1
OPMI Movena - Quickguide Start Up
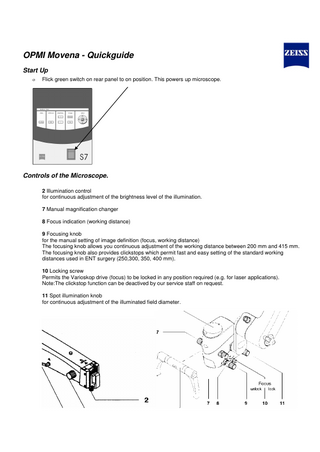
Flick green switch on rear panel to on position. This powers up microscope.
Controls of the Microscope. 2 Illumination control for continuous adjustment of the brightness level of the illumination. 7 Manual magnification changer 8 Focus indication (working distance) 9 Focusing knob for the manual setting of image definition (focus, working distance) The focusing knob allows you continuous adjustment of the working distance between 200 mm and 415 mm. The focusing knob also provides clickstops which permit fast and easy setting of the standard working distances used in ENT surgery (250,300, 350, 400 mm). 10 Locking screw Permits the Varioskop drive (focus) to be locked in any position required (e.g. for laser applications). Note:The clickstop function can be deactived by our service staff on request. 11 Spot illumination knob for continuous adjustment of the illuminated field diameter.
Changing of Illumination Lamp or Complete Illumination Module o
To change the illumination lamp or complete system due to failure press(3) as picture right to disengage the module
o
To switch between illumination globes rotate knob (1) as pictured right to engage the other illumination globe.
o
Alternatively to change the whole illumination module press the red dot using a small instrument like a pen to disengage the module completely. The red dot is on the sliding rail of the illumination module as pictured right by the red arrow. Simply replace the new module for the old module.
** Please note each lamp is rated to approximately 500 hours. We suggest keeping a backup illumination module within your biomedical department to reduce down time on the expiration of the second Xenon lamp
Balancing Microscope Balance setting of the suspension arm Move suspension arm slightly up and down. At the same time, turn Balance screw ( 1. ) until you think that the spring force is sufficient to compensate for the weight of the surgical microscope and accessories. Turn clockwise to increase the spring force, turn counterclockwise to reduce it. ie: If the microscope drops add weight (+) if it rises, take weight away (-) o Continue to perform this adjustment until the surgical microscope moves neither upward nor downward. o
Balancing the left-to-right tilt motion o o
o
Adjusting the friction of the microscope's axis of rotation Use knob (1) to adjust the friction of the microscope's axis of rotation. Adjusting the lateral tilt motion • Loosen friction adjustment knob (3). • Use knob (2) to adjust the spring force in such a way that the surgical microscope is balanced about its lateral tilt axis and remains stationary in the viewing direction required. – If the surgical microscope tends to move clockwise, turn knob (2) counterclockwise. – If the surgical microscope tends to move counterclockwise, turn knob (2) clockwise. Adjusting the friction of the lateral tilt axis • Use knob (3) to adjust the friction for the lateral tilt motion as required.
Balancing the front-to-back tilt motion For initial balancing or after a change of the accessories, proceed as follows: o Loosen friction knob (1). o Turn crank (2) counterclockwise until the microscope has adopted its center-of-gravity position (zero position). This decouples the microscope body from its mount. You can check whether the microscope body has been completely decoupled by tilting it into different positions. Crank (2) must not turn in this process. o Now turn crank (2) clockwise. Important: Allow the microscope to hang in its center-of-gravity position while you turn crank (2). After a few turns, the microscope body has been re-coupled to its mount. o Continue to turn clockwise and check whether the microscope body remains balanced in every tilt position. This may take some time, depending on the mounted accessory equipment. To check this, slightly lift the microscope body and tilt it into different positions to see whether the microscope body has been correctly balanced. o If you turned the crank clockwise too far, simply turn it back to correct the balance setting. Correcting the balance of the front-to-back tilt motion After a slight change in the position of accessories (e.g. the angle of the coobservation tube) it may become necessary to correct the balance setting. o If the microscope body tends to tilt forward (in your direction) with its tube, turn crank (2) clockwise. o If the surgical microscope tends to tilt backward, turn crank (2) counterclockwise. Adjusting the friction of the front-to-back tilt axis o Use knob (1) to adjust the friction of the front-to-back tilt axis as required