Guide
2 Pages

Preview
Page 1
the endosafe
®
nexgen-pts
™
01
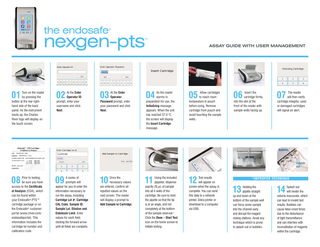
Turn on the reader by pressing the button at the rear righthand side of the back panel. As the instrument boots up, the Charles River logo will display on the touch screen.
02
At the Enter Operator ID prompt, enter your username and click Next.
03
At the Enter Operator Password prompt, enter your password and click Next.
ASSAY GUIDE WITH USER MANAGEMENT
04
As the reader warms in preparation for use, the Initializing message appears. When the unit has reached 37.0 °C, the screen will display the Insert Cartridge message.
05
Allow cartridges to reach room temperature in pouch before using. Remove cartridge from pouch and avoid touching the sample wells.
06
Insert the cartridge firmly into the slot at the front of the reader with sample wells facing up.
07
The reader will then verify cartridge integrity; used or damaged cartridges will signal an alert.
Bubbles
Splash out
08
Prior to testing, be sure you have access to the Certificate of Analysis (COA), which can be found within your Endosafe®-PTS™ cartridge package or on the Endosafe® customer portal (www.criver.com/ endosafeportal). This information includes the cartridge lot number and calibration code.
09
series of A prompts will appear for you to enter the information necessary to run the assay, including Cartridge Lot #, Cartridge CAL Code, Sample ID, Sample Lot, Dilution and Endotoxin Limit. Enter values for each field, clicking the forward arrow until all fields are complete.
10
Once the necessary values are entered, confirm all inputted values on the next screen. The reader will display a prompt to Add Sample to Cartridge.
11
Using the included pippetor, dispense exactly 25 µL of sample into all 4 wells of the cartridge. Be sure to hold the pipette so that the tip is at an angle, and not completely at the bottom of the sample reservoir.* Click the Done – Start Test icon on the home screen to initiate testing.
12
Test results will appear on screen when the assay is complete. You can send this data to a network printer, Zebra printer or download to a computer via USB.
*IMPR OPER TECHNIQU E
13
Holding the pipette straight up and down at the bottom of the sample well can force some sample into the channel early and disrupt the reagent mixing stations. Avoid any technique which is prone to splash out or bubbles.
14
plash out S will render the volume inaccurate, which can lead to invalid test results. Bubbles can cause false onset times due to the disturbance of light transmittance and can interfere with reconstitution of reagents within the cartridge.
Cartridge sensitivity range Lambda = lowest value (0.05) Reaction time of 4 channels 1 & 3 are sample channels, 2 & 4 are spiked channels
Lambda: This refers to the lowest concentration in the standard curve; in this example lambda equals 0.05 EU/ml.
Dilution factor/Concentration 1 = neat, 10 = 1:10, 100 = 1:100, or 0.1 mg/mL, 0.01 mg/mL, etc. CV % of channels 1 & 3 Represents variation in reaction times of the two sample replicates Must be < 25% for a valid test result
Spike recovery: The spike is a known amount of endotoxin that acts as the positive control. This control serves as a check for interference (inhibition and enhancement). Inhibition and enhancement are conditions that adversely alter the recovery of endotoxin in a test sample. Inhibition presents itself as less than 50% spike recovery, where enhancement is typically greater than 200%. For a valid assay, the spike recovery value must be between 50 and 200%, thus indicating no significant interference from the test sample.
Reported EU value for sample (factoring in dilution) If sample is non-reactive, EU value = lambda multiplied by dilution factor or Lambda divided by concentration.. CV % of channels 2 & 4 Represents variation in reaction times of the two spiked replicates Must be < 25% for a valid test result Spike recovery Represents % of spike that was recovered in channels 2 & 4 Must be between 50 and 200% for a valid test result Test suitability Evaluates sample CV, spike CV, and spike recovery for validity and assigns Pass/Fail grade. “Pass” indicates a valid test and the sample value can be trusted.
Technical Assistance: 1.800.762.7016
www.criver.com/endosafeportal