CleanSpace
Washer Disinfector Addendum 2 V6 Dec 2020
Addendum
2 Pages

Preview
Page 1
DISINFECTION GUIDE WITH WASHER DISINFECTOR SECTION 1: DISSASSEMBLING THE PARTS FOR REPROCESSING
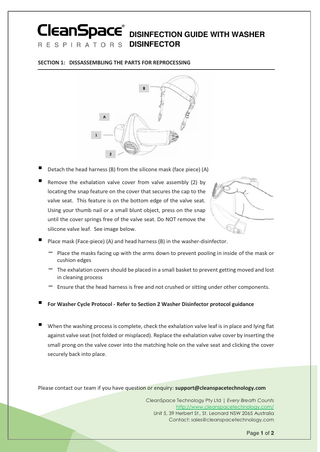
▪ Detach the head harness (B) from the silicone mask (face piece) (A) ▪ Remove the exhalation valve cover from valve assembly (2) by locating the snap feature on the cover that secures the cap to the valve seat. This feature is on the bottom edge of the valve seat. Using your thumb nail or a small blunt object, press on the snap until the cover springs free of the valve seat. Do NOT remove the silicone valve leaf. See image below.
▪ Place mask (Face-piece) (A) and head harness (B) in the washer-disinfector. - Place the masks facing up with the arms down to prevent pooling in inside of the mask or cushion edges
- The exhalation covers should be placed in a small basket to prevent getting moved and lost in cleaning process
- Ensure that the head harness is free and not crushed or sitting under other components. ▪ For Washer Cycle Protocol - Refer to Section 2 Washer Disinfector protocol guidance ▪ When the washing process is complete, check the exhalation valve leaf is in place and lying flat against valve seat (not folded or misplaced). Replace the exhalation valve cover by inserting the small prong on the valve cover into the matching hole on the valve seat and clicking the cover securely back into place.
Please contact our team if you have question or enquiry: [email protected] CleanSpace Technology Pty Ltd | Every Breath Counts http://www.cleanspacetechnology.com/ Unit 5, 39 Herbert St., St. Leonard NSW 2065 Australia Contact: [email protected]
Page 1 of 2
DISINFECTION GUIDE WITH WASHER DISINFECTOR SECTION 2: WASHER DISINFECTOR PROTOCOL GUIDANCE CleanSpace mask and harness are compatible with washer/disinfector use in accordance to Section 4.3 of ISO 15883-2: Requirements and tests for washer disinfectors employing thermal disinfection for surgical instruments, anaesthetic equipment, bowls, dishes, receivers, utensils, glassware
Disinfection - Each operating cycle shall include a thermal disinfection stage for which the time at which the load is maintained at the disinfection temperature gives an A0 of at least 600 on all surfaces of the load to be disinfected when tested in accordance with Thermometric tests - The cycle shall include a thermal disinfection stage giving an A0 of at least 600 on all the internal surfaces of the chamber and on the load carrier when tested in accordance with Thermometric tests. - The WD shall provide for disinfection times and temperatures to be set to give an A0 value up to a maximum value of not less than 3 000. NOTE: The choice of A0 and disinfection temperature will depend upon: ⎯ the intended use of the load items; ⎯ the materials of which the load items are made; ⎯ the nature and extent of the bioburden on the load items with particular reference to heat resistant infective organisms. Advice will usually be sought from those with responsibility for advising on control of infection. Final protocols to be used are determined by the organisation’s Infection Control department based on the use case and bioburden. This protocol may be reviewed by CleanSpace to confirm that the wash program and protocol is compatible with CleanSpace Halo mask and harness. CleanSpace components are compatible with the following temperature and times. Higher temperatures up to 95 °C are possible for times less than 5 minutes. Contact the CleanSpace support team for further information. Washing Disinfection Cycles
WASHING
DRYING
Masks (Face-piece) (A)
90 °C for 3 mins
90 °C for 30 mins
Head harness (B)
90 °C for 3 mins
60 °C for 30 mins
Important Notes 1: Rinse Aid (also known as Drying Aid) is not recommended as an additive in cleaning cycle. Use of Rinse Aid may discolor the polycarbonate on the mask valve set. 2: CleanSpace masks and harness are tested to 100 wash cycles. CleanSpace has not performed destructive testing and continues to validate a process to determine end of life. It is recommended the facility perform regular inspections by trained personnel for damage and missing parts. 3. This is an addendum (A2V6) to the CleanSpace Cleaning Instructions (V6). Please contact our team if you have question or enquiry: [email protected] CleanSpace Technology Pty Ltd | Every Breath Counts http://www.cleanspacetechnology.com/ Unit 5, 39 Herbert St., St. Leonard NSW 2065 Australia Contact: [email protected]
Page 2 of 2