Treatment Steps
4 Pages

Preview
Page 1
Urgent PC ®
TREATMENT STEPS FOR PERCUTANEOUS TIBIAL NERVE STIMULATION
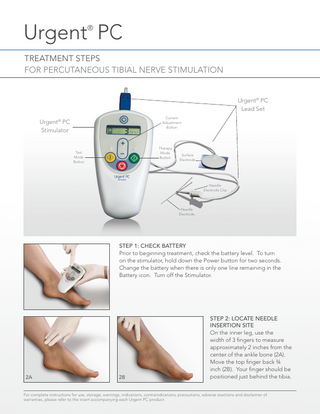
Urgent® PC Lead Set Current Adjustment Button
Urgent® PC Stimulator
Therapy Mode Button
Test Mode Button
Surface Electrode
Needle Electrode Clip
Needle Electrode
STEP 1: CHECK BATTERY Prior to beginning treatment, check the battery level. To turn on the stimulator, hold down the Power button for two seconds. Change the battery when there is only one line remaining in the Battery icon. Turn off the Stimulator.
2A
2B
STEP 2: LOCATE NEEDLE INSERTION SITE On the inner leg, use the width of 3 fingers to measure approximately 2 inches from the center of the ankle bone (2A). Move the top finger back 3/4 inch (2B). Your finger should be positioned just behind the tibia.
For complete instructions for use, storage, warnings, indications, contraindications, precautions, adverse reactions and disclaimer of warranties, please refer to the insert accompanying each Urgent PC product.
STEP 3: PLACE NEEDLE ELECTRODE AT 60° ANGLE Clean the insertion site with the provided alcohol pad. Before removing the clear guide tube or pink stop plug, place the Needle Electrode over the insertion location. The needle should be at a 60° angle from the ankle. Remove the stop plug.
STEP 4: INSERT NEEDLE ELECTRODE Gently tap the top of the Needle Electrode to pierce the skin. Remove the guide tube.
STEP 5: ADVANCE NEEDLE ELECTRODE Using a rotating motion, advance the Needle Electrode until approximately 2 cm, or half of the bottom portion, is inserted into the leg.
STEP 6: CONNECT LEAD WIRE TO STIMULATOR
STEP 7: PLACE SURFACE ELECTRODE Remove the adhesive backing from the Surface Electrode. Place the Surface Electrode on the inside arch of the foot on the treatment leg.
For complete instructions for use, storage, warnings, indications, contraindications, precautions, adverse reactions and disclaimer of warranties, please refer to the insert accompanying each Urgent PC product.
STEP 8: ATTACH NEEDLE ELECTRODE CLIP Attach the Needle Electrode Clip by depressing the plunger and hooking it around the Needle Electrode, close to the skin.
STEP 9: BEGIN TREATMENT Before turning on the Stimulator, talk to your patient about how you will confirm that the stimulation is reaching the tibial nerve. Patient response may be either motor or sensory; for some patients it may be both. Ask your patient to let you know if they start to feel a sensation in their leg or foot. After turning the Stimulator on, enter Test Mode by holding down the yellow Test button for 2 seconds. STEP 10: IDENTIFY TREATMENT LEVEL Using the Current Adjustment button, slowly increase the setting while observing the patient’s foot for a response and periodically asking the patient if they feel any sensation in their leg or foot.
STEP 11: CONFIRM PATIENT RESPONSE Motor response is usually a toe flex (11A), toe fan (11B) or toe twitch. Sensory response (11C) is generally described as a mild pulsing sensation which travels away from the insertion site, towards the heel, arch, toes or up the leg.
11A
11B
•
If the patient is uncomfortable, reduce the current setting, reposition the needle electrode or try the other leg.
•
If the sensation is localized to the immediate area around the insertion site, the needle electrode may need to be inserted further. About half of the bottom portion of the electrode should be inserted in the leg.
•
If there is neither a motor or sensory response, adjust the needle electrode. If there is still no response, discard the needle electrode and try the other ankle.
•
Note that an individual patient’s response may vary from treatment to treatment, based on the needle electrode depth and location.
11C For complete instructions for use, storage, warnings, indications, contraindications, precautions, adverse reactions and disclaimer of warranties, please refer to the insert accompanying each Urgent PC product.
STEP 12: THERAPY MODE Reduce the current setting by one increment and press the green Therapy button for 2 seconds. Therapy mode is automatically set for 30 minutes.
STEP 13: PATIENT RECEIVES TREATMENT WITH URGENT PC NEUROMODULATION SYSTEM The patient is seated comfortably during treatment. STEP 14: COMPLETE TREATMENT SESSION Therapy mode will automatically end after 30 minutes. At this point, the Stimulator will display the word “End” and emit a series of three beeps. Turn off the Stimulator and remove the Needle Electrode and other components.
Urgent PC is indicated for the treatment of Overactive Bladder and associated symptoms of urinary urgency, urinary frequency and urge incontinence. CONTRAINDICATIONS: Treatment with Urgent PC is contraindicated for patients with pacemakers or implantable defibrillators, patients prone to excessive bleeding, patients with nerve damage that could impact either percutaneous tibial nerve or pelvic floor function, or patients who are pregnant or planning to become pregnant during the duration of the treatment. PRECAUTIONS: Exercise caution for patients with heart problems related to pacing. Most patients don’t experience side-effects. If side-effects occur, they are typically temporary and include mild pain and skin inflammation at or near the stimulation site. CAUTION: Federal law (USA) restricts this device to sale by or on the order of a physician. For complete instructions for use, storage, warnings, indications, contraindications, precautions, adverse reactions and disclaimer of warranties, please refer to the insert accompanying each Urgent PC product. Urgent is a registered trademark. Urgent PC is manufactured by Uroplasty LLC. © 2018 LABORIE. All rights reserved.
USA: 5420 Feltl Road Minnetonka, MN 55343 Tel.: 866 258 2182 Fax: 866 255 4522
www.laborie.com 20154F 05/18