Dräger Medical
Anaesthesia Machines
Fabius Family Compact Breathing System Disassembly Assembly Guide Aug 2016
Guide
2 Pages

Preview
Page 1
91 02 535 | 16.08-1 | HQ | PP | Subject to modifications | © 2016 Drägerwerk AG & Co. KGaA
D-58067-2012
Dräger Fabius Family Compact Breathing System Disassembly/Assembly
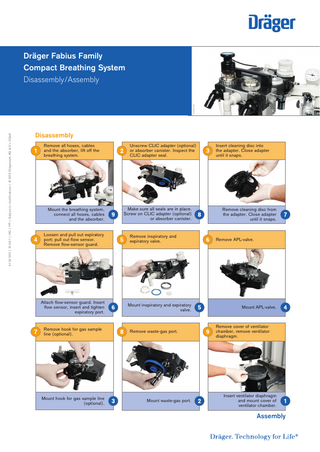
Disassembly Remove all hoses, cables and the absorber, lift off the breathing system.
Mount the breathing system, connect all hoses, cables and the absorber.
Unscrew CLIC adapter (optional) or absorber canister. Inspect the CLIC adapter seal.
Make sure all seals are in place. Screw on CLIC adapter (optional) or absorber canister.
Loosen and pull out expiratory port; pull out flow sensor. Remove flow-sensor guard.
Remove inspiratory and expiratory valve.
Attach flow-sensor guard. Insert flow sensor, insert and tighten expiratory port.
Mount inspiratory and expiratory valve.
Remove hook for gas sample line (optional).
Remove waste-gas port.
Mount hook for gas sample line (optional).
Mount waste-gas port.
Insert cleaning disc into the adapter. Close adapter until it snaps.
Remove cleaning disc from the adapter. Close adapter until it snaps.
Remove APL-valve.
Mount APL-valve.
Remove cover of ventilator chamber, remove ventilator diaphragm.
Insert ventilator diaphragm and mount cover of ventilator chamber.
Assembly
D-58067-2012
Dräger Fabius Family Compact Breathing System Reprocessing Instructions
Manual cleaning and disinfection
Machine cleaning and disinfection
Sterilization
Position components so that all interior spaces and surfaces are completely flushed and water can drain off freely.
Visual check
This guideline does not replace the instruction for use.
After the machine cleaning and disinfection, a hot steam sterilization is required to dry the breathing system. Valves, ventilator cover, and AGS sleeve: Make sure that the cleaning and rinsing liquids can flow in the opening direction of the valve. Remove any water which may have accumulated in the ventilator diaphragm. For further instructions and explanations please see the respective instructions for use.