Enztec Limited
Offset Cup Impactor Technical Guide
16 Pages

Preview
Page 1
Offset Cup Impactor - Technical Guide
Contents OVERVIEW 02 COMPONENTS & FEATURES 03 DISASSEMBLY 04 Engagement of Lever 04 Collet Guide and Lock Ring Removal 05 Collet Removal 06 Anvil and Handle Removal 07 Actuator Removal 08 ASSEMBLY 09 Actuator Insertion 09 Handle and Anvil Attachment 10 Collet Insertion 11 Collet Guide and Lock Ring Attachment 12 Correct Attachment of Collet Guide 13 VERIFICATION 14 NOTA BENE 15
01 Offset Cup Impactor - Technical Guide
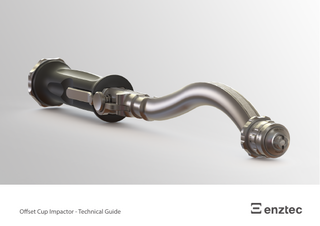
Overview The Enztec Offset Cup Impactor (OCI) supplied by Enztec Limited is a manual medical tool designed for use in fitting customer specific Acetabular Shells.
02 Offset Cup Impactor - Technical Guide
Components & Features
4. ACTUATOR 6. LOCK RING & COLLET GUIDE ASSEMBLY 5. COLLET
The OCI consists of 6 unique components, the Body (1), Handle (2), Anvil (3), Actuator (4), Collet (5) and Collet Guide Lock Ring Assembly (6). These and the Lock Button, Lever and Index Button features are shown.
1. BODY
LEVER
LOCK BUTTON
2. HANDLE 3. ANVIL
03 Offset Cup Impactor - Technical Guide
INDEX BUTTON
LOCK BUTTON LEVER
Disassembly ENGAGEMENT OF LEVER: While depressing the Lock Button lift the Lever to collapse the Collet.
04 Offset Cup Impactor - Technical Guide
Disassembly COLLET GUIDE AND LOCK RING REMOVAL: – – –
Rotate the Lock Ring anti-clockwise 30° relative to the Collet Guide. Slide the Lock Ring forward on the Collet Guide. Slide the Lock Ring and Collet Guide Assembly off the Body.
BODY COLLET GUIDE LOCK RING
05 Offset Cup Impactor - Technical Guide
Disassembly COLLET REMOVAL: Remove the Collet from the Body.
06 Offset Cup Impactor - Technical Guide
COLLET
HANDLE ANVIL
Disassembly ANVIL AND HANDLE REMOVAL: Remove the Anvil by turning it anti-clockwise, and slide the Handle off the Body.
07 Offset Cup Impactor - Technical Guide
BODY
ACTUATOR
BODY
Disassembly ACTUATOR REMOVAL: Remove the Actuator from Body. If the Actuator is difficult to remove fully depress Lock Button.
08 Offset Cup Impactor - Technical Guide
ACTUATOR BODY
Assembly Spray all moving components with a spot lubricant. Enztec recommends Rudolf® Medizintechnik Oil Spray RU8880-00. Remove excess oil with a lint-free cloth. Do not use oil with a silicone base for surgical instrument maintenance. Silicone components can harden during subsequent processing (sterilisation) and cause the instrument to become stiff. Plastic surfaces should not be treated with oil. Since effective ultrasonic cleaning removes all lubrication, re-lubrication is important. ACTUATOR INSERTION: – Ensure the Lever is closed. – Apply lubricant to the Actuator and corresponding slot in the Body. – Slide the Actuator tip into the Body. – Line up step of Actuator with step of Body while lowering the Actuator into the Body.
09 Offset Cup Impactor - Technical Guide
STEP IN ACTUATOR
STEP IN BODY
BODY
Assembly
HANDLE ANVIL
HANDLE AND ANVIL ATTACHMENT: – –
Slide the Handle onto the Body. Screw the Anvil into the Body clockwise until hand tight.
10 Offset Cup Impactor - Technical Guide
Assembly COLLET: – – –
Ensure Lever is open. Apply lubricant to the Collet and corresponding area of the Body. Insert the Collet into the Body.
COLLET
11 Offset Cup Impactor - Technical Guide
BODY LOCK RING AND COLLET GUIDE ASSEMBLY
Assembly COLLET GUIDE COLLET GUIDE AND LOCK RING ATTACHMENT: – Slide the Lock Ring and Collet Guide Assembly onto the Body. – Slide the Lock Ring towards the Body, until it contacts the shoulder on the Collet Guide. – Rotate the Lock Ring clockwise 30° relative to the Collet Guide. – Close the Lever.
12 Offset Cup Impactor - Technical Guide
LOCK RING
Assembly Note: If the Lock Ring will not slide over the Collet Guide check that the tip of the Index Button is seated properly in one of the slots on the back of the Collet Guide. If the tip is protruding from the slot rotate the Lock Ring and Collet Guide Assembly clockwise or anti-clockwise until the tip finds a slot that fully encases it. (Ensure Index Button tip is fully encased by a slot on the back of the Collet Guide.)
13 Offset Cup Impactor - Technical Guide
INDEX BUTTON TIP
Verification After the OCI has been reassembled, test the function of the instrument as detailed below. - Press the Lock Button and open and close the Lever to collapse and expand the Collet several times. - Verify that the instrument can grasp and release an acetabular component prior to releasing for clinical use.
14 Offset Cup Impactor - Technical Guide
Nota Bene A surgeon must always rely on his or her own professional clinical judgment when deciding which products and/or techniques to use on individual patients. Enztec is not dispensing medical advice and recommends that surgeons be trained in orthopaedic surgeries before performing surgeries. Always refer to the package insert, product label and/or user instructions before using any Enztec product. Products may not be available in all markets. Product availability is subject to the regulatory or medical practices that govern individual markets. Please contact your Enztec representative if you have any questions about the availability of Enztec products in your area. Enztec own, use or have applied for the following trademarks or service marks: Enztec.
Enztec Limited 3/17 Print Place Middleton Christchurch 8024 New Zealand
Contact Enztec Limited P.O Box 31029, Ilam, Christchurch, 8444, New Zealand Ph: + 64 3 348 0203 Fax: + 64 3 343 6182
© 2018 Enztec Limited All rights reserved. Part Number: 11547-00, Rev: 3
15 Offset Cup Impactor - Technical Guide