Euromex
EK0 EV1 cold light source LE.5209 USERS MANUAL
USERS MANUAL
4 Pages
Preview
Page 1
2 1.0 Introduction With your purchase of the EUROMEX cold light source LE.5209 you have chosen for a quality product. The EUROMEX cold light source LE.5209 is developed for use in education, at universities and laboratories and very usefull for micro-photography. The maintenance requirement is limited when using the light source in a decent manner. This manual describes the construction of the light source, how to use the light source and maintenance of the light source.
2.0 Index 1.0 2.0 3.0 4.0 5.0 6.0 7.0 8.0
Introduction Index Construction of the cold light source LE.5209 Functions of the cold light source LE.5209 Preparing the cold light source LE.5209 for use Working with the cold light source LE.5209 Maintenance and cleaning Spare parts
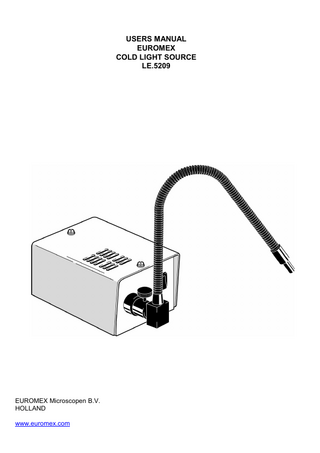
3.0 Construction of the cold light source LE.5209 The names of the below parts are indicated in the picture: A) B) C) D) E) F)
Phillips screws to lock cover Mains cable connector with built-in fuse holder (back side) Set-screw to lock lightconductor Connector for light conductor Single-arm light conductor On/Off switch
4.0 Functions of the cold light source LE.5209 The EUROMEX cold light source LE.5209 can be used for any application were heat on the object to be illuminated should be eliminated. To move the instrument, let it first cool down.
4.1 Technical specifications Prim. voltage: 230 Volt. Sec. Voltage: 12 Volt. Bulb: 12 Volt 20 Watt with reflector. Fitting G4. Fuse: 250 Volt, 1 A slow, 20x5 mm.
3
A)
B) F) C) D) E)
LE.5209 with light guide
5.0 Preparing the cold light source LE.5209 for use Place the light guide into the connector (D), in a way that the flat side of the light guide points upwards, in the direction of the sets crew (C). The light guide should be put into the connector as far as possible. Now it can be locked with screw nr. C. The light source is now ready for use. Connect the plug to the mains supply and switch on the instrument with the switch (F).
4
6.0 Using the light conductors The self-sustaining and flexible light guides are equipped with glass-fibres for maximum conductivity of light, and should be treated as follows: Carefully point the conductor towards the object and only bend the conductor in one direction. The bending radius "R" of the light conductor should never be lower as 50 mm. because otherwise the metal construction of the light conductor can be damaged. This can cause instability and inflexibility.
7.0 Maintenance and cleaning After use the instrument should be cooled down. The instrument can be easily cleaned with a soft cloth.
7.1 Exchanging the halogen bulb Always pull the plug from the mains socket first and let the instrument cool down for a few minutes.
Warning:
Remove the 2 Phillips screws from the cover and take of the cover. Take the reflector in your fingers and pull the bulb out of its holder in a vertical direction. Now remove the fitting from the bulb. Place a fresh bulb into the fitting and place it back into the lamp holder in the correct way.
8.0 Spare parts SL.5208 AE.5227
Spare halogen bulb 12V-20W Set of 10 fuses 250V-1 A - T.
For a wide range of light guides visit www.euromex.coml
EK0 EV1