GAMBRO
HP-X and PrismaLung Quick User Guide v7
Quick User Guide
2 Pages

Preview
Page 1
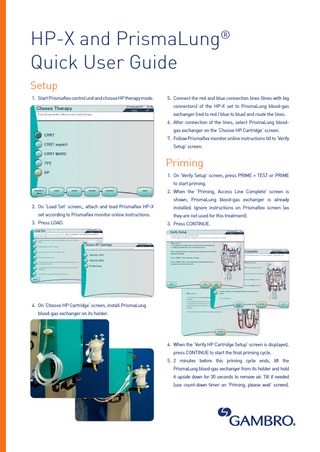
HP-X and PrismaLung® Quick User Guide Setup 1. Start Prismaflex control unit and choose HP therapy mode.
5. Connect the red and blue connection lines (lines with big connectors) of the HP-X set to PrismaLung blood-gas exchanger (red to red / blue to blue) and route the lines. 6. After connection of the lines, select PrismaLung bloodgas exchanger on the ‘Choose HP Cartridge’ screen. 7. Follow Prismaflex monitor online instructions till to ‘Verify Setup’ screen.
Priming 1. On ‘Verify Setup’ screen, press PRIME + TEST or PRIME to start priming. 2. When the ‘Priming, Access Line Complete’ screen is shown, PrismaLung blood-gas exchanger is already 2. On ‘Load Set’ screen,, attach and load Prismaflex HP-X set according to Prismaflex monitor online instructions. 3. Press LOAD.
installed. Ignore instructions on Prismaflex screen (as they are not used for this treatment). 3. Press CONTINUE.
4. On ‘Choose HP Cartridge’ screen, install PrismaLung blood-gas exchanger on its holder.
4. When the ‘Verify HP Cartridge Setup’ screen is displayed, press CONTINUE to start the final priming cycle. 5. 2 minutes before this priming cycle ends, lift the PrismaLung blood-gas exchanger from its holder and hold it upside down for 30 seconds to remove air. Tilt if needed (use count-down timer on ‘Priming, please wait’ screen).
Note: Hold PrismaLung blood-gas exchanger below the deaeration chamber to maintain correct pressures in the system. 6. Place PrismaLung blood-gas exchanger back on its holder.
Connect Patient and Start Treatment 1. Connect patient and start treatment according to Prismaflex monitor online instructions. 2. When Prismaflex set blood circuit is stable remove the green cap on the PrismaLung blood-gas exchanger and connect the oxygen supply line (green colure coded) to the sweep gas inlet. 3. Turn on the sweep gas flow and adjust the gas flow according to prescription.
7. Continue priming and prime test. 8. Inspect PrismaLung blood-gas exchanger for air.
Note: The filter in the oxygen supply line must be connected
9. In case of remaining air, press MANUAL PRIME on
near to the PrismaLung blood-gas exchanger.
‘Priming Complete’ screen, remove PrismaLung blood-
If prescribed connect the NovaTherm® heater / cooler unit to the
air exchanger from its holder, hold upside down until all
PrismaLung blood-gas exchanger refer to NovaTherm® IFU.
air is removed and place back on its holder.
Note: Connect the NovaTherm® water counter-current to blood flow in the PrismaLung blood-gas exchanger.
Note: Check priming bag contains enough priming solution Note: Check level in deaeration chamber. If necessary,
End Treatment
increase level in the deaeration chamber as described on
1. Turn off the sweep gas flow.
‘Prime Test Passed’ screen → ADUST CHAMBER.
2. Stop treatment.
Caution: Avoid lifting the PrismaLung blood-gas exchanger to
3. If prescribed and set is not clotted, return blood to the patient.
a higher level. Therefore do not move from its holder.
4. Disconnect patient.
Note: If prime test fails (‘MALFUNCTION: Prime Self-Test’
5. Unload the HP-X set and discard the PrismaLung blood-
for manual priming. If not connect a new priming bag.
alarm, due to pump occlusivity test) press RETEST. Note: If the system is primed and connection of the patient is delayed for a couple of hours, check PrismaLung blood-gas exchanger for air. In case of residual air in PrismaLung bloodair exchanger, reprime the system.
gas exchanger with the Prismaflex set.