Preoperative Checkout
2 Pages

Preview
Page 1
GE Healthcare
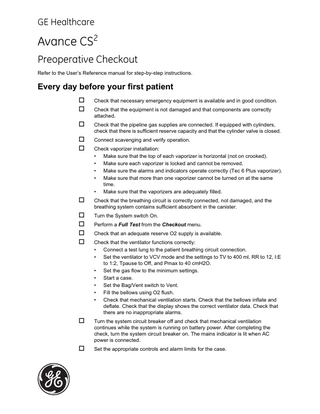
Avance CS2 Preoperative Checkout Refer to the User’s Reference manual for step-by-step instructions.
Every day before your first patient Check that necessary emergency equipment is available and in good condition. Check that the equipment is not damaged and that components are correctly attached.
Check that the pipeline gas supplies are connected. If equipped with cylinders, check that there is sufficient reserve capacity and that the cylinder valve is closed.
Connect scavenging and verify operation. Check vaporizer installation: • • • • •
Make sure that the top of each vaporizer is horizontal (not on crooked). Make sure each vaporizer is locked and cannot be removed. Make sure the alarms and indicators operate correctly (Tec 6 Plus vaporizer). Make sure that more than one vaporizer cannot be turned on at the same time. Make sure that the vaporizers are adequately filled.
Check that the breathing circuit is correctly connected, not damaged, and the breathing system contains sufficient absorbent in the canister.
Turn the System switch On. Perform a Full Test from the Checkout menu. Check that an adequate reserve O2 supply is available. Check that the ventilator functions correctly: • • • • • • •
Connect a test lung to the patient breathing circuit connection. Set the ventilator to VCV mode and the settings to TV to 400 ml, RR to 12, I:E to 1:2, Tpause to Off, and Pmax to 40 cmH2O. Set the gas flow to the minimum settings. Start a case. Set the Bag/Vent switch to Vent. Fill the bellows using O2 flush. Check that mechanical ventilation starts. Check that the bellows inflate and deflate. Check that the display shows the correct ventilator data. Check that there are no inappropriate alarms.
Turn the system circuit breaker off and check that mechanical ventilation continues while the system is running on battery power. After completing the check, turn the system circuit breaker on. The mains indicator is lit when AC power is connected.
Set the appropriate controls and alarm limits for the case.
Before every patient Note
This check does not need to be done before the first case of the day if the “Every day before your first patient” checklist was done.
Check that the necessary emergency equipment is available and in good condition.
Check vaporizer installation: • • • • •
Make sure that the top of each vaporizer is horizontal (not on crooked). Make sure each vaporizer is locked and cannot be removed. Make sure the alarms and indicators operate correctly (Tec 6 Plus vaporizer). Make sure that more than one vaporizer cannot be turned on at the same time. Make sure that the vaporizers are adequately filled.
Select Checkout and perform a Low P Leak test. Check that an adequate reserve O2 supply is available. Check that the breathing circuit is correctly connected, not damaged, and the breathing system contains sufficient absorbent in the canister.
Select Checkout and perform a Circuit Leak test. Check that the ventilator functions correctly: • • • • • • •
•
Connect a test lung to the patient breathing circuit connection. Set the ventilator to VCV mode and the settings for TV to 400 ml, RR to 12, I:E to 1:2, Tpause to Off, and Pmax to 40 cmH2O. Set the gas flow to the minimum settings. Start a case. Set the Bag/Vent switch to Vent. Fill the bellows using O2 flush. Check that mechanical ventilation starts. Check that the bellows inflate and deflate. Check that the display shows the correct ventilator data. Check that there are no inappropriate alarms. Set the appropriate controls and alarm limits for the case. Make sure that the alarms function. See the “Alarm tests.”
Set the appropriate controls and alarm limits for the case.
Datex-Ohmeda, Inc.
12 11 M1222662