GE Healthcare
Venue 50 Quick Card Rev 3
Quick Card
2 Pages

Preview
Page 1
Venue 50 Quick Card
Direction 5437930-100 English Rev. 3
1
Getting Started
Touch Panel
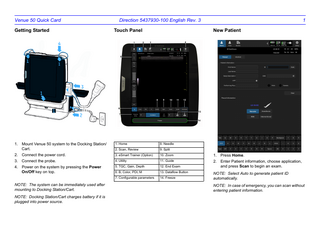
1. Mount Venue 50 system to the Docking Station/ Cart.
1. Home
8. Needle
2. Scan, Review
9. Split
2. Connect the power cord.
3. eSmart Trainer (Option)
10. Zoom
1. Press Home.
3. Connect the probe.
4. Utility
11. Guide
4. Power on the system by pressing the Power On/Off key on top.
5. TGC, Gain, Depth
12. End Exam
2. Enter Patient information, choose application, and press Scan to begin an exam.
6. B, Color, PDI, M
13. Dataflow Button
7. Configurable parameters
14. Freeze
NOTE: The system can be immediately used after mounting to Docking Station/Cart.
New Patient
NOTE: Select Auto to generate patient ID automatically. NOTE: In case of emergency, you can scan without entering patient information.
NOTE: Docking Station/Cart charges battery if it is plugged into power source.
B/M Mode Image Optimize
Venue 50 Quick Card
Direction 5437930-100 English Rev. 3
Image Scanning
Control
Effects on image
1. TGC
Balance the image
2. Gain
Make images brighter or darker
3. Depth
Adjust scanning depth
4. B/Color/PDI/M
switch to different modes
5. Needle
Activate the needle mode
6. Split
Split the screen
7. Zoom
magnify the region of interest
8. Guide
Display the biopsy guidelines
9. Configurable Parameters
Different parameters have different effects on image
2
Measurement and Annotation
Using CINE and Image Management
1. Press Freeze.
1. Press Freeze.
2. Select Measure/Comment to initiate measurement/annotation.
2. Select Play/Pause to play back/pause; select “<“ or “>” to move forward/backward frame by frame.
To measure a distance: 1. Touch the screen and two active calipers display. 2. Move the calipers to the desired postion and press Set. The system displays the value in the Results Window. To add annotations: 1. Select comments from Annotation Library or type an annotation with the keyboard.
The Quick Card is a quick reference to operation, please refer to Basic User Manual for detail information.
3. Press Dataflow Button with storage device icon to store images frozen or to store video clips when playing back. 4. Press Dataflow Button with Printer icon to send image to a connected printer. 5. Images and video clips can be viewed for a patient via Review -> Archive. NOTE: The Dataflow Button can be configured in Utility -> Connectivity -> Dataflow -> D1/D2.