Quick Reference
2 Pages

Preview
Page 1
e
MAC® 5500 Resting ECG Analysis System Quick Reference (Version 9A)
Acquire an ECG 1. Prepare the patient. 2. Power on the unit. 3. From the Main Menu, select the ECG mode: Resting ECG Vector Loops Pediatric ECG 15 Lead ECG
select Same Patient or Next Patient to continue
with more tests, or select Store if system has not been set up to store
records automatically. 11. When finished, do one of the following: go to “File Manager” on page 2 to transmit records, or turn the unit off and plug into AC power.
4. Verify wave format and use the function keys to make adjustments. F2 – Leads F4 – Gain F3 – Speed F5 – Filter
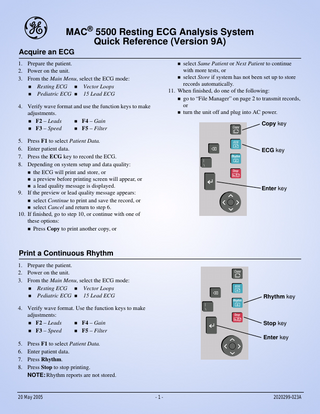
Copy key
5. 6. 7. 8.
Press F1 to select Patient Data. Enter patient data. Press the ECG key to record the ECG. Depending on system setup and data quality: the ECG will print and store, or a preview before printing screen will appear, or a lead quality message is displayed. 9. If the preview or lead quality message appears: select Continue to print and save the record, or select Cancel and return to step 6. 10. If finished, go to step 10, or continue with one of these options: Press Copy to print another copy, or
ECG key
Enter key
Print a Continuous Rhythm 1. Prepare the patient. 2. Power on the unit. 3. From the Main Menu, select the ECG mode: Resting ECG Vector Loops Pediatric ECG 15 Lead ECG
Rhythm key
4. Verify wave format. Use the function keys to make adjustments: F2 – Leads F4 – Gain F3 – Speed F5 – Filter
Stop key Enter key
5. 6. 7. 8.
Press F1 to select Patient Data. Enter patient data. Press Rhythm. Press Stop to stop printing. NOTE: Rhythm reports are not stored.
20 May 2005
-1-
2020299-023A
GE Medical Systems Information Technologies. • 8200 W. Tower Ave. • Milwaukee, WI 53223 U.S.A. © 2005 General Electric Company, Inc. All rights reserved.
Skin Preparation and 12 Lead Placement
A
J
B C
Item
AHA
IEC
A
V1 red
C1 red
B
V2 yellow
C2 Fourth intercostal space at the left yellow sternal border
C
V3 green
C3 Midway between location B and D green
D
V4 blue
C4 Mid-clavicular line in the fifth brown intercostal space
E
V5 orange
C5 black
F
V6 purple
C6 Mid-axillary line on the same horizontal purple level as items D and E
G
LA black
L Left wrist (alternate placement – midway yellow between the elbow and the shoulder)
H
LL red
F Left ankle (alternate placement – upper leg, green as close to torso as possible)
I
RL green
N black
Right ankle (alternate placement – upper leg, as close to the torso as possible)
J
RA white
R red
Right wrist (alternate placement – midway between the elbow and the shoulder)
G D E F
I
H
The quality of your ECG tracing is a direct result of skin preparation and lead placement. 1. Shave hair from application sites. 2. Gently rub area to remove dead skin cells. 3. Cleanse site with alcohol or mild soap and water. 4. Dry skin completely.
Electrode Placement Fourth intercostal space at the right sternal border
Anterior axillary line on the same horizontal level as item D
File Manager Transmit Stored Records
Edit Stored Records
1. From the Main Menu, select File Manager. 2. Press F4 (Directory) to print a directory of stored files before transmitting. 3. Select Location to select a destination. 4. Select the records to transmit. Press F2 to Select All records. or Press F1 to Select individual records. Use the arrow pad to highlight the record. Press the Enter key to select the record. If needed, continue to Select Records. 5. Press F4 to select Transmit.
1. From the Main Menu, select File Manager. 2. Select one or more records as described in “Transmit Stored Records”. 3. Select the item you want to edit. 4. Press F2 to edit 5. Edit the data and select Return. 6. Repeat steps 3 and 4 to edit more data in the record. 7. Select Return. 8. Save the edited record. Press F1 to store the edited record, or Press F2 to store and print the edited record.
Archiving ECGs to SD Card
Print Stored Records
1. From the Main Menu, select File Manager. 2. Select Copy All to begin copying all of the files to the SD card. A warning message displays. 3. Select No to cancel the request or select Yes to continue with request.
1. From the Main Menu, select File Manager. 2. Select one or more records. 3. Press F1 to select the Print function.
2020299-023A
-2-