Quick Reference Guide
2 Pages

Preview
Page 1
MACTM VU360 Resting ECG Analysis System
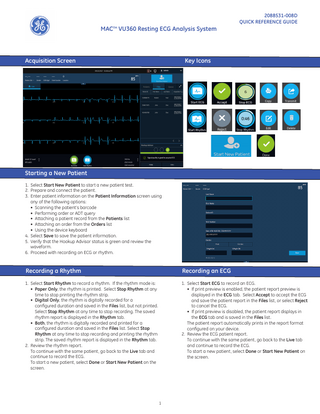
Acquisition Screen
2088531-008D QUICK REFERENCE GUIDE
Key Icons
Starting a New Patient 1. Select Start New Patient to start a new patient test. 2. Prepare and connect the patient. 3. Enter patient information on the Patient Information screen using any of the following options: • Scanning the patient’s barcode • Performing order or ADT query • Attaching a patient record from the Patients list • Attaching an order from the Orders list • Using the device keyboard 4. Select Save to save the patient information. 5. Verify that the Hookup Advisor status is green and review the waveform. 6. Proceed with recording an ECG or rhythm.
Recording a Rhythm
Recording an ECG
1. Select Start Rhythm to record a rhythm. If the rhythm mode is: • Paper Only, the rhythm is printed. Select Stop Rhythm at any time to stop printing the rhythm strip. • Digital Only, the rhythm is digitally recorded for a configured duration and saved in the Files list, but not printed. Select Stop Rhythm at any time to stop recording. The saved rhythm report is displayed in the Rhythm tab. • Both, the rhythm is digitally recorded and printed for a configured duration and saved in the Files list. Select Stop Rhythm at any time to stop recording and printing the rhythm strip. The saved rhythm report is displayed in the Rhythm tab. 2. Review the rhythm report. To continue with the same patient, go back to the Live tab and continue to record the ECG. To start a new patient, select Done or Start New Patient on the screen.
1. Select Start ECG to record an ECG. • If print preview is enabled, the patient report preview is displayed in the ECG tab. Select Accept to accept the ECG and save the patient report in the Files list, or select Reject to cancel the ECG. • If print preview is disabled, the patient report displays in the ECG tab and is saved in the Files list. The patient report automatically prints in the report format configured on your device. 2. Review the ECG patient report. To continue with the same patient, go back to the Live tab and continue to record the ECG. To start a new patient, select Done or Start New Patient on the screen.
1
Reviewing Patient Reports 1. From the Acquisition screen, select the Files tab. 2. In the Files list, select a patient report. The patient report displays in the ECG or Rhythm tab. 3. Review the patient report and perform any of the following: • To transmit the report, select a destination from the Destination menu and select Transmit. • To print a copy of the report in the displayed format, select Copy. • To edit patient information, select Edit, or select anywhere in the Patient Information banner. • To delete the report, select Delete. • To close the report, select .
Querying Orders or ADT Data Ensure that remote patient query is configured and you have the required privileges to query patient demographics. 1. Start a new patient test. 2. Scan the patient’s barcode, or enter Patient ID or Visit Number on the Patient Information screen, and press the Tab or Enter key to initiate the query. • If multiple orders for one patient are found, they are listed in the Orders list. Double-tap an order to attach. • If one matching order is found, it populates the Patient Information screen. • If no orders are found, the system will query for ADT. • If an ADT record is found, it populates the Patient Information screen. • If no matching order or ADT information is found, the data scanned or entered is used to populate the Patient Information screen.
Attaching an Order to a New Patient Test 1. Double-tap the correct patient order found from the patient query to attach it to the patient test. Data from the order is populated in the Patient Information screen and the screen expands. Some populated fields are read-only. 2. Edit the remaining fields and save the patient information. 3. In the Orders list, verify that the order status is Attached. 4. Record the ECG.
© 2018 General Electric Company – All rights reserved. General Electric Company reserves the right to make changes in specifications and features shown herein, or discontinue the product described at any time without notice or obligation. The materials contained in this document are intended for educational purposes only. This document does not establish specifications, operating procedures, or maintenance methods for any of the products referenced. Always refer to the official written materials (labeling) provided with the product for specifications, operating procedures, and maintenance requirements. Specifications are subject to change.
2
0459