Given Imaging
PillCam SB Procedure with PillCam Recorder DR3 Quick Reference Guide
Quick Reference Guide
2 Pages

Preview
Page 1
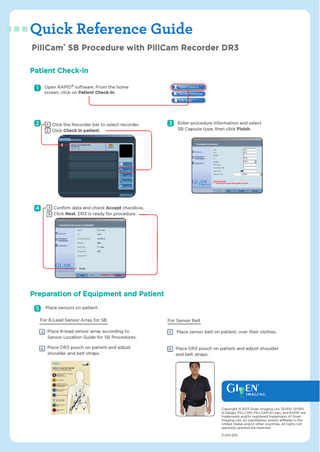
Quick Reference Guide PillCam® SB Procedure with PillCam Recorder DR3 Patient Check-in 1
Open RAPID® software. From the home screen, click on Patient Check-in.
2
Click the Recorder bar to select recorder. Click Check in patient.
4
Confirm data and check Accept checkbox. Click Next. DR3 is ready for procedure.
3
Enter procedure information and select SB Capsule type, then click Finish.
Preparation of Equipment and Patient 5
Place sensors on patient. For 8-Lead Sensor Array for SB
For Sensor Belt
Place 8-lead sensor array according to Sensor Location Guide for SB Procedures.
Place sensor belt on patient, over their clothes.
Place DR3 pouch on patient and adjust shoulder and belt straps.
Place DR3 pouch on patient and adjust shoulder and belt straps.
Copyright © 2013 Given Imaging Ltd. GIVEN, GIVEN & Design, PILLCAM, PILLCAM & Logo, and RAPID are trademarks and/or registered trademarks of Given Imaging Ltd., its subsidiaries, and/or affiliates in the United States and/or other countries. All rights not expressly granted are reserved. 5-001-635
Preparation of Equipment and Patient 6
Remove checked-in DR3 from cradle and confirm that it is charged. If screen is OFF, use any navigation button to turn screen ON. If non-responding, push ON/OFF. Confirm match of patient and procedure data displayed on the LCD screen.
7
Connect sensors to DR3 (audible click). The DR3 plays a sound to confirm connection. Insert DR3 into pouch.
8
Open the PillCam SB box and hold it with the blinking capsule close to the sensors on patient abdominal area to perform pairing. The white capsule LED on the top of the DR3 will blink at the same rate as the capsule. The red pairing ico on the upper right corner of the LCD will appear. Use navigation buttons to select the capsule ID on the screen that matches the one on the back of the capsule box. Push the middle navigation button to pair it with the DR3. After pairing, the green pairing icon should replace the red pairing icon . The capsule LED on the top of the DR3 will blink blue at the same frequency as the recording rate.
9
Instruct patient to swallow capsule with sip of water. Patient should never ingest an unpaired capsule or the procedure will fail, resulting in lost data. Green paired icon must appear on the upper right corner of the LCD before ingestion. Provide patient with procedure instructions.
Instructions During Procedure Instructing the patient after capsule ingestion During procedure, keep all sensor elements in place without removing them. At the end of the procedure, the icon
is displayed on the LCD.
Real-time Viewing Capture thumbnails with the right navigation button .
To start Real-time Viewing, press the middle (1), left (2), and right (3) navigation buttons.
To exit Real-time Viewing, press the left navigation button.
Video Download from DR3 1
Remove equipment from patient and place DR3 into cradle. Open RAPID and click Recorder Download from home screen. Click the Recorder bar to select recorder. Click the Create Video button.
2
The video creation progress bar indicates time remaining.
This indicates that video creation is complete. B
C