User Reference Guide
2 Pages

Preview
Page 1
FLUID MANAGEMENT SYSTEM
User Reference Guide Movement and Positioning
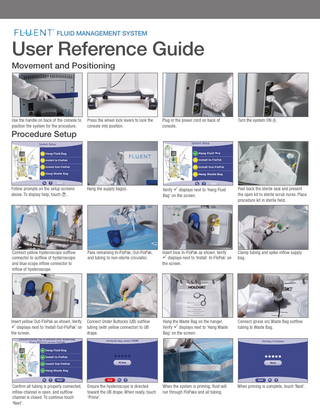
Use the handle on back of the console to position the system for the procedure.
Press the wheel lock levers to lock the console into position.
Plug in the power cord on back of console.
Turn the system ON (I).
Follow prompts on the setup screens above. To display help, touch ? .
Hang the supply bag(s).
Verify ü displays next to ‘Hang Fluid Bag’ on the screen.
Peel back the sterile seal and present the open kit to sterile scrub nurse. Place procedure kit in sterile field.
Connect yellow hysteroscope outflow connector to outflow of hysteroscope and blue scope inflow connector to inflow of hysteroscope.
Pass remaining In-FloPak, Out-FloPak, and tubing to non-sterile circulator.
Insert blue In-FloPak as shown. Verify ü displays next to ‘Install In-FloPak’ on the screen.
Clamp tubing and spike inflow supply bag.
Insert yellow Out-FloPak as shown. Verify ü displays next to ‘Install Out-FloPak’ on the screen.
Connect Under Buttocks (UB) outflow tubing (with yellow connector) to UB drape.
Hang the Waste Bag on the hanger. Verify ü displays next to ‘Hang Waste Bag’ on the screen.
Connect (press on) Waste Bag outflow tubing to Waste Bag.
Confirm all tubing is properly connected, inflow channel is open, and outflow channel is closed. To continue touch ‘Next’.
Ensure the hysteroscope is directed toward the UB drape. When ready, touch ‘Prime’.
When the system is priming, fluid will run through FloPaks and all tubing.
When priming is complete, touch ‘Next’.
Procedure Setup
FLUID MANAGEMENT SYSTEM
User Reference Guide Using the System
To begin, touch ‘Run’.
To adjust deficit limit setting, press the deficit limit ‘Change’ button, then select the preset deficit limits or use pq keys. Touch ü.
To adjust pressure setting, touch the pressure circle ‘Change’ button, then use the keys pq to set the pressure. Touch ü. To start hysteroscopy, touch ‘Run’.
If using MyoSure® Tissue Removal Device, plug the Device and foot pedal into the connectors on green plate on front of the system. Connect the green connector to the green connector on the yellow Out-FloPak.
If system displays a ‘Supply bag low warning’, add another fluid bag.
You can hang a new supply bag at any time, even while the system is running.
When the procedure is complete, touch End. To end procedure, touch ‘Yes’ to confirm.
Remove the blue In-FloPak. When all waste fluid is collected and all excess fluid is recovered, touch ‘Done’. Then remove the yellow Out-FloPak.
Remove the Tissue Trap from the Tissue Trap Holder to access resected tissue.
Screw on the cap and remove Waste Bag.
Cleanup and Disposal
Close the clamp of the inflow tubing to the supply bag.
Disconnect outflow tubing cap from Waste Bag.
Disconnect tube sets from the hysteroscope. Dispose of FloPaks and Waste Bag.
Turn off system and unplug cord from outlet.
www.hologic.com
|
800-442-9892
© 2018 Hologic, Inc.
Hologic, Fluent, and MyoSure are trademarks or registered trademarks of Hologic, Inc. and/or its subsidiaries in the United States and/or other countries. This User Reference Guide is designed to be used in conjunction with, not replace, the Fluent Fluid Management System Operator’s Manual. Prior to performing the procedure, the physician must review and be familiar with the full operating instructions for the Fluent Console and Disposable Devices, as well as any warnings, contraindications, and safety information. AW-14392-002 Rev 001 03/2018