INO Therapeutics
INOmaxDS ir Pre-Use Checkout Rev 03 Dec 2012
Guide
2 Pages

Preview
Page 1
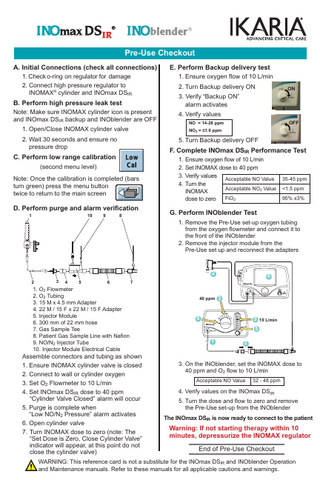
Pre-Use Checkout A. Initial Connections (check all connections) 1. Check o-ring on regulator for damage 2. Connect high pressure regulator to INOMAX® cylinder and INOmax DSIR
B. Perform high pressure leak test Note: Make sure INOMAX cylinder icon is present and INOmax DSIR backup and INOblender are OFF 1. Open/Close INOMAX cylinder valve
Note: Once the calibration is completed (bars turn green) press the menu button twice to return to the main screen
D. Perform purge and alarm verification
4. Verify values OFF
NO = 14-26 ppm
8
1. Ensure oxygen flow of 10 L/min 2. Set INOMAX dose to 40 ppm 3. Verify values Acceptable NO Value 4. Turn the Acceptable NO2 Value INOMAX FiO2 dose to zero
3
4
5
6
1. O2 Flowmeter 2. O2 Tubing 3. 15 M x 4.5 mm Adapter 4. 22 M / 15 F x 22 M / 15 F Adapter 5. Injector Module 6. 300 mm of 22 mm hose 7. Gas Sample Tee 8. Patient Gas Sample Line with Nafion 9. NO/N2 Injector Tube 10. Injector Module Electrical Cable
35-45 ppm <1.5 ppm 95% ±3%
G. Perform INOblender Test 1. Remove the Pre-Use set-up oxygen tubing from the oxygen flowmeter and connect it to the front of the INOblender 2. Remove the injector module from the Pre-Use set up and reconnect the adapters
2 2
ON
3. Verify “Backup ON” alarm activates
5. Turn Backup delivery OFF
(second menu level)
9
2. Turn Backup delivery ON
F. Complete INOmax DSIR Performance Test
C. Perform low range calibration
10
1. Ensure oxygen flow of 10 L/min
NO2 = ≤1.0 ppm
2. Wait 30 seconds and ensure no pressure drop
1
E. Perform Backup delivery test
4
7
Assemble connectors and tubing as shown 1. Ensure INOMAX cylinder valve is closed 2. Connect to wall or cylinder oxygen 3. Set O2 Flowmeter to 10 L/min 4. Set INOmax DSIR dose to 40 ppm “Cylinder Valve Closed” alarm will occur 5. Purge is complete when “Low NO/N2 Pressure” alarm activates 6. Open cylinder valve 7. Turn INOMAX dose to zero (note: The “Set Dose is Zero, Close Cylinder Valve” indicator will appear, at this point do not close the cylinder valve)
40 ppm 3
5
3 10 L/min 5 1
2
3. On the INOblender, set the INOMAX dose to 40 ppm and O2 flow to 10 L/min Acceptable NO Value
32 - 48 ppm
4. Verify values on the INOmax DSIR 5. Turn the dose and flow to zero and remove the Pre-Use set-up from the INOblender The INOmax DSIR is now ready to connect to the patient
Warning: If not starting therapy within 10 minutes, depressurize the INOMAX regulator
End of Pre-Use Checkout
WARNING: This reference card is not a substitute for the INOmax DSIR and INOblender Operation and Maintenance manuals. Refer to these manuals for all applicable cautions and warnings.
Calibration
WARNING: Caution:
INOMAX can be administered during the sensor calibration process. However, inspired gases are not monitored and gas monitoring alarms are disabled. When performing a high range calibration make sure to select the correct calibration gas and confirm the expiration date before using. Never connect the sample line directly to a high pressure gas source (greater than 150 cmH2O); this could damage the sampling system.
Note:
The calibration process can be stopped at anytime by pushing the Cancel Active Status button on the touch screen.
Low Range Calibration Perform daily
To access the calibration menu: Press the menu button
on the main screen to enter the menu screen (second menu level)
The lower part of the menu screen displays the 4 calibration buttons Press the Large Button on the Bottom Left
Note: If the date is flashing it signifies the calibration is past due.
High Range Calibration Perform every thirty days or as necessary
Oxygen Sensor 1. From the menu screen (second menu level) press the 100% O2 button to bring up the O2 high range calibration screen (third menu level) 2. Assemble the following components into a calibration setup (1) 100% O2 source (2) O2 Tubing (3) 15M x 4.5 mm Connector (4) Gas Sample Tee (5) Patient Gas Sample Line 3. Set oxygen flow to 5 L/min 4. To start the O2 high range calibration, press the flashing 100% O2 button on the right hand side of the screen
NO2 Sensor and NO Sensor This procedure is for calibrating the NO or NO2 sensor • The NO2 high range calibration requires an INOcal® cylinder of 10 ppm NO2 (pink label) • The NO high range calibration requires an INOcal cylinder of 45 ppm NO (teal label) 1. From the menu screen (second menu level), press the10 ppm or NO2 button or the 45 ppm NO button to bring up the calibration screen (third menu level) 2. Turn the INOcal cylinder on and check that there is adequate pressure (replace if in the RED zone) 3. Attach the INOcal sample tee to the sample line of the INOmax DSIR (beige adaptor is a pressure relief) 4. To start the high range calibration, press the flashing button on the right hand side of the screen
For assistance contact Technical Support 877-566-9466. INO Therapeutics LLC d/b/a Ikaria, Hampton, NJ 08827-9001 USA
or
20144 Rev 03
2012-12