Quick Start Guide
2 Pages
Preview
Page 1
BIOCON-1100 QUICK START GUIDE Please refer to the operator’s manual for full instructions. When not in use, the BioCon-1100 probe should be securely stored in its trolley or carry case.
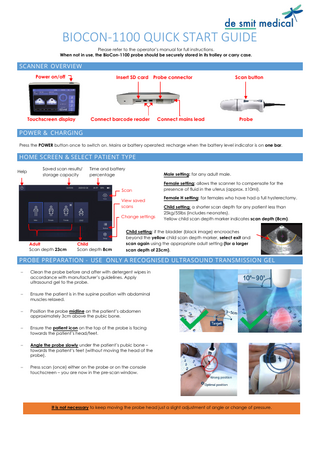
SCANNER OVERVIEW Power on/off
Insert SD card Probe connector
Touchscreen display
Connect barcode reader
Connect mains lead
Scan button
Probe
POWER & CHARGING Press the POWER button once to switch on. Mains or battery operated: recharge when the battery level indicator is on one bar.
HOME SCREEN & SELECT PATIENT TYPE Help
Saved scan results/ storage capacity
Time and battery percentage
Male setting: for any adult male.
Scan View saved scans Change settings
Adult Scan depth 23cm
Child Scan depth 8cm
Female setting: allows the scanner to compensate for the presence of fluid in the uterus (approx. ±10ml). Female H setting: for females who have had a full hysterectomy. Child setting: a shorter scan depth for any patient less than 25kg/55lbs (includes neonates). Yellow child scan depth marker indicates scan depth (8cm).
Child setting: if the bladder (black image) encroaches beyond the yellow child scan depth marker, select exit and scan again using the appropriate adult setting (for a larger scan depth of 23cm).
PROBE PREPARATION - USE ONLY A RECOGNISED ULTRASOUND TRANSMISSION GEL −
Clean the probe before and after with detergent wipes in accordance with manufacturer’s guidelines. Apply ultrasound gel to the probe.
−
Ensure the patient is in the supine position with abdominal muscles relaxed.
−
Position the probe midline on the patient’s abdomen approximately 3cm above the pubic bone.
−
Ensure the patient icon on the top of the probe is facing towards the patient’s head/feet.
−
Angle the probe slowly under the patient’s pubic bone – towards the patient’s feet (without moving the head of the probe).
−
Press scan (once) either on the probe or on the console touchscreen – you are now in the pre-scan window.
It is not necessary to keep moving the probe head just a slight adjustment of angle or change of pressure.
PRE SCAN ( LIVE IMAGE - TO FIND THE BEST VIEW OF THE BLADDER) Display the live pre-scan image: press the scan button once. Centre line
Pink cross: confirms presence of fluid (BladderpointTM).
BladderpointTM
Black image: IS the fluid. Typically: Large pink cross identifies a larger bladder Small pink cross identifies a small bladder, (~less than 50ml)
Scan guide Scan guide (optional): for probe placement assistance.
Smaller bladders are not easy to locate or visualise and you may need to apply a little more pressure.
Find the biggest view of the bladder (black image): angle your probe slowly, ensuring the green centre line is near the centre of the bladder.
It is not essential to align the pink cross with the green centre line.
Capture the scan: hold the probe still and press the scan button again or tap the scan icon on the touchscreen.
It is important to have the green vertical line near the centre of the bladder. It is recommended that you do 2-3 scans per patient.
SCAN RESULTS Cross section 12 planes Scan Print Transfer to EPR Start new patient
(Red represents horizontal plane) (Blue represents vertical plane) Plane image number & area (cm2) Cross hairs (centred image) (patient’s head, foot, right, left)
Current/most recent scanned volume Maximum volume – if several scans performed Enter patient ID (barcode optional) Distance between gradation 10mm
Scans are automatically saved; you can choose to enter patient information, or it will automatically save with only date/time. Between scans, monitor the current volume versus the max volume will build your confidence and scanning technique.
to check all scans are giving consistent readings, this
Automatic correction function compensates for a non-centred bladder
.
Scan again if bladder not fully captured within the crosshairs.
PASSWORD PROTECTION SEE OPERATOR’S MANUAL TO ACTIVATE PIN ACCESS TO SAVED PATIENT DATA Tap to manually enter patient information or enter via barcode if available. Patient ID can be PIN protected if desired.
FURTHER INFORMATION EPR: you can download readings to your electronic patient record (EPR), you will need to install CUBEPro software to do this. WiFi: the BioCon-1100 has WiFi capability. Barcode reader: your BioCon-1100 bladder scanner can also be used with an Mcube barcode reader for patient and user identification, rather than manually entering details. Consult the operator’s manual for more details. The BioCon-1100 should be cleaned and disinfected in accordance with the manufacturer’s guidance and trust recommendations. No routine annual calibration is required. Further training materials are available from de Smit Medical.
0845 345 4226 - [email protected] - www.desmitmedical.com V2 - BioCon-1100 – Quick Start Guide - Page 2 of 2