MEDIVATORS
Endoscope Reprocessors
DSD-1087 and DSD-1088 Chemical Transfer Pump Tube Set and Adapter Instructions Rev D
Instructions
5 Pages

Preview
Page 1
Chemical Transfer Pump Tube Set and Adapter Instructions
Caution: Use personal protective clothing when transferring Liquid Chemical Germicide (LCGs).
1. Recommended Filling Method.
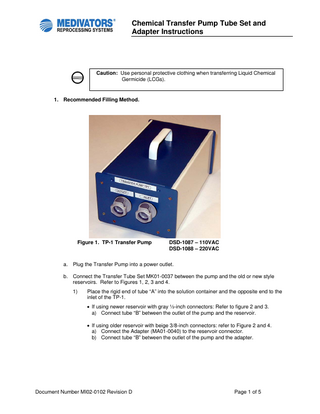
Figure 1. TP-1 Transfer Pump
DSD-1087 – 110VAC DSD-1088 – 220VAC
a. Plug the Transfer Pump into a power outlet. b. Connect the Transfer Tube Set MK01-0037 between the pump and the old or new style reservoirs. Refer to Figures 1, 2, 3 and 4. 1)
Place the rigid end of tube “A” into the solution container and the opposite end to the inlet of the TP-1. • If using newer reservoir with gray ½-inch connectors: Refer to figure 2 and 3. a) Connect tube “B” between the outlet of the pump and the reservoir. • If using older reservoir with beige 3/8-inch connectors: refer to Figure 2 and 4. a) Connect the Adapter (MA01-0040) to the reservoir connector. b) Connect tube “B” between the outlet of the pump and the adapter.
Document Number MI02-0102 Revision D
Page 1 of 5
Chemical Transfer Pump Tube Set and Adapter Instructions
This end to adapter.
Tube A
Tube B
Tube Set MK01-0037
Adapter MA01-0040
Figure 2. Tube Set and Adapter c.
Turn the pump ON at the switch. Note: Ensure that there are no leaks. If leaks are seen, turn the pump OFF. Note: There must be 5 gallons (18.9L) of LCG in the chemical reservoir of all MV and CLM Models 5002V, 5002VX.
d. Fill the reservoir until all 5 gallons of LCG have been transferred and turn the pump OFF. e. Flush the Transfer Pump with clear water. Refer to Step 5.
Document Number MI02-0102 Revision D
Page 2 of 5
Chemical Transfer Pump Tube Set and Adapter Instructions
2. Alternative Filling Method: Pour 5 gallons (18.9L) of LCG into the reservoir of all MV and CLM Models.
Figure 3. New Reservoir Connection
Figure 4. Old Reservoir and Adapter
3. Emptying Reservoir using Transfer Pump TP-1 and Tube Set (MK01-0037). Refer to Figure 2. Note: Some regions of the country require neutralization of the solution prior to disposal. If neutralization is not required, refer to Step 4. a. Plug the Transfer Pump into a standard power outlet. b. Connect the Transfer Tube set (MK01-0037) between the pump and the old or new style reservoirs. Refer to Figures 1, 2, 3, and 4. 1)
Place the rigid end of tube “A” into the drain or solution container and the opposite end to the outlet of the TP-1. • If using newer reservoirs with gray ½-inch connectors: Refer to Figures 2 and 3 a) Connect tube “B” between the inlet of the pump and the reservoir. • If using older reservoirs with beige 3/8-inch connectors: Refer to Figures 2 and 4. a) Connect the Adapter (MA01-0040) to the reservoir connector. b) Connect tube “B” between the inlet of the pump and the adapter (MA01-0040).
c.
Turn the pump ON at the switch. Note: Ensure that there are no leaks. If leaks are observed, turn the pump OFF.
d. Continue to pump until all of the LCG has been pumped out of the reservoir. (You might need to lift one end to remove all chemicals.) e. Turn the pump OFF. f.
Flush the Transfer Pump with clear water. Refer to Step 5.
Document Number MI02-0102 Revision D
Page 3 of 5
Chemical Transfer Pump Tube Set and Adapter Instructions
4. Emptying Manually. a. Press MANUAL, LCG/IN, and START. b. When the disinfectant in the basin has reached maximum fill level, liquid will no longer rise. c.
Press Manual, DRAIN and START.
d. When the chemical has been drained from the basin, press STOP. e. Repeat Step a. • When air bubbles begin to form in the basin and all the chemicals have been pumped from the reservoir, press STOP. f.
Press MANUAL, DRAIN and START.
g. When all chemicals in the basin have been drained, press STOP. h. Remove remaining chemicals from the reservoir using a suction pump or rubber gloves and absorbent lint free cloths. i.
Rinse the chemical from the basin and dilute chemicals in the drain, by turning the reprocessor ON and pressing START. Allow the reprocessor to complete the wash cycle and the rinse cycle if necessary.
j.
Press STOP.
5. Flushing the Transfer Pump and All Tubing. a. Connect the adapter (MA01-0040) to the Transfer Pump Tubing. Refer to Figure 2. b. Place the adapter into the drain. c.
Connect the remaining end of the tubing to the outlet of the pump.
d. Connect tube “A” to the inlet of the pump. Refer to Figure 1, 2. e. Place the inlet tubing into a container of fresh water. f.
Turn the pump ON and flush the system with fresh water.
g. Remove the tubing from the fresh water until all the water is pumped from the tubing. h. Turn the pump OFF and disconnect the tubes.
Document Number MI02-0102 Revision D
Page 4 of 5
Chemical Transfer Pump Tube Set and Adapter Instructions
6. Recommended LCGs Note: It is the responsibility of the reprocessor operator to insure the effectiveness of the high-level disinfectant used. Medivators recommends the use of a LCG that: • Has a 510K approval to market certification from the FDA. • Is approved for use with flexible endoscopes by the endoscope manufacturers. It is the user's responsibility to ensure that the LCG is used for the proper time and temperature to effect high-level disinfection or sterilization. Medivators recommends daily testing of the LCG to ensure an adequate level of active ingredient. Use the manufacturer’s test strips to test the potency of the high level disinfectant on a daily basis. If the minimum effective concentration (MEC) of the high-level disinfectant is below its minimum, discard and replace with fresh high-level disinfectant.
Document Number MI02-0102 Revision D
Page 5 of 5