MEDIVATORS
Endoscope Reprocessors
DSD-201 Internal Water Filter Replacement and Disinfection Instructions Rev B
Instructions
4 Pages

Preview
Page 1
Instructions for Replacement and Disinfection of Internal Water Filter DSD-201
Tools Required: Filter Wrench (supplied with DSD-201) Parts Required: Filter Cartridge MF01-0013 Accessory Tube DSD-1064 (supplied with DSD-201) Replace and Disinfect the Internal Water Filter Caution: The internal water filter must be high-level disinfected or sterilized with high-level disinfectant/sterilant before use: Note: Verify that station A & B disinfectant reservoirs contain effective sterilant/disinfectant. Sterilant/disinfectant from station B reservoir will be used to sterilize/disinfect the internal 0.2 micron water filter, housing and plumbing lines. The default contact time for this process is 3 hours; shorter contact times may be used but should reflect the instructions of the sterilant/disinfectant being used. 1.
The DSD-201 must be in the idle state. Connect the restrictors (see note) into A and B basin. Place the floating lids onto the endoscope basins and close the station covers. Note: Ensure the restrictor adapter provided with the installation kit is connected in the basin before performing this procedure.
2.
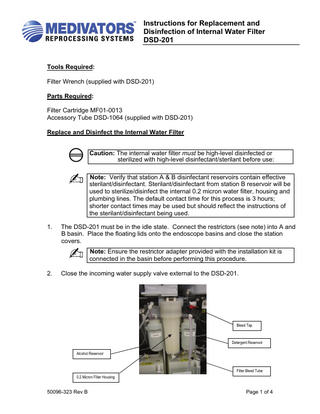
Close the incoming water supply valve external to the DSD-201.
Bleed Tap
Detergent Reservoir Alcohol Reservoir
Filter Bleed Tube 0.2 Micron Filter Housing
50096-323 Rev B
Page 1 of 4
Instructions for Replacement and Disinfection of Internal Water Filter DSD-201 Fig 1 3.
Disconnect the main water inlet tube quick disconnect from the incoming water supply line. Refer to Figure 3.
4.
Connect the accessory hose to the water inlet tube. Refer to Figure 2.
5.
Open the filter bleeder valve and drain the water out of the filter canister.
6.
Remove the detergent and/or alcohol reservoirs to provide additional space. The low reservoir alarm will be triggered when either/both of these reservoirs are removed. The alarm will be reset when they are reattached.
Main Water Inlet Tube Quick Disconnect Fitting
Alcohol & Detergent Reservoirs Removed Filter Housing
Accessory Hose
Fig 2
Fig 3
7.
Unscrew the internal water filter canister housing using the filter wrench supplied with the DSD-201, and remove in order to expose the water filter. Refer to Figure 2.
8.
Turn the water filter ½-inch in the counterclockwise position to unlock the filter; then pull the filter downwards to release the filter. Refer to arrows on Figure 4.
9.
Place the new filter into the filter housing by pushing the filter upwards into the canister cap. Turn the water filter clockwise until the filter locks into the cap. Refer to Figure 4. Double check filter installation by pulling down on the filter cartridge to ensure that it is locked in place. Refer to Figure 5 & 6.
50096-323 Rev B
Page 2 of 4
Instructions for Replacement and Disinfection of Internal Water Filter DSD-201
Rotate Counter-clockwise to Remove
0.2 Micron Filter Cartridge
Ensure that new filter engages locking tabs and rotate clockwise to lock into position
Fig 4
Underside View of Filter Head Fig 5 For illustrative purposes only. Filter cartridge retaining screws. These retaining screws are not visible when fitting a new cartridge. There will be a distinct feeling when the locking tabs engage with the retaining screws.
50096-323 Rev B
Fig 6
Filter cartridge locking tabs. These tabs must locate above the head of the retaining screw and lock into position when the filter cartridge is rotated clockwise
Page 3 of 4
Instructions for Replacement and Disinfection of Internal Water Filter DSD-201
10. Wipe the filter canister clean with a lint-free cloth. Do not remove silicon grease from the housing ‘O’ ring. 11. Re-attach the filter canister ensuring that the O-ring is in place. 12. Hand-tighten (do not use the filter wrench). 13. Reconnect the main water inlet tube. Refer to Figure 3. NOTE: Ensure the filter bleeder valve is in the CLOSED POSITION. 14. Ensure that the ‘B’ station reservoir is full of disinfectant. 15. Select station ‘B’ on the control panel. 16. Press ‘setup’, # 6, and ‘enter’ (screen prompt will say ‘auto line dis’). 17. Press ‘start’ (screen prompt will say ‘attach restrictors’) for both A and B basins. 18. Press ‘start’ (if a ‘no flow’ error is observed, press ‘start’ to continue this may occur more than once) 19. Once disinfectant is seen entering the A & B basins, turn the main water supply back on. 20. Allow water-line disinfect cycle to complete. 21. Top up ‘B’ station disinfectant reservoir to the fill to mark. 22. Resume normal use.
50096-323 Rev B
Page 4 of 4