Medline Industries
Konig Surgical Instruments Standard Laryngoscopes Recommended Cleaning, Sterilization and Instructions for Use
2 Pages

Preview
Page 1
Standard Laryngoscopes – Recommended Cleaning, Sterilization, and Instructions for Use
Battery Replacement Procedure
Standard Laryngoscope Features These operating instructions pertain to König brand standard laryngoscope systems. These instructions should be followed to ensure the longevity and durability of this product. Please inspect all components before use to confirm all items are present and in perfect working condition. Medline standard laryngoscope blades are manufactured from high quality AISI 303/304 stainless steel which is highly resistant to corrosion and conforms to ISO 7376.
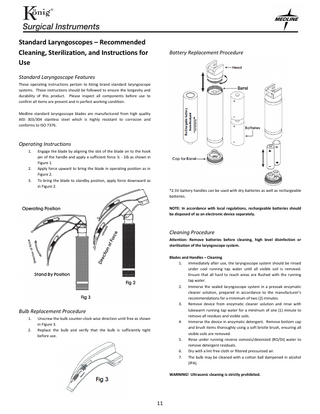
Operating Instructions 1.
2. 3.
Engage the blade by aligning the slot of the blade on to the hook pin of the handle and apply a sufficient force ¼ - 1lb as shown in Figure 1. Apply force upward to bring the blade in operating position as in Figure 2. To bring the blade to standby position, apply force downward as in Figure 2.
*2.5V battery handles can be used with dry batteries as well as rechargeable batteries. NOTE: In accordance with local regulations, rechargeable batteries should be disposed of as an electronic device separately.
Cleaning Procedure Attention: Remove batteries before cleaning, high level disinfection or sterilization of the laryngoscope system. Blades and Handles – Cleaning 1. Immediately after use, the laryngoscope system should be rinsed under cool running tap water until all visible soil is removed. Ensure that all hard to reach areas are flushed with the running tap water. 2. Immerse the sealed laryngoscope system in a presoak enzymatic cleaner solution, prepared in accordance to the manufacturer’s recommendations for a minimum of two (2) minutes. 3. Remove device from enzymatic cleaner solution and rinse with lukewarm running tap water for a minimum of one (1) minute to remove all residues and visible soils. 4. Immerse the device in enzymatic detergent. Remove bottom cap and brush items thoroughly using a soft bristle brush, ensuring all visible soils are removed. 5. Rinse under running reverse osmosis/deionized (RO/DI) water to remove detergent residuals. 6. Dry with a lint free cloth or filtered pressurized air. 7. The bulb may be cleaned with a cotton ball dampened in alcohol (IPA).
Bulb Replacement Procedure 1. 2.
Unscrew the bulb counter-clock wise direction until free as shown in Figure 3. Replace the bulb and verify that the bulb is sufficiently tight before use.
WARNING! Ultrasonic cleaning is strictly prohibited.
11
Disinfection Soaking in solutions or thermo chemically in a washer sterilizer up to 65˚ C max may be used to perform disinfection. Manufacturer’s instructions regarding duration and concentration of solutions should be strictly adhered. After disinfection, rinse thoroughly in RO/DI water and dry with a lint free cloth.
contacts. Be sure adequate supplies of spare lamps, batteries and replacement parts are readily available.
NOTE: THE ABOVE LISTED STERILIZATION GUIDELINES, PROVIDED BY MEDLINE INDUSTRIES, INC., ARE INTENDED AS PROCEDURES COMPATIBLE WITH SPECIFIC MATERIALS. STERILIZATION MUST BE PERFORMED TO APPROVED HOSPITAL PROTOCOL. MEDLINE INDUSTRIES, INC., CAN NOT GUARANTEE STERILITY. THIS WILL BE VALIDATED BY THE HOSPITAL AND OR STERILIZATION EQUIPMENT MANUFACTURERS.
Cold Soak Solution To achieve a high-level disinfection, Cidex OPA or 2.4% Glutaraldehyde solution may be used according to the manufacturer’s instructions. Dry with lint free, clean cloth or filtered pressurized air. Reassemble all parts, load handle with batteries and test the system for proper function. If not functional, review the battery lamp testing instructions below. WARNING! Do not immerse blades in Bleach, Betadine or Potassium Hydroxide solutions. Doing so will cause severe damage to the instruments. Avoid metal to metal contact during and after soaking. Standard Handles Standard handles may withstand the same cold soak solution outlined in the blade section. The batteries must be removed prior to disinfection/sterilization. Battery handles may withstand exposure to ethylene oxide. Attention: Do not allow excess fluid to seep into electrical contact; batteries must be removed before cleaning and sterilization.
Sterilization Before performing any of the procedures described below, the blade and handle should be cleaned as described in the cleaning procedure. Cycle Type Parameter Minimum Set Point Exposure Temp 270˚F (132˚C) Prevacuum Exposure Time 4 minutes Dry Time 20 minutes Cycle Type Gravity Displacement
Parameter Exposure Temp Exposure Time Dry Time
Minimum Set Point 250˚F (121˚C) 30 minutes 15 minutes
Gas Sterilization Gas sterilization by ethylene oxide may be used up to a maximum temperature of 65˚ C and 8p.s.i.. This method is preferred if sterilization is to be performed regularly. Steam Sterilization Steam sterilization can also be performed. autoclave pouch.
Insert device inappropriate
Note: do not exceed a temperature of 135˚ C and a pressure of 28p.s.i. WARNING! Flash autoclaving and hot air sterilization should be avoided as these processes will damage the instrument.
Blade and Handle Test Procedure Laryngoscope blades and handles should always be tested after cleaning, disinfection, sterilization and prior to use. To test, connect the laryngoscope blade to the handle and pull it to the ON position as shown in Figure 1. If the unit fails to light or flickers, check the lamp/batteries and the electrical
©2014, 2015 Medline Industries, Inc. All rights reserved. König and Medline are registered trademarks of Medline Industries, Inc. Mundelein, IL 60060 USA. 1-800-MEDLINE. www.medline.com
12