medtronic
POWEREASE Adapter Instrictions for Use
148 Pages
Preview
Page 1
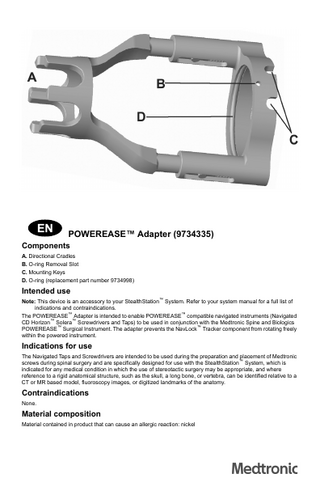
POWEREASE™ Adapter (9734335) Components A. Directional Cradles B. O-ring Removal Slot C. Mounting Keys D. O-ring (replacement part number 9734998)
Intended use Note: This device is an accessory to your StealthStation™ System. Refer to your system manual for a full list of indications and contraindications. The POWEREASE™ Adapter is intended to enable POWEREASE™ compatible navigated instruments (Navigated CD Horizon™ Solera™ Screwdrivers and Taps) to be used in conjunction with the Medtronic Spine and Biologics POWEREASE™ Surgical Instrument. The adapter prevents the NavLock™ Tracker component from rotating freely within the powered instrument.
Indications for use The Navigated Taps and Screwdrivers are intended to be used during the preparation and placement of Medtronic screws during spinal surgery and are specifically designed for use with the StealthStation™ System, which is indicated for any medical condition in which the use of stereotactic surgery may be appropriate, and where reference to a rigid anatomical structure, such as the skull, a long bone, or vertebra, can be identified relative to a CT or MR based model, fluoroscopy images, or digitized landmarks of the anatomy.
Contraindications None.
Material composition Material contained in product that can cause an allergic reaction: nickel
Compatibility This device is compatible with Medtronic StealthStation™ image-guided surgery systems and Medtronic navigation instruments.
System-level manuals This device can be used with Medtronic image-guided surgery systems. See the StealthStation™ system-level manuals and spine procedure pocket guides for descriptions of patient groups, intended users, clinical benefits, side effects, and potential complications. This device is an accessory to your StealthStation™ System.
Warnings Warning: Use caution and exercise care to prevent injury during use. See the corresponding system-level manuals and procedure pocket guides for further handling instructions. Warning: Prior to use, examine the device for damage or deterioration. If damaged or deteriorated, do not attempt to use the device and do not attempt to repair it. Warning: The POWEREASE™ Adapter is designed for re-use and is supplied non-sterile. Clean and sterilize the device components before every use according to the instructions in this document. Warning: Do not open sterile-barrier packages or containers until surgical use. At time of use, inspect barrier for breach. If the sterile barrier was breached before surgical use, reprocess all devices contained in the package. Warning: During navigation, and after decompression and/or distraction, frequently confirm navigational accuracy by touching the tip of the navigated instrument on known anatomical points, including accuracy checkpoints, and comparing the position of the instrument tip in the image with its physical location. Warning: Abandon use if damage or malfunction occurs during a procedure. Warning: Do not attempt to alter the product. Only use the product in accordance with its labeling. Warning: Touching the adapter to electrocautery may expose the user to harmful electrical current. Warning: To avoid potential exposure to blood-borne pathogens and chemicals, use appropriate Personal Protective Equipment when handling, processing, or disposing of Medtronic devices. Warning: Do not re-use or re-process a device where transmissible spongiform encephalopathy agents or Creutzfeldt-Jakob disease contamination is suspected or confirmed. Incinerate the potentially contaminated device according to national guidelines. Warning: Abandon use if device sterility is compromised.
Precautions Caution: Federal law (U.S.A.) restricts this device to sale by or on the order of a physician. Caution: Refer to the StealthStation™ system-level manual and procedure pocket guides for additional instructions, warnings, and cautions. Caution: Remove navigated instruments that are not in use from the surgical field to prevent navigational inaccuracies. Caution: Disengage all components before cleaning and sterilizing.
Use 1. Secure the POWEREASE™ Adapter to the POWEREASE™ Drill. a. Slide the adapter over the drill chuck onto the nose piece. Align the adapter mounting keys to the drill alignment pins on the bottom of the drill nose cone. b. Press the POWEREASE™ Adapter firmly onto the nose piece to seat the o-ring onto the drill nose cone. c. Confirm that the adapter is secured to the drill by making sure that it cannot be pulled out of the drill. Do not use the POWEREASE™ Adapter if the adapter is loose. 2. Place a tap or screwdriver into the NavLock™ Tracker. a. Insert the hind end of the tap or screwdriver until it is fully seated in the NavLock™ Tracker. b. Confirm that the instrument is secured in the NavLock™ Tracker by making sure that it cannot be pulled out of the device. 3. Place single-use sterile spheres on each of the four NavLock™ Tracker stems. Push each sphere onto the stem until it “clicks” into place. Make sure the sphere is firmly seated on the stem. 4. Attach the NavLock™ Tracker assembly to the POWEREASE™ Drill. a. Insert the hind end of the NavLock™ Tracker assembly into the drill chuck. b. Align the instrument’s hind end dual flats to the drill’s slotted chuck. Press the instrument into the drill until it fully seats. Pull on the instrument to confirm the instrument is fully seated. c. Align the NavLock™ Tracker to the system camera by retracting the adapter and rotating the NavLock™ Tracker to the desired position and releasing the adapter to capture NavLock™ Tracker within one of its cradles.
2
d. Confirm that the NavLock™ Tracker assembly is secured in the POWEREASE™ Drill by making sure that it cannot be pulled out of the drill.
5. Verify the assembly. a. Select the current color NavLock™ Tracker from the instrument list in the procedure software ensuring that the default instrument matches the selected instrument. b. Check that the instrument has green status (that it is being tracked by the StealthStation™ system) on the screen. c. Place the tip of the tap or driver into the reference frame divot. d. Face the NavLock™ Tracker array toward the camera. e. Press the footswitch or wait for the system to verify.
Cleaning, inspection and sterilization Before cleaning and sterilizing the POWEREASE™ adapter and the NavLock™ Tracker, remove and properly dispose of all sterile spheres. Caution: Because of the variability in cleaning efficiencies and sterilizer operating parameters, all given parameters (temperature, time, etc.) should be validated by persons who have training and expertise in sterilization processes. Deviation from the recommended sterilization processes is at the risk of the user facility. Limitations on reprocessing
End of useful life is normally determined by wear and damage due to use. See the “Maintenance inspection testing” section in this document to determine if the device is at the end of its useful life. Caution: At the end of its useful life, dispose of the device in accordance with national regulations.
Instructions Point of use
Do not allow blood, debris or bodily fluids to dry on the device. Remove excess soil using running, cold tap water.
Containment and transportation
Caution: Devices should be cleaned within 30 minutes of use to limit fixation of contaminants. If the device cannot be reprocessed immediately, keep the device moist during transport. Tap water is defined as utility water with a hardness of < 150 mg/l. To prolong the life of the device, reprocess immediately after use.
3
Preparation for cleaning
To prepare the devices for cleaning: 1. Disengage all components. Remove the O-ring from the POWEREASE™ Adapter by using the O-ring removal pin to push the O-ring out. Clean the O-ring with the other components. 2. Thoroughly rinse the devices and O-ring with running cold tap water at a temperature of 10-22°C (50-72°F) to remove any visible soil. 3. Flush the lumen with running cold tap water. 4. While rinsing, actuate any movable surfaces through their full range of motion, including the spring mechanism on the POWEREASE™ Adapter, to allow water to penetrate hard-to-reach areas. 5. Use a soft-bristled brush, such as a nylon bristle toothbrush-style brush, or clean cloth to aid soil removal. Give particular attention to crevices and other areas that present a challenge to cleaning. 6. Carefully inspect the devices, including any lumens and cavities, to ensure all visible soil is removed prior to placing the devices and the O-ring into the instrument washer.
Automated cleaning
Transfer the devices to the washer and select the instrument cycle. Ensure the following set of cycle parameters are properly programmed. Note: Cycle validated using Steris Prolystica™ 2x Concentrate Enzymatic Cleaner and Steris Prolystica™ 2x Concentrate Neutral Detergent at a concentration of 1.0 ml/L (1/ 8 oz/gal). Phase
Recirculation/ Soak (minutes)
Water Temperature
Detergent Type
Prewash 1
02:00
Cold tap water 10-16°C (50-61°F)
N/A
Enzyme Wash
02:00
Hot tap water 43- 55°C (109-131°F)
Neutral pH enzymatic cleaner
Wash 1
02:00
66°C (151°F) (setpoint)
Neutral pH detergent
Rinse 1
00:15
Hot tap water 43-60°C (109-140°F)
N/A
Thermal Rinse
01:00
90°C (194°F) (setpoint)
N/A
Purified Water Rinse
00:10
66°C (151°F) (setpoint)
N/A
Warning: After cleaning, visually examine all parts of the device for cleanliness. If visible soil remains, repeat cleaning. Drying
If necessary, dry the device with a clean, lint-free towel.
Maintenance inspection testing
Visually inspect the device before each use for obvious damage or corrosion to ensure it is not pitted, fractured, bent, loose, or otherwise damaged. Make sure of the following: • Laser etchings, engravings, and other markings are legible. • No cracks are present on any part of the device. • Discoloration, corrosion, stains or rust are not present. If so, attempt to clean using the cleaning instructions provided in this document. If reprocessing does not remove the corrosion, stains, or rust, the device is at the end of its useful life. • There is no damage to the working ends or tips. The working end should be free from cracks, sharp-edged gouges, and other damage. • There is no damage to the threads. • All parts are present and free of damage and deterioration. • Mating ends are free of damage (nicks, gouges, bends, etc.) that would interfere with the mating function. A device that shows or exhibits properties listed above is at the end of its useful life. Dispose of the device according to national regulations. Warning: Do not reprocess for surgical use a device that has obvious damage or corrosion.
4
Packaging
Sterilize this device in a sterilization container with SCF01 paper filters. Caution: The device sterilization tray is to be used only for sterilization, not for cleaning.
Sterilization
After cleaning, re-insert a clean O-ring into the POWEREASE™ Adapter and sterilize the device according to the instructions below. Caution: Device cannot be sterilized to an adequate Sterility Assurance Level without prior cleaning. Use a prevacuum steam sterilization cycle with these parameters to sterilize the device. Sterilization cycle parameters for medical facilities inside the U.S.A. • Temperature: 132°C (270°F) • Exposure Time: 4 minutes (04:00) • Minimum Dry Time: 30 minutes (30:00) Sterilization cycle parameters for medical facilities outside the U.S.A. Option A • Exposure: Prevacuum • Temperature: 132°C (270°F) • Exposure Time: 4 minutes (04:00) • Minimum Dry Time*: 30 minutes (30:00) Option B • Exposure: Prevacuum • Temperature: 134°C (273°F) • Exposure Time: 18 minutes (18:00) • Minimum Dry Time*: 30 minutes (30:00) * The time required to dry the device may vary with environmental conditions. Note: Steam for sterilization should be generated from water that has been treated to remove total dissolved solids, filtered to remove contaminants and water droplets, and supplied via piping without deadlegs or other stagnant zones where contamination might collect. Steam saturation should be greater than 97%.
Storage
Ensure instruments and sterile packaging are dry before storing. Store in dry, clean conditions at ambient room temperature such that the package is not compromised.
Sterile spheres During a surgical procedure, a sterile sphere may become coated with fluid or debris, hindering its ability to reflect light. If this occurs, wipe away the debris with a soft, sterile cloth (the cloth may be wet, but make sure to dry the sphere thoroughly). Keep extra sterile spheres available as replacements during a case. Sterile spheres are pre-sterilized, single-use components. Remove and properly dispose of all sterile spheres. Warning: Do not reprocess, resterilize, or reuse any single-use device. Attempts to reprocess or resterilize a single-use device may be ineffective and may compromise its structural integrity. Any reuse creates a risk of contamination which could result in patient injury, illness, or death.
Disposal Dispose contaminated devices according with your facility’s procedure for medical devices and national regulations.
Contact information If a serious incident occurs in relation to the use of this device, report it to Medtronic Navigation. If a serious incident occurs in the European Union, also report it to the competent authority in the Member State where the incident occurred.
Assistance For questions about using the POWEREASE™ Adapter, contact your local Medtronic Navigation representative or call Medtronic Navigation at 1 800 595 9709 or 1 720 890 3200.
5
2023-09 9734925 G02 Revision A ©2023 Medtronic Navigation, Inc. All Rights Reserved
Medtronic Navigation, Inc. 826 Coal Creek Circle Louisville, Colorado 80027 USA Main 720 890 3200 Fax 720 890 3500 www.medtronic.com Technical Support USA 1 800 595 9709 International 1 720 890 3160 rs.navtechsupport@medtronic.com
Medtronic B.V. Earl Bakkenstraat 10 6422 PJ Heerlen Netherlands Telephone 31 45 566 80 00 Australia Medtronic Australasia Pty Ltd 2 Alma Road Macquarie Park, NSW 2113 1800 668 670 Printed in the USA
ȤŋȦƮƛŭƮŲŶőŋȯʼnĖĉĚąȟȥ