medtronic
Touch-n-Go Registration Probe Instruction for Use
160 Pages
Preview
Page 1
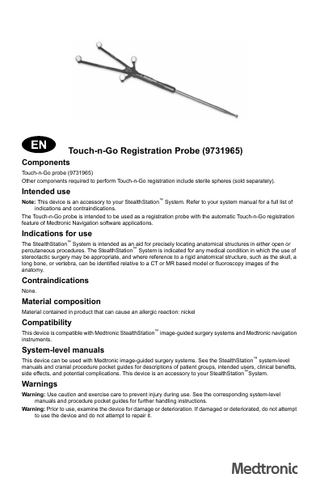
Touch-n-Go Registration Probe (9731965) Components Touch-n-Go probe (9731965) Other components required to perform Touch-n-Go registration include sterile spheres (sold separately).
Intended use Note: This device is an accessory to your StealthStation™ System. Refer to your system manual for a full list of indications and contraindications. The Touch-n-Go probe is intended to be used as a registration probe with the automatic Touch-n-Go registration feature of Medtronic Navigation software applications.
Indications for use The StealthStation™ System is intended as an aid for precisely locating anatomical structures in either open or percutaneous procedures. The StealthStation™ System is indicated for any medical condition in which the use of stereotactic surgery may be appropriate, and where reference to a rigid anatomical structure, such as the skull, a long bone, or vertebra, can be identified relative to a CT or MR based model or fluoroscopy images of the anatomy.
Contraindications None.
Material composition Material contained in product that can cause an allergic reaction: nickel
Compatibility This device is compatible with Medtronic StealthStation™ image-guided surgery systems and Medtronic navigation instruments.
System-level manuals This device can be used with Medtronic image-guided surgery systems. See the StealthStation™ system-level manuals and cranial procedure pocket guides for descriptions of patient groups, intended users, clinical benefits, side effects, and potential complications. This device is an accessory to your StealthStation™System.
Warnings Warning: Use caution and exercise care to prevent injury during use. See the corresponding system-level manuals and procedure pocket guides for further handling instructions. Warning: Prior to use, examine the device for damage or deterioration. If damaged or deteriorated, do not attempt to use the device and do not attempt to repair it.
Warning: The virtual “tip” of the Touch-n-Go probe is at the center of the 4.3 mm ball located at the end of the probe. Thus, the surface of the ball is offset approximately 2 mm from the center of the ball, and the center of the ball is the site identified on-screen during localization. For this reason, the Touch-n-Go probe is not recommended for navigational use apart from Touch-n-Go registration. If you decide to use the probe for navigation, you must keep the 2 mm offset in mind or risk inaccurate navigation. Warning: If you use the Touch-n-Go probe for navigation, visually confirm navigational accuracy frequently by touching the tip of the instrument on known anatomical points and confirming that the locations identified on the navigation images match the locations touched on the patient. Warning: Do not attempt to perform Touch-n-Go registration with any probe but the Touch-n-Go probe. Inaccurate navigation could result. Warning: The Touch-n-Go is provided in non-sterile condition. Properly sterilize the instrument before using it in a sterile environment. Warning: Remove and dispose of the sterile spheres before cleaning the Touch-n-Go probe. Warning: Prior to use, inspect the device for damage. Do not use the device if any part of it appears to be bent or otherwise damaged. Contact Medtronic Navigation. Warning: Do not attempt to alter the product. Only use the product in accordance with its labeling. Warning: Abandon use if damage or malfunction occurs during a procedure. Warning: Disengage all components before cleaning and sterilizing. Warning: To avoid potential exposure to blood-borne pathogens and chemicals, use appropriate Personal Protective Equipment when handling, processing, or disposing of Medtronic devices. Warning: Do not re-use or re-process a device where transmissible spongiform encephalopathy agents or Creutzfeldt-Jakob disease contamination is suspected or confirmed. Incinerate the potentially contaminated device according to national guidelines.
Precautions Caution: Federal law (U.S.A.) restricts this device to sale by or on the order of a physician. Caution: Touching the device to electrocautery may expose the user to harmful electrical current Caution: Refer to the StealthStationTM system-level manual and cranial procedure pocket guides for additional instructions, warnings, and cautions.
Installation The Touch-n-Go registration feature must be installed by a Medtronic Navigation Clinical Specialist (CS) or technical support representative before first use. Technical support can be reached at +1 800 595 9709 (inside the US only) or +1 720 890 3160.
Fiducial marker placement for cranial scans Skin fiducial markers are required for Touch-n-Go registration. Note: The following instructions apply to skin fiducial markers (960-991). If you are using a different kind of fiducial marker, follow these recommendations as well as any recommendations from the fiducial marker manufacturer. Although imaging may occur at any time prior to surgery, fiducial markers must remain fixed from the time of scanning until after registration in the navigation software. Instruct the patient not to remove or alter the position of the markers. If a marker falls off after the patient has been scanned, leave it off. Follow these best practices for fiducial marker placement for Touch-n-Go registration.
Good fiducial marker placement • Place 7 to 11 fiducial markers. • Distribute the fiducial markers around the patient’s head. • Choose locations where the skin is taut. Avoid areas with loose skin such as the cheeks and under the eyes. • Choose locations where the fiducial markers will not be depressed or shifted when the patient is lying in the scanner or when the patient is positioned for surgery. • The mastoid behind the ear is an ideal location for fiducial markers. Place the markers high enough on the mastoid that the scan will encompass them. • Place more fiducial markers near the surgical area of interest. • It may be helpful to place 2 markers near each other on one side of the head to help the surgeon confirm correct image orientation.
2
Examples of good fiducial marker placement
1
Good fiducial marker placement for anterior and lateral surgical approaches
2
Good fiducial marker placement for posterior surgical approaches
Poor fiducial marker placement • Do not place all fiducial markers in one concentrated location or on one side of the head.
• Do not place fiducial markers in a symmetrical pattern. That is, do not place markers in the same locations on both sides of the head. Also, do not place the markers such that they form squares or triangles with equal-length sides.
• Do not place fiducial markers in a repeating pattern.
3
• Do not place fiducial markers in a straight line.
Placing fiducial markers To place the fiducial markers on the patient: 1. Choose a site where the skin is taut. Shave a small patch of hair (approximately one inch square) at the site where you will place the fiducial marker. 2. Clean the site with alcohol to strengthen the marker’s adhesion to the skin. Allow the site to dry thoroughly. Note: If the patient is diaphoretic, you may wish to apply adhesive. 3. Remove the paper from the adhesive backing on the marker, and place the marker at the prepared site. Note: Make sure that the center dot is removed from the fiducial marker. 4. Mark the skin with an indelible ink pen through the hole in the center of the fiducial marker. 5. Place 7 to 11 markers in this manner. Distribute the markers around the patient’s head as described in the best practices for fiducial marker placement. 6. Ensure positioning in the scanner does not shift any of the fiducial markers. 7. Image the patient according to the appropriate protocol given in the Imaging Protocol (9732379).
Use 1. Place single-use sterile spheres on each of the Touch-n-Go probe stems. Push each sphere onto the stem until it clicks into place. 2. Use the Touch-n-Go probe to complete Touch-n-Go registration, as described in the applicable Cranial software pocket guide. Before you begin a registration, verify that the 3D model accurately represents the patient and that all of the fiducial markers are clearly visible. If the 3D model contains artifacts or scatter, edit the model to make it as smooth and accurate as possible. If you edit the skin model after registration, the software deletes the registration. 3. Use a different tracked tool to verify registration accuracy by localizing on known anatomical points.
Cleaning, inspection and sterilization Before cleaning and sterilizing the Touch-n-Go probe, remove and properly dispose of all sterile spheres. Caution: Because of the variability in cleaning efficiencies and sterilizer operating parameters, all given parameters (temperature, time, etc.) should be validated by persons who have training and expertise in sterilization processes. Deviation from the recommended sterilization processes is at the risk of the user facility. Limitations on reprocessing
End of useful life is normally determined by wear and damage due to use. See the “Maintenance Inspection Testing” section in this document to determine if the device is at the end of its useful life. Caution: At the end of its useful life, dispose of the device in accordance with national regulations.
Instructions Point of use
Do not allow blood, debris or bodily fluids to dry on the device. Remove excess soil using running, cold tap water.
Containment and transportation
Caution: Devices should be cleaned within 30 minutes of use to limit fixation of contaminants. If the device cannot be reprocessed immediately, keep the device moist during transport. Tap water is defined as utility water with a hardness of < 150 mg/l. To prolong the life of the device, reprocess immediately after use.
4
Preparation for cleaning
Disengage all components. Before the cleaning step, thoroughly rinse the device under running cold tap water at a temperature of 10-22°C (50-72°F) to remove any visible soil. Use a soft-bristled brush or clean cloth to aid soil removal. Give particular attention to crevices and other areas that present a challenge to cleaning. Carefully inspect devices, including any lumens and cavities, to ensure all visible soil is removed.
Automated cleaning
Transfer the devices to the washer and select the instrument cycle. Ensure the following set of cycle parameters are properly programmed. Note: Cycle validated using Steris Prolystica 2x Concentrate Enzymatic Cleaner and Steris Prolystica 2x Concentrate Neutral Detergent at a concentration of 1.0ml/L (1/8 oz/gal). Phase
Recirculation/ Soak (minutes)
Water Temperature
Detergent Type
Prewash 1
02:00
Cold tap water 10-16°C (50-61°F)
N/A
Enzyme Wash
02:00
Hot tap water 43-55°C (109-131°F)
Neutral pH enzymatic cleaner.
Wash 1
02:00
66°C (151°F) (setpoint)
Neutral pH detergent
Rinse 1
00:15
Hot tap water 43-60°C (109-140°F)
N/A
Thermal Rinse
01:00
90°C (194°F) (setpoint)
N/A
Purified Water Rinse
00:10
66°C (151°F) (setpoint)
N/A
Warning: After cleaning, visually examine all parts of the device for cleanliness. If visible soil remains, repeat cleaning. Drying
If necessary, dry the device with a clean, lint-free towel.
Maintenance inspection testing
Visually inspect the device before each use for obvious damage or corrosion to ensure it is not pitted, fractured, bent, loose, or otherwise damaged. Make sure of the following: • Laser etchings, engravings, and other markings are legible. • No cracks are present on any part of the device. • Discoloration, corrosion, stains or rust are not present. If so, attempt to clean using the cleaning instructions provided in this document. If reprocessing does not remove the corrosion, stains, or rust, the device is at the end of its useful life. • That the handle-to-shaft connection is secure. • There is no damage to the working ends or tips. The working end should be free from cracks, sharp-edged gouges, and other damage. • There is no damage to the threads. • All parts are present and free of damage and deterioration. • Mating ends are free of damage (nicks, gouges, bends, etc.) that would interfere with the mating function. A device that shows or exhibits properties listed above is at the end of its useful life. Dispose of the device according to national regulations. Warning: Do not reprocess for surgical use a device that has obvious damage or corrosion.
Packaging
Sterilize this device in a sterilization container with SCF01 paper filters. Caution: The device sterilization tray is to be used only for sterilization, not for cleaning.
5
Sterilization
Caution: Device cannot be sterilized to an adequate Sterility Assurance Level without prior cleaning. Use a prevacuum steam sterilization cycle with these parameters to sterilize the device. Sterilization cycle parameters for medical facilities inside the U.S.A. • Temperature: 132°C (270°F) • Exposure Time: 4 minutes (04:00) • Minimum Dry Time: 30 minutes (30:00) Sterilization cycle parameters for medical facilities outside the U.S.A. Option A • Exposure: Prevacuum • Temperature: 132°C (270°F) • Exposure Time: 4 minutes (04:00) • Minimum Dry Time*: 30 minutes (30:00) Option B • Exposure: Prevacuum • Temperature: 134°C (273°F) • Exposure Time: 18 minutes (18:00) • Minimum Dry Time*: 30 minutes (30:00) * The time required to dry the device may vary with environmental conditions. Note: Steam for sterilization should be generated from water that has been treated to remove total dissolved solids, filtered to remove contaminants and water droplets, and supplied via piping without deadlegs or other stagnant zones where contamination might collect. Steam saturation should be greater than 97%.
Storage
Ensure instruments and sterile packaging are dry before storing. Store in dry, clean conditions at ambient room temperature such that the package is not compromised.
Sterile spheres During a surgical procedure, a sterile sphere may become coated with fluid or debris, hindering its ability to reflect light. If this occurs, wipe away the debris with a soft, sterile cloth (the cloth may be wet, but make sure to dry the sphere thoroughly). Keep extra sterile spheres available as replacements during a case. Sterile spheres are pre-sterilized, single-use components.Remove and properly dispose of all sterile spheres. Warning: Do not reprocess, resterilize, or reuse any single-use device. Attempts to reprocess or resterilize a single-use device may be ineffective and may compromise its structural integrity. Any reuse creates a risk of contamination which could result in patient injury, illness, or death.
Disposal Dispose contaminated devices according with your facility’s procedure for medical devices and national regulations.
Contact information If a serious incident occurs in relation to the use of this device, report it to Medtronic Navigation. If a serious incident occurs in the European Union, also report it to the competent authority in the Member State where the incident occurred.
Assistance For questions about this device or for return shipping instructions, contact your local Medtronic Navigation representative or call technical support at +1 800 595 9709 (inside the US only) or +1 720 890 3160.
Symbol definitions The following symbols may appear on the device packaging: Caution: Federal law (U.S.A.) restricts this device to sale by or on the order of a physician. Medical device.
6
2023-08 9732177 G03 Revision A ©2023 Medtronic Navigation, Inc. All Rights Reserved
Medtronic Navigation, Inc. 826 Coal Creek Circle Louisville, Colorado 80027 USA Main 720 890 3200 Fax 720 890 3500 www.medtronic.com Technical Support USA 1 800 595 9709 International 1 720 890 3160 [email protected]
Medtronic B.V. Earl Bakkenstraat 10 6422 PJ Heerlen The Netherlands Telephone 31 45 566 80 00 Australia Medtronic Australasia Pty Ltd 2 Alma Road Macquarie Park, NSW 2113 1800 668 670 Printed in the USA
ȤŋȦƮƛŭƮŵťŭŋȯʼnĖĉĚąǙȥ