Natus Medical Incorporated
Natus Newborn Hearing Screeners
echo-screen AABR Technology Quick Reference Guide
Quick Reference Guide
2 Pages

Preview
Page 1
QUICK REFERENCE GUIDE AABR® TECHNOLOGY control panel & functions
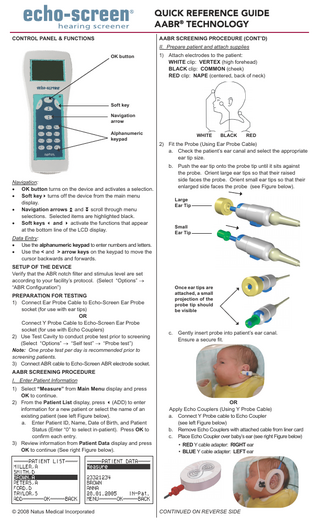
AABR screening procedure (cont’d) II. Prepare patient and attach supplies OK button
1) Attach electrodes to the patient: WHITE clip: VERTEX (high forehead) BLACK clip: COMMON (cheek) RED clip: NAPE (centered, back of neck)
Soft key Navigation arrow Alphanumeric keypad
Navigation: • OK button turns on the device and activates a selection. • Soft keyturns off the device from the main menu display. • Navigation arrows and scroll through menu selections. Selected items are highlighted black. • Soft keys and activate the functions that appear at the bottom line of the LCD display.
WHITE
RED
2) Fit the Probe (Using Ear Probe Cable) a. Check the patient’s ear canal and select the appropriate ear tip size. b. Push the ear tip onto the probe tip until it sits against the probe. Orient large ear tips so that their raised side faces the probe. Orient small ear tips so that their enlarged side faces the probe (see Figure below). Large Ear Tip
Small Ear Tip
Data Entry: • Use the alphanumeric keypad to enter numbers and letters. • Use the < and > arrow keys on the keypad to move the cursor backwards and forwards. SETUP OF THE DEVICE Verify that the ABR notch filter and stimulus level are set according to your facility’s protocol. (Select “Options” → “ABR Configuration”) preparation for testing 1) Connect Ear Probe Cable to Echo-Screen Ear Probe socket (for use with ear tips) OR Connect Y Probe Cable to Echo-Screen Ear Probe socket (for use with Echo Couplers) 2) Use Test Cavity to conduct probe test prior to screening (Select “Options” → “Self test” → “Probe test”) Note: One probe test per day is recommended prior to screening patients. 3) Connect ABR cable to Echo-Screen ABR electrode socket.
BLACK
Once ear tips are attached, a small projection of the probe tip should be visible
c.
Gently insert probe into patient’s ear canal. Ensure a secure fit.
AABR screening procedure I. Enter Patient Information 1) Select “Measure” from Main Menu display and press OK to continue. 2) From the Patient List display, press (ADD) to enter information for a new patient or select the name of an existing patient (see left Figure below). a. Enter Patient ID, Name, Date of Birth, and Patient Status (Enter “0” to select in-patient). Press OK to confirm each entry. 3) Review information from Patient Data display and press OK to continue (See right Figure below).
© 2008 Natus Medical Incorporated
OR Apply Echo Couplers (Using Y Probe Cable) a. Connect Y Probe cable to Echo Coupler (see left Figure below) b. Remove Echo Couplers with attached cable from liner card c. Place Echo Coupler over baby’s ear (see right Figure below) • RED Y cable adapter: RIGHT ear • BLUE Y cable adapter: LEFT ear
CONTINUED ON REVERSE SIDE
QUICK REFERENCE GUIDE AABR® TECHNOLOGY AABR Screening Procedure (cont’d) III. Start Screening/Monitor Progress 1) Select “ABR” from Measure display and press OK to continue (See Figure below).
a. AABR testing with Ear Probe Cable (ear tips): • Select “Comments” to enter additional information regarding the screen and press OK (See left Figure below). Add a new comment or select a default comment. • Select the ear to be tested (Right or Left) and press OK to start the test (See left Figure below). Note: An impedance check is automatically conducted prior to testing (See right Figure below). Press OK to begin testing.
3) At the completion of the test, a PASS or REFER result automatically displays (See Figure below).
a. Press OK to test another ear or to view, print, and transfer results. printing results via infrared (wireless) 1) Select “Print results” from the Main Menu display (See left Figure below). 2) From the Patient List display, select the patient whose results are to be printed (See right Figure below). Press OK to continue.
3) Select “Print menu” from the Patient Data display (See left Figure below). Press OK to continue. b. AABR testing with Y Probe Cable (Echo Couplers): • Select “Comments” to enter additional information regarding the screen and press OK (See left Figure below). Add a new comment or select a default comment. • Select method for testing ears (Right & Left Sequential or Single ear testing) and press OK to continue. (See left Figure below).
4) Turn on the Seiko label printer. 5) Point the printer’s IR dongle toward the IR window of Echo-Screen device (6 inches/15 cm distance). 6) Select the type of printout from the Print Results menu and press OK to continue. (See right Figure below).
Note: An impedance check is automatically conducted prior to testing (See right Figure below). Press OK to begin testing.
7) Select the result(s) to be printed from the Results menu and press OK to print.
NOTE: Vertex (White) and Nape (Red) impedances must be below 12,000 Ohms for testing to proceed. Balance impedance must be below 4,000 Ohms for testing to proceed. 2) As testing proceeds, the status is indicated on the display (See Figure below). a. Time = screen duration ABR = probability of detecting an ABR signal EEG = amplitude of total registered potential. b. Press to pause the test or to cancel the test.
Distributed by: Natus Medical Incorporated 1501 Industrial Road San Carlos, CA 94070 • USA Phone: +1 650-802-0400 • Fax: +1 650-802-0401 Email: [email protected] • www.natus.com Manufactured by: Natus Europe GmbH Bärmannstrasse 38 D-81245 München Germany
P/N 051611C