NSK NAKANISHI
Handpiece Maintenance & Infection Control Guide Ver 3
Guide
2 Pages

Preview
Page 1
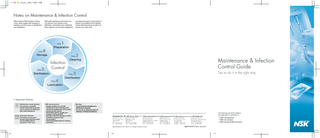
Notes on Maintenance & Infection Control are being imposed in recent years to prevent your patients from infection during dental practices as well as to protect your clinic staff.
With well-maintained instruments you can perform your practice more efficiently, comfortably and confidently. More hygienic and proactive obligations
NSK presents NSK Infection Control Cycle, which begins with cleaning or washing, and then goes on disinfection and sterilisation.
Step
1
Preparation Step
6
Storage
Step
Step
Infection Control
5
Sterilisation
4
Maintenance & Infection Control Guide
Cleaning
Step
Step
2
Tips to do it in the right way
3
Disinfection
Lubrication
• Important Notices Disinfection-ready Symbol
NSK recommends :
Warning :
This symbol on your NSK product means that the product can be cleaned and disinfected with a thermodisinfector.
· Visually checking out your NSK instruments for any loosening and/or damage immediately after each practice. · Using protective clothing (tear-resistant gloves, goggles and possibly mouth protection). · Adhering to directions described in NSK's operating manual and other documentation. · Using demineralised water for washing instruments.
· Do not immerse handpieces in disinfectant solutions. · Do not use an ultrasonic bath for cleaning / washing handpieces.
Autoclave Symbol This symbol on your NSK product means that the product can be sterilised with an autoclave at 135˚C max.
The following recommendations are applicable in particular to:
• NSK Handpieces • NSK Air Scalers • NSK Surgical Micromotors PR-D337E Ver.3 08.04.05.A
P4
H4
H1
Air Turbine, Contra Angle & Straight Handpieces 1 PREPARATION 1
2 CLEANING 2
3 DISINFECTION 3
1 PREPARATION 1
2 CLEANING 2
3 3 DISINFECTION
1 PREPARATION 1
2 2 CLEANING
3 3 DISINFECTION
6 STORAGE 6
5 STERILISATION 5
4 LUBRICATION 4
6 STORAGE 6
5 5 STERILISATION
4 LUBRICATION 4
6 6 STORAGE
5 5 STERILISATION
4 LUBRICATION 4
1. PREPARATION
Contra Angle : Remove the contra angle from the motor and detach the bur from the chuck. Air Turbine : Remove the air turbine from the coupling joint and detach the bur from the chuck. Bring handpieces to a well-prepared cleaning room without contamination. Remove organic contaminants with a paper wipe.
2. CLEANING
Manual : Clean the external surface of handpiece with running water (<38˚C, demineralised water recommended). Automated NSK handpieces with this symbol are the thermodisinfector-ready and may be washed and disinfected by using a thermodisinfector. When using a thermodisinfector, be sure to follow its manufacturer's instructions.
3. DISINFECTION
Manual : Wipe the external surface of handpiece carefully with cleaning or disinfectant solution. Automated
4. LUBRICATION
· Essential after every thermodisinfection process · Essential prior to sterilisation process Manual : Lubricate handpiece by using NSK Pana Spray Plus / Pana Spray. To prevent mist spray from escaping into the environment, use absorbent cloth. Expel excess lubrication. Automated : Clean and lubricate handpieces with NSK Care3 Plus. Be sure to use a right adaptor for each handpiece.
1. PREPARATION
Remove the air scaler from the coupling joint and detach the tip. Bring air scalers to a well-prepared cleaning room without contamination. Remove organic contaminants with a paper wipe.
1. PREPARATION
Attach an autoclave plug to the micromotor. *Do not disconnect the motor cord from the micromotor.
2. CLEANING
Manual : Clean the external surface of air scaler with running water (<38˚C, demineralised water recommended). Automated NSK air scalers with this symbol are the thermodisinfector-ready and may be washed and disinfected by using a thermodisinfector. When using a thermodisinfector, be sure to follow its manufacturer's instructions.
2. CLEANING
Manual : Clean the external surface of micromotor with running water (<38˚C, demineralised water recommended).
3. DISINFECTION
Manual : Wipe the external surface of micromotor with cleaning or disinfectant solution.
3. DISINFECTION
Manual : Wipe the external surface of air scaler with cleaning or alcohol for disinfection. Automated
4. LUBRICATION
The NSK surgical micromotor series is maintenance-free. Do not lubricate micromotors.
4. LUBRICATION
· Essential after every thermodisinfection process · Essential prior to each sterilisation process Manual : Supply 1-2 drops of NSK Turbine Oil to the drive air port of the air scalers. Connect to the coupling joint and operate for 5 seconds. Note : Excessive oil may cause unstable motion. Please consult the operating manual before use.
holding time) at 134˚C or 15 minutes (minimum holding time) at 121˚C. NSK recommends Class B or S sterilisation. (All NSK micromotors are autoclavable at 135˚C Max.)
6. STORAGE
holding time) at 134˚C or 15 minutes (minimum holding time) at 121˚C. NSK recommends Class B or S sterilisation. (All NSK air scalers are autoclavable at 135˚C Max.)
holding time) at 134˚C or 15 minutes (minimum holding time) at 121˚C. NSK recommends Class B or S sterilisation. (All NSK handpieces are autoclavable at 135˚C Max.)
6. STORAGE
5. STERILISATION Place micromotors in a sterilisation pouch and seal them. EN13060 4.6.3 recommends autoclaving for 3 minutes (minimum
5. STERILISATION Place air scalers in a sterilisation pouch and seal them. EN13060 4.6.3 recommends autoclaving for 3 minutes (minimum
5. STERILISATION Place handpieces in a sterilisation pouch and seal them. EN13060 4.6.3 recommends autoclaving for 3 minutes (minimum
P1
Surgical Micromotors
Air Scalers
6. STORAGE
Immediately after a sterilisation cycle, remove handpieces from the autoclave. Keep them in a dust-free sterilised storage or bring them to a treatment room for use.
P2
Immediately after a sterilisation cycle, remove air scalers from the autoclave. Keep them in a dust-free sterilised storage or bring them to a treatment room for use.
P3
Immediately after a sterilisation cycle, remove micromotors from the autoclave. Keep them in a dust-free sterilised storage or bring them to a treatment room for use.