2 Pages

Preview
Page 1
Endodontic Contra Angle Handpiece Titanium Body
: AUTOCLAVABLE
OPERATION MANUAL
OM-C0332E
The EU directive 93/42/EEC was applied in the design and production of this medical device. Please read this Operation Manual carefully and file for future reference.
Caution • When operating the handpiece always consider the safety of the patient. • The handpiece is designed only for dental clinical use. • Check the vibration, noise and overheating outside the patient's oral cavity before use. If any abnormalities are found, stop using immediately and contact your dealer. • Do not connect or disconnect the handpiece until the drive motor has completely stopped. • Do not attempt to disassemble the handpiece nor tamper with the mechanism. • Should the handpiece function abnormally, cease operation immediately and return the handpiece to the dealer for repair. • Make sure not to push the push button to prevent a chuck from causing a malfunction during rotation. • Do not drop the handpiece. • Do not exceed drive motor speed, refer to 1. Specification's Allowable Max. Speed. Do not exceed the rotating speed recommended by a file manufacturer. • Do not use the shank type of files unspecified in ISO 1797-1. • Ti-ENDO is made for Ni-Ti file. Make sure to use Ni-Ti file. • Do not use bent, damaged, or sub-standard files. The shank could be bent or broken even within the recommended speed. • Always keep the file shank clean. Entry of debris into the chuck could cause file run-out, looseness and the file could not be mounted inmost. • Use a file per patient or change the file after using several times. Excessive use of a file may cause metal fatigue and the break of it. • Be sure to supply Pana Spray Plus after use and/or before autoclaving. Failure to lubricate may cause torque fluctuations. • Do not wipe with, or clean or immerse in, high acid water or sterilizing solutions. • A torque card is included in the package. Refer to this card to find the appropriate value of the torque in use.
1. Specifications Ti-ENDO 40,000min-1 Ultra Push Micro Motor Ni-Ti Files 128:1 Reduction
Model Allowable Max. Speed Chuck Type Motor File Gear Ratio
2. Connecting / Disconnecting the motor and the handpiece To connect the motor and the handpiece, align the positioning marks of the motor and the handpiece, and insert straightly. To disconnect, hold the front part of the motor and the back part of the handpiece, and pull out straightly.
Caution Do not connect or disconnect the handpiece until the motor has completely stopped.
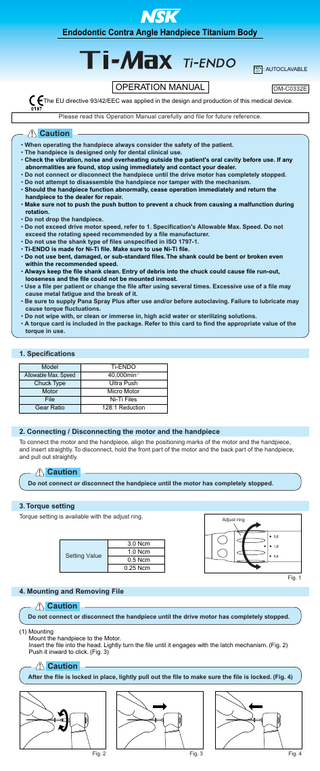
3. Torque setting Torque setting is available with the adjust ring.
Setting Value
Adjust ring
3.0 Ncm 1.0 Ncm 0.5 Ncm 0.25 Ncm Fig. 1
4. Mounting and Removing File
Caution Do not connect or disconnect the handpiece until the drive motor has completely stopped. (1) Mounting Mount the handpiece to the Motor. Insert the file into the head. Lightly turn the file until it engages with the latch mechanism. (Fig. 2) Push it inward to click. (Fig. 3)
Caution After the file is locked in place, lightly pull out the file to make sure the file is locked. (Fig. 4)
Fig. 2
Fig. 3
Fig. 4
(2) Removal Push the push button with a thumb, and the file is removed. (Fig. 5)
Fig. 5
5. Lubrication Supply PANA SPRAY Plus and/or Care3 Plus after each use and/or before each autoclaving. NSK Care3 Plus automatic handpiece lubrication system After cleaning the handpiece simply connect the handpiece to the correct adaptor and activate the Care3 System per the Care3 System instructions. Manual lubrication (Fig. 6) 1 Push E-type spray nozzle attachment over the PANA SPRAY nozzle until it firmly seats. 2 Shake the can 3-4 times to well mix lubricant and propellant. 3 Insert the E-type spray nozzle in the rear of the handpiece and spray for approximately 2-3 seconds
until the oil comes out of the handpiece head.
E-type Spray Nozzle
Handpiece
PANA SPRAY Plus
PANA SPRAY Plus
Fig. 6
Caution • Be sure to hold the handpiece firmly to prevent the handpiece from slipping out of hand by the spray pressure when lubricating. • Supply lubricant until it comes out of the handpiece head (for approx. 2 seconds). • Hold the PANA SPRAY can upright.
6. Cleaning and Sterilization This handpiece can be washed via Thermo Disinfector. Steam autoclave is recommended. Sterilization required after each patient as noted below. Autoclave Procedure : 1 Scrub dirt and debris from the handpiece, and wipe clean with alcohol-immersed cotton swab or cloth. Do not use a wire brush. 2 Lubricate with PANA SPRAY Plus. Refer to 5. Lubrication. 3 Insert into an autoclave pouch. Seal the pouch. 4 Autoclavable up to a max. 135˚C. ex.) Autoclave for 20 min. at 121˚C, or 15 min. at 132˚C. 5 Keep the handpiece in the autoclave pouch to keep it clean until you use it. Sterilization at 121˚C for more than 15 minutes is recommended by EN13060 or EN554. Performing sterilization according to our instruction has minimal effect on the instruments. Life span is generally determined by wear and damage due to use.
Caution • In case the sterilizer chamber temperature could exceed 135˚C during the dry cycle, skip the dry cycle. • Always place the handpiece in the center or upper shelf of the chamber, as the local temperature at the bottom of chamber could rise beyond the set value.