2 Pages

Preview
Page 1
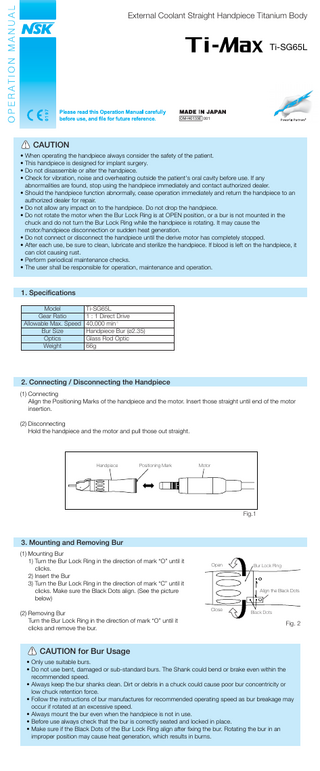
External Coolant Straight Handpiece Titanium Body
Ti-SG65L
OM-H0133E 001
CAUTION • When operating the handpiece always consider the safety of the patient. • This handpiece is designed for implant surgery. • Do not disassemble or alter the handpiece. • Check for vibration, noise and overheating outside the patient's oral cavity before use. If any abnormalities are found, stop using the handpiece immediately and contact authorized dealer. • Should the handpiece function abnormally, cease operation immediately and return the handpiece to an authorized dealer for repair. • Do not allow any impact on to the handpiece. Do not drop the handpiece. • Do not rotate the motor when the Bur Lock Ring is at OPEN position, or a bur is not mounted in the chuck and do not turn the Bur Lock Ring while the handpiece is rotating. It may cause the motor/handpiece disconnection or sudden heat generation. • Do not connect or disconnect the handpiece until the derive motor has completely stopped. • After each use, be sure to clean, lubricate and sterilize the handpiece. If blood is left on the handpiece, it can clot causing rust. • Perform periodical maintenance checks. • The user shall be responsible for operation, maintenance and operation.
1. Specifications Model Gear Ratio Allowable Max. Speed Bur Size Optics Weight
Ti-SG65L 1 : 1 Direct Drive 40,000 min-1 Handpiece Bur (ø2.35) Glass Rod Optic 66g
2. Connecting / Disconnecting the Handpiece (1) Connecting Align the Positioning Marks of the handpiece and the motor. Insert those straight until end of the motor insertion. (2) Disconnecting Hold the handpiece and the motor and pull those out straight.
Handpiece
Positioning Mark
Motor
Fig.1
3. Mounting and Removing Bur (1) Mounting Bur 1) Turn the Bur Lock Ring in the direction of mark “O” until it clicks. 2) Insert the Bur 3) Turn the Bur Lock Ring in the direction of mark “C” until it clicks. Make sure the Black Dots align. (See the picture below) (2) Removing Bur Turn the Bur Lock Ring in the direction of mark “O” until it clicks and remove the bur.
Open
Bur Lock Ring
Align the Black Dots
Close
Black Dots
Fig. 2
CAUTION for Bur Usage • Only use suitable burs. • Do not use bent, damaged or sub-standard burs. The Shank could bend or brake even within the recommended speed. • Always keep the bur shanks clean. Dirt or debris in a chuck could cause poor bur concentricity or low chuck retention force. • Follow the instructions of bur manufactures for recommended operating speed as bur breakage may occur if rotated at an excessive speed. • Always mount the bur even when the handpiece is not in use. • Before use always check that the bur is correctly seated and locked in place. • Make sure if the Black Dots of the Bur Lock Ring align after fixing the bur. Rotating the bur in an improper position may cause heat generation, which results in burns.
4. External Irrigation Nozzle Connect the Irrigation Tube to the External Irrigation Nozzle firmly. External Irrigation Nozzle
Irrigation Tube
Fig. 3
5. Maintenance
CAUTION After each patient, be sure to keep the handpiece after cleaning, lubrication, and sterilization. If the blood is left on the handpiece, it can be clotted causing rusty. (1) Cleaning Clean the External Irrigation Nozzle inside with clean water. (2) Lubrication 1) Push E-type spray nozzle attachment over the PANA SPRAY Plus / PANA SPRAY nozzle until it firmly seats. 2) Shake the can 3-4 times to well mix lubricant and propellant. 3) Insert the E-type spray nozzle in the rear of the handpiece and spray the lubricant into the handpiece 2-3 times for 2-3 seconds each time. Repeat this lubrication until you see no foreign articles such as blood penetrated into the handpiece comes out.
E-type Spray Nozzle
PANA SPRAY Plus / PANA SPRAY
Handpiece
PANA SPRAY Plus / PANA SPRAY
Fig. 4
CAUTION • Be sure to hold the handpiece firmly to prevent the handpiece from slipping out of hand by the spray pressure when lubricating. • Supply lubricant until it comes out of the handpiece head (for approx. 2 seconds). • Hold the spray can upright. (3) Sterilization This handpiece can be washed via Thermo Disinfector. Steam autoclave is recommended. Sterilization is required first time you use and after each patient as noted below. Autoclave Procedure 1) Clean the External Irrigation Nozzle. (Refer to 5. (1) Cleaning) 2) Cleaning, or wipe off the handpiece with the medicated solution (alcohol etc.). 3) Lubricate with Lubricant spray. (Refer to 5. (2) Lubrication) 4) Insert into an autoclave pouch. Seal the pouch. 5) Autoclavable up to max. 135˚C. Ex.) Autoclave for 20 min. at 121˚C or 15 min. at 132˚C. 6) Keep the handpiece in the autoclave pouch to keep it clean until you use. Sterilization at 121˚C for more than 15 minutes is recommended by EN13060 or EN554.
CAUTION Do not soak the handpiece with/in potentially oxidizing solutions (strong acid, superacid solution), sterilizing solution, or medicated solutions.
6. Cleaning the Glass Rod Optic Clean the glass rod optic with cotton swab soaked in alcohol.
Glass Rod Optic
CAUTION Do not use a sharp tool to clean the glass rod optic. It could damage the glass rod optic and decrease the light transmission. If it becomes dim, contact your dealer.
Cotton Swab
Fig. 5
’09.05.005 M