Setup Guide
8 Pages

Preview
Page 1
PiCCO plus
Setup
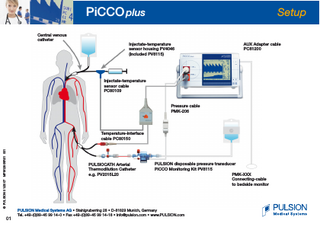
Central venous catheter Injectate-temperature sensor housing PV4046 (included PV8115)
AUX Adapter cable PC81200
Injectate-temperature sensor cable PC80109
Pressure cable PMK-206
© PULSION 01/2007 MPI812905R01 001
Temperature-interface cable PC80150
PULSIOCATH Arterial Thermodilution Catheter e.g. PV2015L20
01
PULSION disposable pressure transducer PiCCO Monitoring Kit PV8115 PMK-XXX Connecting-cable to bedside monitor
PULSION Medical Systems AG • Stahlgruberring 28 • D-81829 Munich, Germany Tel. +49-(0)89-45 99 14-0 • Fax +49-(0)89-45 99 14-18 • info@pulsion.com • www.PULSION.com
PiCCO plus 1
Choose Yes for a new patient, old data will be deleted, modify with
2
Confirm with
3
Enter patient ID number, height and weight of the patient For safety reasons, change of the ID number will delete stored data
Patient Admission
1
2
Arterial catheter will be detected automatically
4
The minimal required injectate volume is given in ( )
3
15 ml iced NaCl 0,9 % as the default setting for adult patients
02
4
Enter CVP
5
5
Upper / lower limit of the display range of PCCO
6
6
Upper / lower warning limits for range of PCCO
<24°C = room tempered injectate; <8°C = iced injectate
PiCCO plus 1
Open transducer to the atmosphere
2
Press zero button
Zero Adjustment
Perform Zero Adjustment first on PiCCO plus then on bedside monitor 3
Confirm with
2
1
3
After pressing AP Correction Screen appears, default setting should be <0>. (Difference in level of pressure transducer and patients heart can be corrected.)
03
4
Thermodilution Screen
5
Configuration Screen
6
Input Screen
7
Pulse-Contour Screen
8
Pressure-Zeroing Screen
4
5
6
7
8
Dräger Infinity PiCCO plus PiCCO SmartPod ®
™
Configuration
* For safety reasons, modification of date or time will delete patient related data Press to Configuration Screen and choose <individual> to access the Configure Display and select the most important PiCCO parameters Basic setup: Can not be changed and displays most common parameters as default Individual: User can configure own parameter selection
04
PiCCO plus Press
to Thermodilution Screen
1
Press
to perform a measurement
2
Wait until <STABLE> appears
3
Perform a rapid and smooth injection
Thermodilution
2 1
3
05
PiCCO plus 1
Press
Thermodilution II
for further measurements
Perform initially 3 thermodilution measurements In case of ELWI >10m l/kg it is recommended to use iced injectate for further measurements **If ΔT < 0,15°C, it may be necessary to use more and / or colder injectate. Select “injectate temperature <8°C” in the Input Screen 2
Deviating measurements (“?” next to value) should be deleted Press
06
to change to Info Screen
1
2
PiCCO plus
Calibrate
1
Deviating measurements should be selected with and by pressing once. Selected Thermodilution Curve To delete this measurement press again
, confirm is displayed.
It is only possible to delete the current measurements under the dashed line 1
07
The mean results of the Thermodilution measurements of the last 10 minutes automatically calibrate the continuous cardiac output
PiCCO plus CI = Cardiac Index GEF = Global Ejection Fraction *GEDI or ITBI = Global End-Diastolic Volume Index or Intrathoracic Blood Volume Index ELWI = Extravascular Lung Water Index PCCI = Pulse Contour Cardiac Index 1
Continuous Cardiac Output
2
SVV = Stroke Volume Variation
3
Press
4
The display range of PCCI can be changed in the Input Screen
5
NB: Values can be displayed as either indexed or absolute values by pressing
Parameters Thermodilution results
1 2 5
to display arterial pressure curve
*parameter selection in
Continuous results
4
5 08
3