Quick Guide
2 Pages
Preview
Page 1
QIAsymphony® SP/AS - Quick Guide Maintenance O-Ring Change Take Off the Tip-Adapter O-Ring
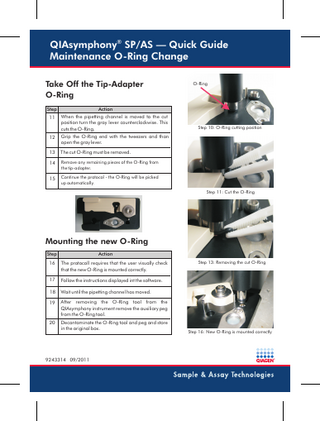
O-Ring
Action
Step
11
When the pipetting channel is moved to the cut position turn the gray lever counterclockwise. This cuts the O-Ring.
12
Grip the O-Ring end with the tweezers and than open the gray lever.
13
The cut O-Ring must be removed.
14
Remove any remaining pieces of the O-Ring from the tip-adapter.
15
Continue the protocol - the O-Ring will be picked up automatically.
Step 10: O-Ring cutting position
Step 11: Cut the O-Ring
Mounting the new O-Ring Action
Step
16
The protocoll requires that the user visually check that the new O-Ring is mounted correctly.
17
Follow the instructions displayed int the software.
18
Wait until the pipetting channel has moved.
19
After removing the O-Ring tool from the QIAsymphony instrument remove the auxiliary peg from the O-Ring tool.
20
Decontaminate the O-Ring tool and peg and store in the original box.
9243314 09/2011
Step 13: Removing the cut O-Ring
Step 16: New O-Ring is mounted correctly
®
QIAsymphony® SP/AS - Quick Guide Maintenance O-Ring Change Preparing the new O-Ring using the Tip Adapter Before removing the old O-Ring, the new O-Ring must be pepared. These steps should be performed for both the QIAsymphony SP and AS instruments. Action
Step
1
Slide the new O-Ring over the small end of the peg
2
Push the gray lever all the way to the black stop and insert the small end of the peg into the hole between the stop and the lever.
3
Press the peg down using the one end of the tweezers until the O-Ring slides up to the larger end of the peg.
4
Open the gray lever.
5
Insert the peg small end first into the hole as shown in the picture .
Step 1: Preparation of the new O-Ring
Step 2: Insert the peg into the opening
Note: Do not start an inventory scan during the protocol run. When the inventory scan message appears, press "No, nothing changed".
O-Ring Tool Change Procedure - Software Supported Action
Step
6
In the “Main Menu” screen, press “Service SP ” or “Service AS”.
7
Select the service script: “ChangePipettingChannelORing.lua”.
8
Press “Start”.
9
Follow the instructions displayed in the Service touchscreen. Place the O-Ring tool in the position given in the software message.
10
During this procedure the pipetting channel will move to the cut position.
Step 3: Slide the O-Ring to the larger end
Step 5: Insert the peg with new O-Ring
®