Radi Medical Systems
Coronary Pressure Measurement Monitors
RadiAnalyzer Xpress Quick Guide Rev 04 July 2008
Quick Guide
2 Pages

Preview
Page 1
QUICK GUIDE 1.
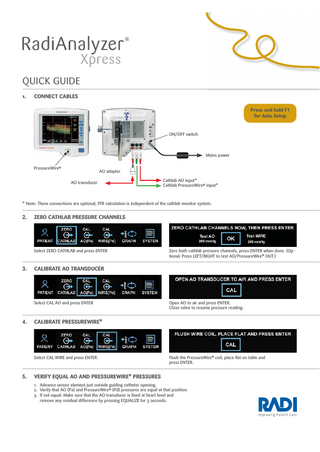
CONNECT CABLES Press and hold F1 for Auto Setup
ON/OFF switch
Mains power PressureWire®
AO adapter AO transducer
Cathlab AO input* Cathlab PressureWire® input*
* Note: These connections are optional, FFR calculation is independent of the cathlab monitor system.
2.
ZERO CATHLAB PRESSURE CHANNELS
Select ZERO CATHLAB and press ENTER
3.
CALIBRATE AO TRANSDUCER
Select CAL AO and press ENTER
4.
Open AO to air and press ENTER. Close valve to resume pressure reading.
CALIBRATE PRESSUREWIRE®
Select CAL WIRE and press ENTER.
5.
Zero both cathlab pressure channels, press ENTER when done. (Optional: Press LEFT/RIGHT to test AO/PressureWire® OUT.)
Flush the PressureWire® coil, place flat on table and press ENTER.
VERIFY EQUAL AO AND PRESSUREWIRE® PRESSURES 1. Advance sensor element just outside guiding catheter opening. 2. Verify that AO (Pa) and PressureWire® (Pd) pressures are equal at that position. 3. If not equal: Make sure that the AO transducer is fixed at heart level and remove any residual difference by pressing EQUALIZE for 3 seconds.
6.
RECORD AND CALCULATE FFR.
7.
USE CURSOR TO ANALYZE RECORDING
Select CURSOR and press ENTER.
8.
FFRmyo = Pd Pa (at maximum hyperemia) 1)
1. Advance sensor element distal to the stenosis of interest. 2. Wait for stable baseline pressure values. 3. Use cathlab standard routines to induce maximum hyperemia. 4. Press REC to start recording. 5. When maximum hyperemia is reached, press STOP/VIEW to stop recording. (The instrument then calculates FFR automatically.)
Move cursor with LEFT and RIGHT buttons. Press ENTER so save new position and leave menu. Press ESC to leave without saving position.
AFTER PROCEDURE – VERIFY EQUAL AO AND PRESSUREWIRE® PRESSURES 1. Withdraw PressureWire® so that the pressure element is just outside the guiding catheter opening. 2. Verify that AO (Pa) and PressureWire® (Pd) pressures are equal (difference < 5 mmHg) at that position.
REVIEW PREVIOUS RECORDINGS
Press STOP/VIEW. Select LIBRARY and press ENTER.
Browse through recordings using PREV and NEXT. Select PRINT to print recording (optional). Select PC to send recording to PC (optional).
USING THE AUTO SETUP SEQUENCE If auto setup is enabled, the user is automatically guided through the zeroing and calibration process (step 2-4) when the instrument is turned on. The auto setup function is enabled in the SYSTEM/OPTIONS menu. The auto setup guide can be reactivated from the MAIN menu by pressing F1 for 2 seconds.
Réf.: 1 Pijls NHJ, et. al.Circulation 1995; 92:3183-3193.
Read the instructions for use which accompany the product for indications, contraindications, warnings and precautions.
60522 Rev. 04. 2008-07
Radi Medical Systems AB Palmbladsgatan 10 Box 6350, SE-751 35 Uppsala, SWEDEN Tel: +46 (0) 18 16 10 00, Fax: +46 (0) 18 16 10 99 E-mail: [email protected] www.radi.se