Schiller
ARGUS VCM Service Manual Rev a
Service Manual
78 Pages
Preview
Page 1
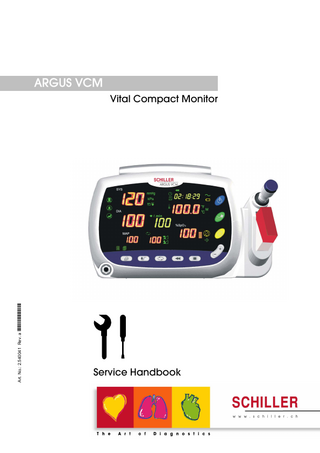
ARGUS VCM
Art. No.: 2.540041 Rev. a *2.540041*
Vital Compact Monitor
Service Handbook
Contents Figures Tables
Notice This document contains proprietary information that is protected by copyright. All Rights Reserved. Reproduction, adaptation, or translation without prior written permission is prohibited, except as allowed under the copyright laws.
Warranty The information contained in this document is subject to change without notice. Schiller makes no warranty of any kind with regard to this material, including, but not limited to, the implied warranties or merchantability and fitness for a particular purpose. Schiller shall not be liable for errors contained herein or for incidental or consequential damages in connection with the furnishing, performance, or use of this material.
Revision History The documentation part number and revision number indicate its current edition. The revision number changes when a new edition is printed in accordance with the revision history of the documentation. Minor corrections and updates which are incorporated at reprint do not cause the revision number to change. The document part number changes when extensive technical changes are incorporated.
ARGUS VCM Service Manual
i
Contents
ARGUS VCM
Introduction
1
Manual Overview ... 3 Related Documents... 3 Description of the ARGUS VCM monitor ... 3
Specifications
7
Physical... 7 Electrical ... 7 Environmental ... 7 Measurement Parameters ... 8 Compliance ... 10
Routine Maintenance
11
Cleaning ... 11 Periodic Safety and Functional Checks ... 11 Functional Checks... 12 Batteries ... 12 Environmental Protection... 12
Performance Verification
13
Introduction ... 13 Equipment Needed... 13 Performance Tests ... 14 Safety Tests... 21
Service Mode and Demo Mode
25
Introduction ... 25 Service Mode ... 25 Demo Mode ... 31
Firmware download
33
Introduction ... 33 Equipment Needed... 33 How to Download ... 33
Troubleshooting
35
Introduction ... 35 How to Use This Section ... 35 Who Should Perform Repairs... 35 Replacement Level Supported ... 35 Troubleshooting Guide... 36
Disassembly Guide
43
General ... 43 Replacement Level Supported ... 44 Prior to Disassembly... 45 Fuse Replacement ... 45 Battery Replacement... 45 Monitor Disassembly... 46
Spare Parts
57
Introduction ... 57 Obtaining Replacement Parts ... 57 Parts List... 58
ii
ARGUS VCM Service Manual
ARGUS VCM
Contents
Packing For Shipment
61
General Instructions ... 61 Returning the ARGUS VCM... 61 Repacking In Original Carton ... 61 Repacking In a Different Carton ... 62
System Processing Description
63
System Overview ... 63 NIBP Processing ... 66 SpO2 Processing... 68 Temperature Processing... 70
ARGUS VCM Service Manual
iii
Contents
ARGUS VCM
Figures Figure 1. ARGUS VCM Front Panel... 4 Figure 2. ARGUS VCM Rear Panel... 5 Figure 3. ARGUS VCM Left Side Panel... 6 Figure 4. ARGUS VCM Right Side Panel ... 6 Figure 5. System Version... 25 Figure 6. Battery Voltage Level... 26 Figure 7. NIBP Inflation Cycle ... 26 Figure 8. Total Runtime ... 27 Figure 9. Factory Defaults Reset ... 27 Figure 10. Night Panel ... 29 Figure 11. NIBP Calibration... 29 Figure 12. NIBP Pressure Test... 30 Figure 13. Sound Calibration ... 30 Figure 14. Demo Mode Display... 31 Figure 15. Disassembly Sequence Flow Chart ... 44 Figure 16. Battery Disassembly... 45 Figure 17. Monitor Disassembly... 46 Figure 18. Front Case Disassembly... 47 Figure 19. Main BD, SpO2, FND modules Disassembly ... 48 Figure 20. Front Case Disassembly – Overlay, NIBP cuff hose connector... 49 Figure 21. Rear Case Disassembly- Battery, SMPS... 50 Figure 22. Rear Case Disassembly- NIBP module ... 51 Figure 23. Rear Case Disassembly- Printer ... 52 Figure 24. Rear Case Disassembly – Speaker, Handle, etc... 53 Figure 25. Temperature Case Disassembly – Temperature Module ... 54 Figure 26. Temperature Case Disassembly... 55 Figure 27. ARGUS VCM Exploded View ... 56 Figure 28. ARGUS VCM Exploded View – Spare Parts... 58 Figure 29. ARGUS VCM System Block Diagram... 63
Tables Table 1. Required Test Equipments ... 13 Table 2. Earth Leakage Current Values ... 21 Table 3. Enclosure Leakage Current... 22 Table 4. Patient Leakage Current Values ... 22 Table 5. Patient Leakage Current Values-Mains Voltage on Applied Part... 23 Table 6. Test Lead Combinations ... 24 Table 7. Allowable Leakage Current... 24 Table 8. Factory Default Settings for ARGUS VCM ... 28 Table 9. Required Equipments for Firmware download... 33 Table 10. Technical Error Codes... 42 Table 11. Part Descriptions – Monitor Assembly... 46 Table 12. Part Descriptions – Front Case Assembly... 47 Table 13. Part Descriptions – Main BD, SpO2, FND Modules Assembly... 48 Table 14. Part Descriptions – Overlay, NIBP Cuff Hose Connector... 49 Table 15. Part Descriptions – Battery, SMPS Assembly ... 50 Table 16. Part Descriptions – NIBP Module Assembly... 51 Table 17. Part Descriptions – Printer Assembly ... 52 Table 18. Part Descriptions – Speaker, Handle, etc Assembly ... 53 Table 19. Part Descriptions – Temperature Module Assembly... 54 Table 20. Part Descriptions – Temperature Case Assembly... 55 Table 21. ARGUS VCM Parts List ... 59
iv
ARGUS VCM Service Manual
Introduction Manual Overview Related Documents Description of the ARGUS VCM monitor
Warnings
Warnings are identified by the WARNING symbol shown above. Warnings alert the user to potential serious outcomes (death, injury, or adverse events) to the patient or user. WARNING: Explosion hazard. Do not use ARGUS VCM in the presence of flammable anesthetics or gases. WARNING: Do not spray, pour, or spill any liquid on ARGUS VCM, its accessories, connectors, switches, or openings in the chassis. WARNING: Do not immerse ARGUS VCM or its accessories in liquid or clean with caustic or abrasive cleaners. WARNING: Ensure that conductive portions of the cables do not come into contact with any other conductive parts. WARNING: Electrical shock hazard. Disconnect the power cord from ARGUS VCM before attempting to open or disassemble ARGUS VCM. WARNING: The use of accessories, transducers and cables other than those specified may result in increased emission and/or decreased immunity of ARGUS VCM monitor. WARNING: Do not silence ARGUS VCM audible alarm or decrease its volume if patient safety could be compromised. WARNING: During safety tests, AC mains voltage will be present on the applied part terminals. Exercise caution to avoid electrical shock hazard. WARNING: Do not place ARGUS VCM into operation after repair or maintenance until Performance, Safety Tests and NIBP Calibration listed in this service manual have been performed. Failure of these tests could result in erroneous readings.
ARGUS VCM Service Manual
1
Introduction
ARGUS VCM
Cautions
Cautions are identified by the Caution symbol shown above. Cautions alert the user to exercise care necessary for the safe and effective use of ARGUS VCM monitor. CAUTION: Observe ESD (electrostatic discharge) precautions when working within the unit and/or when disassembling and reassembling ARGUS VCM monitor and when handling any of the components of ARGUS VCM monitor. CAUTION: When reassembling ARGUS VCM, over-tightening could strip out the screw holes in the cases, rendering it unusable. CAUTION: If any problem with ARGUS VCM built in an optional printer, check a printer’s door is closed well. Operating error may be caused if the cover is not closed correctly. CAUTION: If internal battery cable has been disconnected, pay particular attention to polarity of the cable before reattaching. If battery cable polarity is reversed, it is likely that circuit damage will occur. CAUTION: Ferrite Cores are used for electromagnetic compatibility. Please do not remove Ferrite Cores while disassembling or reassembling, otherwise the monitor can be affected by electromagnetic interference and measure inaccurate data to be displayed or stored.
2
ARGUS VCM Service Manual
Introduction
ARGUS VCM
Manual Overview This manual contains information for servicing ARGUS VCM monitor. The monitor subsequently referred to as ARGUS VCM throughout this manual. Only qualified service personnel should service this product. Before servicing ARGUS VCM, read the operator’s manual carefully for a thorough understanding of safe operation. Read and understand all safety warnings and service notes printed in this service manual and the operator’s manual. This manual contains information about ARGUS VCM monitor. ARGUS VCM monitor includes the following configuration: Config. Features N
Standard (NIBP + Pulse Rate)
Config. Features NP
Standard + Printer
NS
Standard + SpO2
NSP
Standard + SpO2 + Printer
NT
Standard + Temperature
NTP
Standard + Temperature+ Printer
NST
Standard + SpO2 + Temperature
NSTP
Standard + SpO2 + Temperature + Printer
All information in this manual, including the illustrations, is based on the monitor configured with Temperature, SpO2 and Printer options. If your monitor lacks any of these options, some information in this manual does not apply.
Related Documents To perform test and troubleshooting procedures and to understand the principles of operation and circuit analysis sections of this manual, you must know how to operate the monitor. Refer to ARGUS VCM operator’s manual. To understand the various blood pressure cuffs, SpO2 sensors and temperature probes that work with the monitor, refer to the individual directions for use that accompany these accessories.
Description of the ARGUS VCM monitor The purpose and function of Schiller ARGUS VCM monitor is to monitor noninvasive blood pressure (systolic, diastolic, and mean arterial pressures), functional arterial oxygen saturation, pulse rate, and temperature for adult, pediatric and neonate patients in all hospital areas and hospital-type facilities. It may be used during hospital transport and in mobile, land-based environments, such as ambulances, within the specification of the environmental characteristics. Monitor users should be skilled at the level of qualified health care professionals, such as a technician, doctor, nurse or medical specialist. Note: Hospital use typically covers such areas as general care floors, operating rooms, special procedure areas, intensive and critical care areas, within the hospital plus hospital-type facilities. Hospital-type facilities include physician office based facilities, sleep labs, skilled nursing facilities, surgicenters, and sub-acutecenters. Note: Intra-hospital transport includes transport of a patient within the hospital or hospital-type facility.
ARGUS VCM Service Manual
3
Introduction
ARGUS VCM The physical and operational characteristics of the monitor are described in the operator’s manual and in the Specification section of this manual. Figure 1 and 2 identify the displays, controls, indicators and symbols of the front and rear panels. 28 27 26 25 1 2
24 23 22 21
3 4 5 6 7
8
9 10 11
12 13
1. Blood Pressure Unit Indicators 2. Systolic Blood Pressure Display 3. Patient Type Indicators 4. Diastolic Blood Pressure Display 5. Pulse Rate Display 6. MAP (Mean Arterial Pressure) Display 7. Print Setting Indicators 8. Print Button 9. Alarm Button 10. Auto Indicator 11. Auto Cycle Display 12. Auto Button 13. Pulse Tone/Alarm Volume Setting Indicators 14. Review Button
14
15
16 1718
15. %SpO2 Display 16. Mode Button 17. Pulse Amplitude Indicator 18. Alarm Silence Indicator 19. Up/Down Selection Button 20. Alarm Silence Button 21. BP start/stop button 22. Temperature Unit/Mode Indicators 23. Temperature Display 24. Power Button 25. Battery Indicator 26. Charging/AC in Indicator 27. Time Display 28. Review Indicator
Figure 1. ARGUS VCM Front Panel
4
ARGUS VCM Service Manual
19 20
Introduction
ARGUS VCM
1
2
AC IN 100-240V~, 50/60 Hz 28-38VA
3
4
5
1. Handle 2. Air Ventilator 3. AC Power Connector
6
4. Equipotential (Ground) 5. Battery Cover (Replacement) 6. RS-232 Data Interface
Figure 2. ARGUS VCM Rear Panel
ARGUS VCM Service Manual
5
Introduction
ARGUS VCM
1
2
3
1. Printer 2. SpO2 sensor/cable connector
3. NIBP hose connector
Figure 3. ARGUS VCM Left Side Panel
1
2 3
4
1. Temperature probe 2. Probe cover
3. Probe holder 4. Temperature probe connector
Figure 4. ARGUS VCM Right Side Panel
6
ARGUS VCM Service Manual
Specification Physical Electrical Environmental Measurement Parameters Compliance
Physical Instrument Dimensions
130×180×278 (mm)
Weight
2.7 (kg)
Electrical AC Power Power
100Vac to 240Vac, 50 Hz/60 Hz, 28 to 38 VA
Battery Type
Lead acid
Voltage/Capacity
6 V/ 4 Ampere-Hours
Recharge
12 hours with ARGUS VCM
Shelf Life
2 months, new fully charged battery
Complies with
91/157/EEC
Environmental Operation Temperature
10 °C (50 °F) to 40 °C (104 °F) Exemption: thermometry module – operating temperature 16 °C (60 °F) to 40 °C (104 °F)
Humidity Altitude
15 % RH to 95% RH, non-condensing 170 m (557 ft) below sea level 4,877 m (16,000 ft) above sea level
Transport and Storage Temperature
–20 °C (-4 °F) to 50 °C (122 °F)
Humidity
15 % RH to 95% RH, non-condensing
Altitude
–610 m (–2,000 ft) below sea level 12,192 m (40,000 ft) above sea level
Note: The system may not meet its performance specifications if stored or used outside the manufacturer’s specified temperature and humidity range.
ARGUS VCM Service Manual
7
Specification
ARGUS VCM
Measurement Parameters NIBP Pulse Rate Pulse Rate Range
Adult/Pediatric/Neonatal
30 BPM to 220 BPM
Pulse Rate Accuracy
±3 BPM or ±3%, whichever is greater
NIBP (Non-Invasive Blood Pressure) Technique
Oscillometric Measurement
Measurement modes
AUTO, MANUAL and STAT
AUTO Mode
Automatic NIBP measurements at intervals of 1, 2, 3, 4, 5, 10, 15, 30, 45, 60, 90, 120, and 240 minutes
MANUAL Mode
Single measurement initiated by NIBP Start/Stop switch
STAT Mode
Series of consecutive measurements for 5 minutes
NIBP pressure measurement range Systolic pressure range
Diastolic pressure range
Mean pressure range
Adult:
30 mmHg to 260 mmHg (3.9 kPa to 34.5 kPa)
Pediatric:
30 mmHg to 160 mmHg (3.9 kPa to 21.2 kPa)
Neonatal:
25 mmHg to 120 mmHg (3.3 kPa to 15.9 kPa)
Adult:
20 mmHg to 235 mmHg (2.6 kPa to 31.2 kPa)
Pediatric:
15 mmHg to 130 mmHg (1.9 kPa to 17.2 kPa)
Neonatal:
10 mmHg to 105 mmHg (1.3 kPa to 13.9 kPa)
Adult:
20 mmHg to 255 mmHg (2.6 kPa to 33.9 kPa)
Pediatric:
15 mmHg to 140 mmHg (1.9 kPa to 18.6 kPa)
Neonatal:
10 mmHg to 110 mmHg (1.3 kPa to 14.6 kPa)
Pressure Display Accuracy
Meets ANSI/AAMI SP10:1992+A1:1996
Cuff Pressure Range
0 to 300 mmHg (0 to 40 kPa)
Initial Cuff Inflation
Adult: 100, 120, 140, 160(Default), 180, 200, 220, 240, 270 mmHg (13.3, 15.9, 18.6, 21.2(default), 23.9, 26.6, 29.2, 31.9, 35.9 kPa) Pediatric: 80, 90, 100, 110, 120(default), 130, 140, 150, 160, 170 mmHg (10.6, 11.9, 13.3, 14.6, 15.9(default), 17.2, 18.6, 19.9, 21.2, 22.6 kPa) Neonatal: 50, 60, 70, 80, 90(default), 100, 110, 120, 132 mmHg (6.6, 7.9, 9.3, 10.6, 11.9(default), 13.3, 14.6, 15.9, 17.5 kPa)
Overpressure protector
Adult
280 mmHg (N.C.), 308 mmHg (S.F.C.)
Pediatric Standards
220 mmHg
Neonatal
154 mmHg
ANSI/AAMI SP10:1992+A1:1996, IEC60601-2-30:1999 EN1060-1:1995 and EN1060-3:1997.
Note: Systolic and diastolic blood pressure measurements determined with this device are equivalent to those obtained by a trained observer using the cuff/stethoscope auscultation method, within the limits prescribed by the American National Standard, Electronic or automated sphygmomanometers.
8
ARGUS VCM Service Manual
Specification
ARGUS VCM SpO2/Pulse Rate %Saturation Range
1% to 100%
Low Perfusion
0.03% to 20%
Accuracy
Without Motion-Adults
70% to 100% ±2 digits 1% to 69% unspecified
Without Motion-Neonate 70% to 100% ±3 digits 1
1% to 69% unspecified Low Perfusion2
70% to 100% ±2 digits 1% to 69% unspecified
Pulse Rate Range
20 BPM to 300 BPM
Accuracy
Without Motion2
20 BPM to 300 BPM ±3 digits
Low Perfusion2
20 BPM to 300 BPM ±3 digits
Standards
EN865:1997
1Neonate specifications are shown for neonate sensors with ARGUS VCM. Saturation accuracy will vary
by sensor type recommended by the manufacturer.. 2Specification applies to monitor performance and was validated with Biotek and Nellcor simulators
Temperature Probe Type
Thermistor probe
Range
26° C to 43° C (80° F to 110°F)
Display Accuracy
±0.1° C (±0.2° F)
Measurement units
° C, ° F
Measurement modes
Predictive, Monitored
Predictive Mode
One-time measurement in a single temperature reading which is displayed at the end of the brief measurement period
Monitored Mode
Continuous measurement over an indefinite period.
Standards
ASTM E1112-00, EN12470-3
Type
Thermal
Resolution
8 (dots/mm)
Printing speed
45 (mm/s)
Paper width
57 (mm)
Printer
ARGUS VCM Service Manual
9
Specification
ARGUS VCM
Compliance Item
Compliant with
Classification
Class I (on AC power) Internally powered (on battery power)
Type of protection
Type BF – Applied part
General Safety
IEC60601-1:1998+A1:1991+A2:1995 General requirements for Safety and Essential Performance
Alarms
IEC60601-1-8:2001 Draft Alarm systems requirements, tests and guidances in medical electrical equipments systems
Non-invasive blood pressure
AAMI SP10:1992+A1:1996 Electronic or Automated Sphygmomanometers EN1060-1:1995 Non-invasive sphygmomanometers EN1060-3:1997 Supplementary requirements for electrical-mechanical blood pressure measuring systems IEC60601-2-30:1999 Particular requirements for the Safety, including essential performance, of automatic cycling indirect blood pressure monitoring equipment
Oxygen saturation
EN865:1997
Temperature monitoring
E1112-00
Pulse oximeters, Particular requirements
Electronic thermometer for intermittent determination of patient temperature EN12470-3:2000 Performance of compact electrical thermometers (non-predictive and predictive) with maximum device
Electromagnetic Compatibility
IEC 60601-1, sub clause 36, IEC/ IEC60601-1-2:2001 Electromagnetic compatibility-requirements & test
Labeling
EN1041:1998 Information supplied by the manufacturer with medical devices
Marking
10
IEC 60878, EN 980, ISO 7000, EN 60417-1, EN 60417-2
ARGUS VCM Service Manual
Routine Maintenance Cleaning Periodic Safety and Functional Checks Functional Checks Batteries Environmental Protection
WARNING: Do not spray or pour any liquid on the monitor or its accessories. Do not immerse ARGUS VCM or its accessories in liquid or clean with caustic or abrasive cleaners.
Cleaning To clean ARGUS VCM, dampen a cloth with a commercial, nonabrasive cleaner and wipe the exterior surfaces lightly. CAUTION: Do not allow any liquids to come in contact with the power connector or switches or to penetrate connectors or openings in the instrument. Note: For cuffs, sensors and probes, follow the cleaning instructions in the directions for use that accompany these accessories. Note: If liquid is spilled on the monitor, clean and dry thoroughly before reuse. Note: If in doubt about the monitor safety, refer the unit to qualified service personnel. For surface-cleaning, follow your institution’s procedures or: ARGUS VCM may be surface-cleaned by using a soft cloth dampened with either a commercial or nonabrasive cleaner, and lightly wiping the top, bottom, and front surfaces of the monitor lightly.
Periodic Safety and Functional Checks ARGUS VCM requires no routine service or calibration other than cleaning and battery maintenance. The following performance verification tests may be used following repair or during routine maintenance (if required by your local institution).
1. Inspect the exterior of ARGUS VCM for damage. 2. Inspect labels for legibility. If the labels are not legible, contact Schiller Technical Services Department. 3. Verify that the unit performs properly as described in Performance Verification section. 4. Perform the electrical safety tests detailed in Performance Verification section. If the unit fails these electrical safety tests, do not attempt to repair. Contact Schiller Technical Services Department.
ARGUS VCM Service Manual
11
Routine Maintenance
ARGUS VCM
Functional Checks The following checks should be performed at least every 2 years by a qualified service technician. 1. If the monitor has been visibly damaged or subjected to mechanical shock (for example, if dropped), perform the performance tests as described in Performance Verification section. 2. Perform the electrical safety tests as described in Safety Tests section. If the unit fails these electrical safety tests, refer to Troubleshooting section. 3. Inspect the fuses for proper value and rating - qty 2, 2.0 A, 250 volts for AC mains (L/N: F1, F2) - qty 1, 6.3 A, 250 volts for internal battery (L/N: F3)
Batteries If ARGUS VCM has not been used for a long period of time, more than 2 months, the battery will need charging. To charge the battery, connect ARGUS VCM to an AC outlet as described in Performance Verification section of this service manual or the Battery Operation section of the operator’s manual. Schiller recommends replacing the instrument’s battery every 2 years. When ARGUS VCM is going to be stored for 2 months or more, it is recommended to remove the battery prior to storage. To replace or remove the battery, refer to Disassembly Guide. Note: Storing ARGUS VCM for a long period without charging the battery may degrade the battery capacity. The battery may require a full charge/discharge cycle to restore normal capacity. A full charge of a dead battery takes approximately 12 hours while the monitor is turned off. Schiller recommends that ARGUS VCM’s sealed, lead acid batteries be replaced at 2-year intervals. Refer to Disassembly Guide Section. CAUTION: If ARGUS VCM is to be stored for a period of 2 months or longer, it is recommended to notify service personnel to remove the battery from the monitor prior to storage. Recharging the battery is strongly recommended when the battery has not been recharged for 2 or more months. CAUTION: If the battery shows any signs of damage, leakage, or cracking, it must be replaced immediately. CAUTION: Discarded battery may explode during incineration. Recycle used batteries properly. Do not dispose of batteries in refuse containers.
Environmental Protection Follow local governing ordinances and recycling plans regarding disposal or recycling batteries and other device components.
12
ARGUS VCM Service Manual
Performance Verification Introduction Equipment Needed Performance Tests Safety Tests
Introduction This section discusses the tests used to verify performance following repairs or during routine maintenance. All tests can be performed without removing ARGUS VCM covers. All tests except battery charge and battery performance tests must be performed as the last operation before the monitor is returned to the user. If ARGUS VCM fails to perform as specified in any test, repairs must be made to correct the problem before the monitor is returned to the user.
Equipment Needed Table 1 lists the equipment required for performance verification.
Table 1. Required Test Equipments Equipment
Description
Digital Multi Meter (DMM)
Fluke Model 87 or Equivalent
NIBP Cuff
Durable, Adult 11cm
NIBP Cuff
Durable, Neonatal 5cm
NIBP Hose
Adult, 8 feet
NIBP Hose
Neonatal, 6 feet
NIBP Rigid PVC Vessel
9cm diameter
NIBP Rigid PVC Vessel
5cm diameter
SpO2 Sensor Extension Cable
DOC-10
Temperature Probe
Oral Probe
NIBP Simulator
Bio-Tek BP Pump 2 or Equivalent
SpO2 Simulator
NELLCOR SRC-MAX
Temperature Simulator
WelchAllyn 9600 Calibration Tester
Safety Analyzer
METRON QA-90 or Equivalent
Stopwatch
Manual or electronic
ARGUS VCM Service Manual
13
Performance Verification
ARGUS VCM
Performance Tests The battery charge and battery performance test should be performed before the monitor repairs whenever the battery is suspected as being a source of the problems. All other tests may be used following repairs or during routine maintenance (if required by your local institution). Before performing the battery performance test, ensure that the battery is fully charged. This section is written using factory defaults set as power-up. If your institution has preconfigured custom defaults, those values will be displayed.
Power 1. Connect the monitor to AC power source using proper power cord. 2. Verify Charging/AC in indicator is lit (or flashing). 3. Press Power button over 1 second, and then verify that the monitor is turned on. 4. After the monitor operates in normal mode, disconnect the power cord. 5. Verify Battery indicator is lit instead of Charging/AC in indicator. 6. Press Power button over 1 second, and then verify that the monitor is turned off.
Battery Charge 1. Connect the monitor to AC power source using proper power cord. (the monitor is turned off) 2. Verify Charging/AC in indicator is lit (or flashing). Note: If Charging/AC in indicator is flashing, the battery needs fully charging. 3. Charge the battery fully until Charging/AC in indicator is no more flashing. It takes for at least 12 hours. 4. To check for a full charge, disconnect the power cord. Press Power button and the NIBP start/stop button simultaneously over 1 second to enter the Service mode. Then select battery voltage level displayed. 5. Verify that current battery voltage display in Service mode indicates ‘6.0V’ or greater. Note: The battery may require a complete charge/discharge cycle to restore its normal capacity, depending on its previous usage.
Battery Discharge 1. Disconnect the power cord from the monitor with fully charged battery. 2. Turn on the monitor by pressing Power button over 1 second. 3. Connect NIBP simulator to the monitor. Set NIBP simulator: SYS of 120mmHg, DIA of 80mmHg, PR of 80 bpm. 4. Set NIBP Auto interval of the monitor to 15 minutes. 5. After more than 2 hours of the monitor operating, verify an audible alarm is sounding and the battery level of the monitor is under 5.4V. 6. Allow the monitor to operate until it automatically powers down due to low battery condition. Verify that high priority alarm occurs 5 seconds before the monitor automatically shuts down. 7. If the monitor passes this test, immediately recharge battery.
14
ARGUS VCM Service Manual
Performance Verification
ARGUS VCM Power-On Self-Test
1. Connect the monitor to AC power source and verify Charging/AC in indicator is lit. 2. Observe the monitor front panel. With the monitor off, press Power button. The monitor must perform the following sequence. a.
All FNDs and indicators are illuminated.
b.
Power-on beeps sounds consecutively.
c.
Upon successful completion of power-on self-test, the display will enter the normal mode.
Note: Power-on self-test takes approximately 7 seconds to complete. Note: If an error code is displayed, please refer to Troubleshooting section.
General Operation Tests Alarms and Alarm Silence 1. Connect the monitor to an AC power source. 2. Press the monitor Power button to turn the monitor on. 3. Connect NIBP simulator to the monitor. 4. Set NIBP simulator as follows: Systolic of 120mmHg, Diastolic of 80mmHg and pulse rate of 150 bpm. 5. Press NIBP start/stop button. 6. Verify following the monitor reaction after measurement completes: a.
The monitor displays NIBP and pulse rate as specified by the simulator.
b.
Audible alarm sounds and Pulse rate display flashes indicating the parameter has violated default alarm limits.
7. Press Alarm silence button on the front panel of the monitor. 8. Verify the following: a. b. c. d.
An audible alarm is temporarily silenced. Pulse rate display continues flashing. Alarm silence indicator is lit. Audible alarm returns in approximately 90 seconds.
9. Set NIBP simulator as follows: Systolic of 120mmHg, Diastolic of 80mmHg and pulse rate of 80 bpm. 10. Press NIBP start/stop button. 11. Verify following the monitor reaction after measurement completes: a.
The monitor displays NIBP and pulse rate as specified by the simulator.
b.
The alarm is terminated.
12. Disconnect NIBP simulator from the monitor. 13. Kink NIBP cuff hose connector of monitor and then press NIBP start/stop button. 14. Verify that the monitor displays an error code, E23 and sounds audible alarm. 15. Press Alarm silence button. 16. Verify that the alarm is terminated.
ARGUS VCM Service Manual
15