Instruction Manual
330 Pages
Preview
Page 1
seca 677
D
Bedienungsanleitung und Garantieerklärung... 3
GB
Instruction manual and guarantee... 49
FR
Mode d’emploi et garantie... 93
IT
Manuale di istruzioni e garanzia... 141
ES
Manual de instrucciones y garantia... 187
PT
Instruções de utilização e declaração de garantia... 235
PL
Instrukcja obsługi i gwarancja... 283
English English TABLE OF CONTENTS 1. Device description... 51 1.1 Intended use... 51 1.2 Description of function... 51 1.3 User qualification... 51 Assembly... 51 Operation... 51 2. Safety information... 52 2.1 Safety information in these instructions for use... 52 2.2 Basic safety instructions... 53 Handling the instrument... 53 Preventing electric shock... 54 Avoiding infections... 54 Avoiding injuries... 55 Preventing device damage . . . 55 Handling measuring results . . . 56 Handling packaging material . . 57 3. Overview... 58 3.1 Controls... 58 3.2 Symbols in the display... 60 3.3 Marking on the device and on the rating plate... 60 3.4 Marking on the packaging . . . 61 3.5 Menu structure... 62 4. Before you really get started ... . 63
5.2 Weighing... 68 Switching on the scale... 68 Starting the weighing procedure... 69 Determining extra weight (TARE)... 69 Keeping the measurement result in the display (HOLD) . . . 69 Determining and rating body mass index (BMI)... 70 Sending measurement results to wireless receivers... 72 Calculating and printing out BMI automatically... 72 Automatic switching of weighing range... 72 Switching off the scale... 73 5.3 Other functions (menu)... 73 Navigating in the menu... 73 Deleting saved values automatically (AClr)... 74 Permanently saving the additional weight (Pt)... 75 Activating the auto hold (Ahold) function... 76 Activating beeps (BEEP)... 76 Setting filtering (Fil)... 77 Restoring factory settings (RESET)... 77
4.1 Scope of delivery... 63 4.2 Assembling the device... 64 Setting up the railing... 64 6. The seca 360° wireless network... 78 Assembling the display housing... 65 6.1 Introduction... 78 Final steps... 65 seca wireless groups... 78 4.3 Establishing power supply . . . 66 Channels... 79 Connecting the power pack . . 66 Device detection... 79 6.2 Operating the scale in a 5. Operation... 67 wireless group (menu)... 80 5.1 Making the scale operational . 67 Activating the wireless module Moving the scale... 67 (SYS)... 80 Aligning the scale... 67 Setting up a wireless group Swiveling the display housing . 68 (Lrn)... 80
• 49
Activating automatic send (ASend)... 82 Selecting print option (APrt) . . 82 Set the time (Time)... 83 7. Hygiene treatment... 84
10.2 Checking the content of the calibration counter... 88 11. Technical data... 89 11.1 General technical data... 89 11.2 Technical data, weighing . . . 90
7.1 Cleaning... 84 7.2 Disinfecting... 84 7.3 Sterilizing... 85
12. Optional accessories... 91
8. Function check... 85
14. Disposal... 91
9. Troubleshooting... 86
15. Warranty... 92
10. Servicing/recalibration... 88
16. Declaration of conformity... 92
10.1 Information on maintenance and recalibration... 88
50 •
13. Spare parts... 91
English
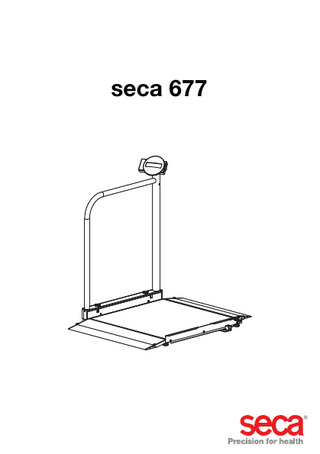
1. DEVICE DESCRIPTION 1.1 Intended use Electronic platform scale seca 677 is mainly used in hospitals, medical practices and in-patient care facilities in accordance with national regulations. The scale is for conventional determination of weight and establishment of general state of nutrition; it assists the physician supervising treatment in making a diagnosis or deciding on a course of treatment. To make an accurate diagnosis, however, other specific examinations have to be ordered by the physician and their results taken into account, in addition to determining a weight value.
1.2 Description of function In addition to conventional determination of weight, the seca 677 provides a function for determining body mass index. To this end, height is entered on the keypad and the body mass index associated with the weight value is calculated automatically. Length measuring devices from the seca 360° wireless system can transmit height to the seca 677 wirelessly. Via the seca 360° wireless wireless network, measuring results can be transmitted wirelessly to a seca wireless printer or to a PC equipped with seca analytics PC software and the seca USB wireless adapter. The seca 677 can be moved on casters. Use the scale only for the purpose named in the section entitled "Intended use" on page 51.
1.3 User qualification Assembly
Devices that are shipped partially assembled may only be mounted by sufficiently qualified persons such as specialist dealers, hospital technicians or seca service technicians.
Operation
The device may only be operated by healthcare professionals. • 51
2. SAFETY INFORMATION 2.1 Safety information in these instructions for use DANGER! Used to identify an extremely hazardous situation. If you fail to take note of this information, serious irreversible or fatal injuries will occur. WARNING! Used to identify an extremely hazardous situation. If you fail to take note of this information, serious irreversible or fatal injuries may result. CAUTION! Used to identify a hazardous situation. If you fail to take note of this information, minor to moderate injuries may result. NOTICE! Used to identify possible incorrect usage of the device. If you fail to take note of this information, you may damage the device, or the measured results may be incorrect. NOTE Includes additional information about use of the device.
52 •
English
2.2 Basic safety instructions Handling the instrument
► Please take note of the information in these instruc-
tions for use. ► Keep the instructions for use in a safe place. The
instructions for use are a component of the device and must be available at all times. DANGER! Risk of explosion
Do not use the device in an environment in which one of the following gases has accumulated: ► oxygen ► flammable anesthetics ► other flammable substances/air mixtures
CAUTION! Patient hazard, damage to device ► Additional devices which are connected to
electrical medical devices must provide evidence of compliance with the relevant IEC or ISO standards (e.g. IEC 60950 for dataprocessing devices). Furthermore, all configurations must comply with the requirements of standards for medical systems (see IEC 60601-1-1 or Section 16 of the 3rd edition of IEC 60601-1 respectively). Anyone connecting additional devices to electrical medical devices is considered a system configurer and is therefore responsible for ensuring that the system complies with the requirements of standards for systems. Your attention is drawn to the fact that local laws take precedence over the above-mentioned requirements of standards. In the event of any queries, please contact your local specialist dealer or Technical Service. ► Have servicing and recalibration carried out
regularly as described in the relevant section of this document. ► Technical modifications may not be made to
the device. The device does not contain any parts for servicing by the user. Only have servicing and repairs performed by an authorized seca service partner. You can find Safety information • 53
service partners in your area at www.seca.com or by sending an e-mail to service@seca.com. ► Only use original seca accessories and spare
parts, otherwise seca will not grant any warranty. CAUTION! Patient hazard, malfunction ► Keep other electrical medical devices, e.g.
high-frequency surgical devices, a minimum distance of approx. 1 meter away to prevent incorrect measurements or wireless transmission interference. ► Keep HF devices such as cell phones a
minimum distance of approx. 1 meter away to prevent incorrect measurements or wireless transmission interference. ► The actual transmission output of HF
equipment may require minimum distances of more than 1 meter. Details can be found at www.seca.com.
Preventing electric shock
WARNING! Electric shock ► Set up the device so that the power supply
socket is easy to reach and the device can be disconnected from the power supply quickly. ► Ensure that your local power supply matches
the information on the power supply unit. ► Do not touch the power supply unit with wet
hands. ► Do not use extension cables or power strips. ► Make sure that cables are not pinched or
damaged by sharp edges. ► Make sure that cables do not come into con-
tact with hot objects. ► Do not operate the device at an altitude of
more than 3000 m above sea level.
Avoiding infections
WARNING! Risk of infection ► Hygienically reprocess the scale regularly as
described in the respective section in this document.
54 •
English ► Make sure that the patient has no infectious
diseases. ► Make sure that the patient has no open
wounds or infectious skin alterations, which may come into contact with the device.
Avoiding injuries
WARNING! Injury from falls ► Ensure that the device is positioned firmly and
level. ► Route connecting cables (if present) in such a
way that neither user nor patient can trip over them. ► The device is not designed as a standing aid.
Assist people with limited motor skills when they are getting up, e.g. from a wheelchair. ► Make sure that the patient does not step onto
and off the weighing platform right at the edges. ► Make sure that the patient steps onto and off
the weighing platform slowly and safely. WARNING! Danger of slipping ► Ensure that the weighing platform is dry be-
fore the patient steps onto it. ► Ensure that the patients feet are dry before he
or she steps onto the weighing platform. ► Make sure that the patient steps onto and off
the weighing platform slowly and safely.
Preventing device damage
NOTICE! Damage to device ► Ensure that no liquids enter the device. They
can damage the electronics. ► Switch off the device before disconnecting
the power supply unit from the mains socket. ► Disconnect the power supply unit from the
mains socket if you intend to not use the device for a longer period of time. Only this way it can be ensured that the device is currentless. ► Make sure not to drop the device. ► Do not expose the device to any impacts or
vibrations. Safety information • 55
► Perform function controls regularly as de-
scribed in the relevant section in this document. Do not operate the device if it is damaged or not working properly. ► Ensure that there is no heat source in the im-
mediate vicinity. Do not expose to direct sunlight. The excessive temperature could damage the electronics. ► Avoid rapid temperature fluctuations. When
the device is transported so that a temperature difference of more than 20 °C occurs, it must stay turned off for at least 2 hours before it can be turned on again. Otherwise, condensation water will form which can damage the electronics. ► Use only chlorine and alcohol-free disinfec-
tants which are explicitly suitable for acrylic sheet and other sensitive surfaces (active ingredient: quaternary ammonium compounds, for example). ► Do not use aggressive or abrasive cleaning
agents. ► Do not use organic solvents (e.g. white spirit
or petroleum spirit).
Handling measuring results
WARNING! Patient hazard
This device is no diagnostic device. It simply assists the treating physician in establishing a diagnosis. ► In order to make a precise diagnosis and initiate therapeutic measures, besides determination of the weight, further targeted examinations must be set up by the physician, and their results must be considered. ► The responsibility for diagnosis and treatment
lies with the treating physician. NOTICE! Inconsistent measuring results ► Before you electronically save measurement
values determined using this device and use them further (e.g. in seca PC software or in a hospital information system), make sure that the measurement values are plausible.
56 •
English ► If measurement values are transmitted to
seca PC software or a hospital information system, make sure prior to further use that the measurement values are plausible and are assigned to the correct patient.
Handling packaging material
WARNING! Risk of suffocation
Packaging material made of plastic foil (bags) is a choking hazard. ► Keep packaging material out of reach of children. ► In the event that the original packing material
may not be available anymore, only use plastic bags with security holes in order to reduce the risk of suffocation. Use recyclable materials if possible. NOTE Keep the original packing material for future use (e.g. returning for maintenance service).
Safety information • 57
3. OVERVIEW 3.1 Controls 6 2
1
3 4 5
10 11 12
9
7 8
13 No.
1
58 •
Control
Function Central control and display element, can be swiveled Display housing 180° to left and right
2
Switch scale on and off
3
Arrow key • During weighing: - press briefly: activate hold function - press and hold: activate tare function • In the menu: - select submenu, select menu item - increase value
tare
English No.
Control
4
5
6
Display
8
Transport casters Locking screws
9
Access ramps
10
Spirit level Power supply connection Latch Foot screw
7
11 12 13
Function Arrow key • During weighing: - press briefly: activate BMI function - press and hold: call up menu • In the menu: - select submenu, select menu item - reduce value Enter key During weighing (if wireless network is set up): - press briefly: send measuring result to devices ready to receive it (PC with USB wireless adapter) - press and hold: print out measuring result (wireless printer) • In the menu: - confirm selected menu item - save set value Display element for measuring results and to configure the device The scale can be moved on these casters. For securing the railing in the upright position • Can be folded up • Facilitate access to the scale by wheelchair Shows whether the device is horizontal Serves to connect the power pack supplied Secures the railing in the down position during transport. 4 pcs, for precise alignment
Safety information • 59
3.2 Symbols in the display A B C D
2
Symbol
Meaning
A
Operation with power pack
B
Non-calibratable function active 1
C
3
2
Memory location currently in use Weighing range currently in use see "Technical data" on page 89
D
3.3 Marking on the device and on the rating plate Text/symbol Mod S/N ProdID
Meaning Model number Serial number Product identification number Follow instructions for use Electrical medical device, type B Insulated device, protection class II
e d
x
Value in units of measurement used to classify and verify a scale Value in units of measurement which gives the difference between two consecutive display values Active weighing range Class III scale to directive 2014/31/EU
60 •
English Text/symbol
M16 0102 0123
FCC ID IC
x-y V max. xxx mA use compatible seca adapter only
Meaning Device complies with EC standards and directives. • M: Conformity label according to Directive 2014/31/EU governing non-automatic weighing instruments (verified models) • 16: (Example: 2016) Year in which the declaration of conformity was completed and the CE symbol was applied (verified model) • 0102: Notified body metrology (verified models) • 0123: Notified body medical products Symbol of the US Federal Communications Commission (FCC) Device license number from the Federal Communications Commission (FCC) Device license number from Industry Canada Rating plate on the power supply connection socket • x-y V: required supply voltage • max xxx mA: maximum current consumption • •
: note polarity of device plug : operate device with direct current
Do not dispose of device with household waste
3.4 Marking on the packaging Protect from moisture Arrows indicate top of product. Transport and store in an upright position. Fragile Do not throw or drop. Permitted min. and max. temperature for transport and storage Permitted min. and max. moisture for transport and storage Open packaging here Packaging material can be disposed of through recycling programs Safety information • 61
3.5 Menu structure Other functions are available to you in the menu for the device. This enables you to configure the device perfectly to suit your needs (details from Page 73). • Channel 1 (C1) rF*
Learn Autosend
Group(ID)
• Channel 2 (C2)
• on
• Channel 3 (C3)
Stop
Reg. Devices (Mo)
• off • on
System
• off • HI
Autoprint
• MA
* seca 360° wireless network
• HI_MA
Group (ID) Max. three seca wireless groups: 0, *Funknetzwerk seca 360° Wireless: 1, 2 Raum (ID): configuration per Maximum Max. drei seca Funkräume: 0, 1, 2 wireless group - 1 baby scale Maximal-Konfiguration pro Funkraum: 1 personal scale - 1-Babywaage - 1 length measuring rod - 1 Personenwaage - 1 wireless printer - 1 Längenmessstab - 1 PC with USB wireless adapter
• off • Year • Month Time
• Day • Hour
Reset
Autoclear
• Minute
• on • off
PT
PT Weight
- 1 Funkdrucker
Net Weight
• on Autohold
Beep
• off Press
• on • off
Hold
• on • off
•0 Fil
•1
(Hinweis: Im Display keine Leerzeichen)
•2
Navigation: Call up menu:
- 1 PC mit USB-Funkmodul Channel (C1, C2, C3) - Three channels per wireless Kanal (C1, C2, C3):9 channels) group (total -Drei Kanäle pronumbers: Funkraum ( 0insg. 9 Kanäle) - Channel - 99 - Only use0-99 each channel number -Kanalzahlen: -Jedeonce Kanalzahl für nur jeweils einen Kanal - Recommended spacing: 30 -Empfohlener Abstand: 30 Example configuration Beispiel-Konfiguration: - Group 0: C1 0, C2 30, C3 60 - Raum 0: C1__0, C2_30, C3_60 - Group 1: C1 10, C2 40, C3 70 - Raum 1: C1_10, C2_40, C3_70 - Group 2: C1 20, C2 50, C3 80 (Note: spaces in display) - Raumno 2: C1_20, C2_50, C3_80
Registered devices (Mo) - 1: Personal scale Erkannte Geräte (Mo): - Personenwaage 2: Length measuring rod - 1: - 3: Wireless printer - 2: Längenmessstab - 4: PC with USB wireless adapter - 3: Funkdrucker - 7: Baby scale - 4: PC mit USB-Funkmodul - 7: Babywaage
62 •
English
4. BEFORE YOU REALLY GET STARTED ... 4.1 Scope of delivery
A
B USA/Japan Euro
E
Australia UK
C
D
No. A B C D E
Component Scale with railing in down position Display housing with display cable Pan-head tapping screw B 3.5 x 9.5 Screwdriver Power pack with adapters (model-dependent: power pack with Euro-connector) Instructions for use, not shown
Pcs. 1 1 3 1 1 1
Before you really get started ... • 63
4.2 Assembling the device Setting up the railing Latch
Locking screws
1. Place the scale on a solid, level surface. 2. Release the latch for the railing. 3. Fold up the railing and hold it in this position. 4. Tighten up both locking screws until the railing is firm without any play.
64 •
English
Assembling the display housing
1. Take the display cable out of the fixing in the railing. 2. Connect the display cable in the railing to the cable of the display housing.
Display cable 3 x B 3.5 x 9.5
3. Push the cable carefully into the railing. 4. Place the display housing on the railing. 5. Ensure that the bores on the display housing and the bores in the railing are in line over one another. 6. Screw the display housing firmly to the railing.
Final steps
1. Ensure that all parts are correctly located. 2. Ensure that all screws are fully tightened.
Before you really get started ... • 65
4.3 Establishing power supply Power is supplied to the scale with a power pack.
Connecting the power pack
WARNING! Using the wrong power packs may cause bodily injury or damage to the device
Conventional power packs may deliver a higher voltage than is indicated on them. The scale may overheat, catch fire, melt or short-circuit. ► Use only original seca plug-in power packs with a 9 V or controlled 12 V output voltage. 1. If required, insert the power supply connector necessary for your power supply into the power pack.
2. Insert the connector of the power pack into the connecting socket of the scale. 3. Plug the power pack into a power supply socket. 4. Perform a function check as described in the section entitled "Function check" on page 85.
66 •