Smith & Nephew
smith & nephew Hysteroscopic Fluid Management Systems
Hysteroscopy System Setup Guide Rev A May 2020
Setup Guide
2 Pages

Preview
Page 1
*smith&nephew
Operative Hysteroscopy System Setup Guide
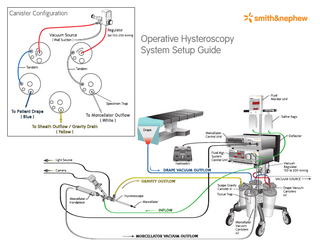
SYSTEM SETUP - CIRCULATOR 1. Turn Fluid Management System ON Unit performs self test: 3 beeps from control unit / 3 beeps from fluid monitor unit 2. Connect INFLOW tubing • Remove pressure chamber safeguard from tube set • Insert roller tubing: - Slide pressure chamber (nose upward) into slot until seated flush - Place tubing around roller wheel - Pull on tubing until locking ring snaps • Spike fluid bags and close tubing clips 3. Canister configuration: • Connect tubing from vacuum source to barbed fitting on vacuum regulator bracket • Fluid collection from morcellator handpeice (WHITE connectors): - Place tissue trap in largest hole in canister lid - Connect two canisters in series (using tandem tubing) beginning with the canister containing the tissue trap - Connect second canister in series to the vacuum regulator The Vacuum port on the canister must be used - Connect outflow tubing (from morcellator handpiece) to tissue trap in canister • Fluid collection from patient drape (BLUE connectors): - Connect two canisters in series (using tandem tubing) - Connect second canister in series to the stopcock port on the vacuum regulator bracket. The Vacuum port on the canister must be used. - Connect tubing from patient drape to first suction canister in series • Fluid collection from hysteroscope sheath (YELLOW connectors): - Connect outflow tubing from sheath to gravity collection system canister - Leave one canister port open to facilitate drainage • Set system vacuum regulator in “REG” mode between 128 mmHg and 200 mmHg; verify vacuum setting 4. Connect morcellator handpiece cable to front of Morcellator Control Unit 5. Connect footswitch cable to front of Morcellator control unit 6. Turn Morcellator Control Unit power ON • Control unit performs system check and displays welcome message SYSTEM SETUP - SCRUB 1. Connect inflow tubing (BLUE luer) to hysteroscope inflow stopcock (blue ring); Pass bag spike end to circulator 2. Connect morcellator outflow tubing (WHITE connector) to the barbed fitting on the morcellator handpiece. Pass fitting end to circulator
3. Connect hysteroscope sheath outflow (YELLOW luer) end of outflow tubing to the stopcock (yellow ring). Pass fitting end to circulator 4. To facilitate gravity drainage be sure tubing is not draped over patient leg 5. Pass morcellator handpiece cable to Circulator INSTRUMENT DETECTION PROCEDURE 1. If unsure of pathology (polyp/fibroid), use Hysteroscope Insert (instead of morcellator) to calibrate fluid management system 2. Scrub or Surgeon – assemble the morcellator handpiece • Attach morcellator on morcellator handpiece • Open insertion port on hysteroscope completely (be sure blue seal cap is on) • Insert morcellator into hysteroscope 3. Surgeon – open the hysteroscope inflow stopcock completely 4. Surgeon – hold morcellator/hysteroscope at working height over funnel in drape 5. Circulator – open irrigation inflow tubing clamps. • Press Start/Stop button to start irrigation and perform Instrument Detection process • Instrument Detection process will run for approximately 30 seconds • A long beep signals the start • When detection is successful, the unit emits another long beep and irrigation flows freely • Saline flow is now controlled by surgeon closing inflow stopcock • Reset fluid monitor system to “ 0 ” WINDOW LOCK PROCEDURE 1. Surgeon – perform morcellator window lock by aligning black line on inner tube to black line on outer tube (press Window Lock button on footswitch to rotate inner tube) SYSTEM SETTINGS 1. Set & verify morcellator speed and direction • Rotary recommended setting: 750 RPM, Oscillate mode • Reciprocator recommended setting: 1100 RPM, Forward or Reverse mode (not Oscillate) 2. Set IU pressure setting • Adjust per physician preference (60 – 120 mmHg)
System is ready for operation Endoscopy Smith & Nephew, Inc. Andover, MA 01810 USA
www.smith-nephew.com 978 749 1000 978 749 1108 Fax 800 343 5717 U.S. Customer Service
©2005 Smith & Nephew, Inc. All rights reserved. Printed in USA 10/05 1061484 Rev. A