Quick Reference Guide
2 Pages
Preview
Page 1
Symbols/Alarms On/off When the operation switch is in the continuous or intermittent mode, the status light will illuminate green Battery indicator The low battery is signalled by audible and flashing yellow status light. Plug the device into an AC outlet immediately when the alarm occurs Over vacuum If the system encounters an excessively high vacuum (of >235mmHg) the device will stop delivering therapy. The audible alarm will sound and the status light will flash yellow Leak When the system detects a significant leak the audible alarm will sound and the status light will flash yellow Low vacuum If the vacuum level is lower than set point of therapy by>15mmHg, the audible alarm will sound and the status light will flash yellow
Basic Operation 1. Ensure vacuum is turned off.
Continuous therapy Device will maintain the preset vacuum level, without stopping, until switched off OFF position Returning the mode of operation switch to this position stops the device from delivering therapy Intermittent therapy Device produces vacuum for approximately 5 minutes and turns off for approximately 2 minutes Keep upright
Quick reference guide
2. Connect the in-line bacterial overflow guard to the vacuum opening on the device.
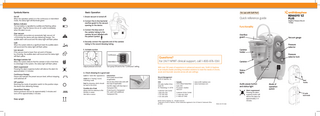
Functionality
3. Connect the blue end of the canister tubing to the canister lid port labelled with the patient symbol:
Overflow guard
Vacuum gauge
4. Securely connect the opposite end of the canister tubing to the wound dressing tubing.
Pressure selector Canister holder
5. Activate suction Continuous
Blockage/canister full When the system detects that the canister is full or that there is a blockage in the system, the status light will flash yellow Alarm suppressed Pressing the alarm suppress button will silence the alarm for approximately 2-4 minutes
For use with Soft Port
Intermittent Adjust pressure and lock.
Turn pump ON and to the “Continuous” setting.
6. Check dressing for a good seal Look for “raisin-like” appearance. Listen for a “hissing” sound, indicating a leak. Feel the dressing, which should be hard to the touch. Possible site of leak Where Soft Port attaches to film Wrinkle or crease Skin fold or crevice
Intervention Pinch paste around drain (if applicable). Secure area where tube exits with blue tape (if applicable). Seal film edges with blue tape or Transparent Film. If hole found in Transparent Film, patch with additional Transparent Film.
Questions? For 24/7 NPWT clinical support, call 1-800-876-1261.
Canister
With over 150 years of experience in advanced wound care, Smith & Nephew is an industry leader providing innovative solutions to meet the needs of chronic, acute and traumatic wounds across all care settings.
Status lights
Pressure selector lock
Wound Management Smith & Nephew, Inc. USA 970 Lake Carillon Drive Suite 110 St. Petersburg, FL 33716 Customer Care Center 1-800-876-1261 T 727-392-1261 F 727-392-6914
Canada 2250 Alfred-Nobel Blvd. Suite 300 St-Laurent, Quebec H4S 2C9
www.smith-nephew.com www.myrenasys.com
Audio pause button and status light Alarm suppressed. Pressing the alarm suppress button will silence the alarm for approximately 2-4 minutes.
Customer Action Center T 1-800-463-7439 F 1-800-671-9140
©2012 Smith & Nephew, Inc., All rights reserved. ™Trademark of Smith & Nephew. Certain trademarks registered in the US Patent & Trademark Office RA 5000
RNCE-04-1111-NAE
Mode of operation switch
Bed hooks
IV pole lock knob
Dressing the wound – RENASYS™-G Gauze Dressing Kit with Soft Port
Dressing the wound – RENASYS™-F Foam Dressing Kit with Soft Port Dressing Application: Use clean or sterile techniques for application depending on institutional protocol.
1
Debride any necrotic/eschar tissue if necessary. Cleanse wound bed and pat dry per protocol. Thorough wound cleansing should occur with each dressing change.
2
Foam should fill the wound cavity and it may be necessary to stack pieces of foam in deep wounds. A non-adherent dressing may be applied to the wound prior to placing the foam into the wound bed if required. Warnings: • Foam should be cut to fit loosely into wound bed. Do not tightly pack or force foam into any areas of the wound. • Do not cut the foam directly over the wound bed to avoid foam fragments from falling into the wound. Rub the edges of the foam to remove any loose fragments after cutting.
5
Cut a small hole (no less than 2.0cm) in the center of the film, over the foam. Remove excess trimmed film.
6
• If multiple pieces of foam are needed to cover the wound bed, count and record how many foam pieces are present.
8
Secure the drain tubing to the canister tubing at the adaptor site. Attach the RENASYS™ Soft Port tubing to the canister tubing, activate the device and adjust to the prescribed therapy level. The recommended therapeutic pressure range is 80-120mmHG for foam. Finished and leak-free dressings should be firm to the touch.
• If a tunnel exists, cut the foam longer than the tunnel to ensure that contact is made with the foam in the primary wound bed/cavity.
Remove the liner from the Soft Port Dressing. Position the center opening of the Soft Port Dressing so it surrounds the hole in the film.
• Do not place foam into blind or unexplored tunnels.
7
Cover foam with Transparent Film. Film should extend 5.1cm beyond wound margin to facilitate adequate seal. Film should be securely anchored to periwound area to maintain a good seal.
Cut the foam dressing to fit the size and shape of the wound and place into wound cavity.
Bridging Away from Wound and Dressing Small Wounds
1
Use gentle pressure to anchor the Soft Port Dressing to the Transparent Film. Smooth the dressing down while removing the frame.
Important: Contact must be made between the bridge and the matching wound filler used in the wound bed (overlap).
1
8
Cleanse wound bed and pat dry per protocol.
2a Cover both the wound and the bridge with Transparent Film. Film should extend 5.1cm beyond wound margin to facilitate adequate seal. Film should be securely anchored to periwound area to maintain a good seal.
2
Cover gauze with Transparent Film. Film should extend 5.1cm beyond wound margin to facilitate adequate seal. Film should be securely anchored to periwound area to maintain a good seal.
5
Apply skin sealant to periwound area.
2b
The center opening of the Soft Port Dressing will be aligned over the hole to deliver negative pressure.
Secure the Soft Port to the patient according to your institutional protocol. Ensure the aeration disc, located near the quick click connector is not covered or otherwise occluded by the method used to secure the Soft Port.
4
Cut a small hole (no less than 2.0cm) in the center of the film, over the gauze. Remove excess trimmed film.
RENASYS™ foam dressings should be changed every 48 to 72 hours after the initial application of therapy. If no leak is present and the patient is comfortable, dressing changes should occur no less than 3 times per week.
Secure the drain tubing to the canister tubing at the adaptor site. Attach the RENASYS Soft Port tubing to the canister tubing, activate the device and adjust to the prescribed therapy level. The recommended therapeutic pressure range is 40-80mmHG for gauze. Finished and leak-free dressings should be firm to the touch.
9
Canister selection The RENASYS EZ Plus device is to be used only with the Smith & Nephew 800ml S-Canister kit (p/n 66800912), 250ml S-Canister kit (p/n 66800913). The canister kit should be changed at least once a week or when the canister has reached a level of 2/3 full.
Canister tubing Connecting the tubing
Disconnect the tubing
Cap the tubing
6
Proceed with step 6 - step 9. Trim a single layer of non-adherent gauze and lay across wound bed.
3
Remove the liner from the Soft Port Dressing. Position the center opening of the Soft Port Dressing so it surrounds the hole in the film.
7 Cut additional foam and place on top of Transparent Film to form the bridge. If using moistened gauze, apply a 5.1cm wide bridge (recommended thickness: 8 single layers of gauze). Ensure the foam or gauze bridge is wider than the Soft Port opening 3.8cm.
Dressing changes
RENASYS gauze dressings should be changed 48 hours after the initial application of therapy. If no leak is present and the patient is comfortable, dressing changes should occur 2-3 times per week.
3
Cut a small hole (no less than 2.0cm) in the center of the film, over the bridge. Remove excess trimmed film.
Cover intact skin with Transparent Film where bridge will be placed.
Apply skin sealant to periwound area. (Skin sealant not included as part of kit).
3
Under normal circumstances using the Soft Port, it should not be necessary to bridge away from wounds. If there is a concern that the Soft Port may create pressure at the wound due to the wound’s location and conditions, or if the wound is smaller than the Soft Port opening (1.5cm), utilize the bridge technique. This technique will allow the Soft Port to be redirected to a non-weight bearing area.
9
4
Protect the periwound from exposure to moisture and adhesive.
Utilizing Bridging Technique:
Smooth the dressing down while removing the frame.
Fill wound with saline-moistened antimicrobial gauze. Gauze should loosely fill to surface of wound. Avoid overpacking. Use gentle pressure to anchor the Soft Port Dressing to the Transparent Film.
Secure the Soft Port to the patient according to your institutional protocol. Ensure the aeration disc, located near the quick click connector is not covered or otherwise occluded by the method used to secure the Soft Port. Under normal circumstances using the Soft Port, it should not be necessary to bridge away from wounds. If there is a concern that the Soft Port may create pressure at the wound due to the wound’s location and conditions, or if the wound is smaller that the Soft Port opening (1.5cm), utilize the bridge technique.
Notes: • Please refer to the RENASYS EZ Plus User Manual for a complete discussion of indications, contraindications, precautions, warnings, and manufacturer’s recommendations. • Please refer to the RENASYS-F Foam Dressing Kit with Soft Port and RENASYS-G Gauze Dressing Kit with Soft Port Instructions for Use for the full application techniques. • Use clean or sterile/aseptic techniques for application depending on institutional protocol. • Only the Smith & Nephew wound dressing kits and canisters are approved for use with RENASYS EZ Plus.