Step-by-Step Guide
2 Pages

Preview
Page 1
HOTLINE® Fluid Warmer (HL-90) HOTLINE® Fluid Warming Sets (L-70) Step-by-Step Guide IMPORTANT: Please refer to the Operator’s Manual supplied with the product for detailed instructions, contraindications, warnings and cautions and the appropriate IFU for specific information on using disposable sets.
Warning: Prime the recirculating solution path before connecting to the intravenous extension set, to confirm there is no breach between the recirculating solution path and the intravenous path.
•1
•2
HL-90
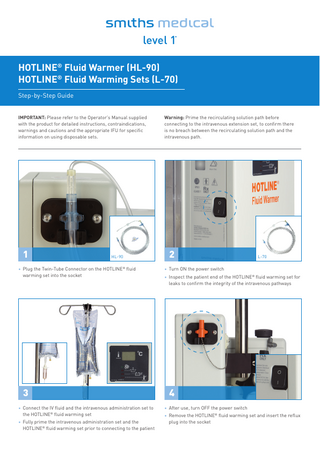
• Plug the Twin-Tube Connector on the HOTLINE® fluid warming set into the socket
• Turn ON the power switch
•3
•4
• Connect the IV fluid and the intravenous administration set to the HOTLINE® fluid warming set
• After use, turn OFF the power switch
• Fully prime the intravenous administration set and the HOTLINE® fluid warming set prior to connecting to the patient
L-70
• Inspect the patient end of the HOTLINE® fluid warming set for leaks to confirm the integrity of the intravenous pathways
• Remove the HOTLINE® fluid warming set and insert the reflux plug into the socket
HOTLINE® Fluid Warmer (HL-90) HOTLINE® Fluid Warming Sets (L-70) Step-by-Step Guide
Troubleshooting* Over Temperature Alarm:
No Power: • Confirm the HOTLINE warmer is plugged in properly
• Check the HOTLINE® fluid warming set for kinks or other restrictions
• Confirm the power switch in in the ON position (note: if the HOTLINE® warmer is plugged in and the power switch is turned ON, the green or red LED will illuminate)
• Check for air lock:
®
Check Disposables Alarm: • Confirm the HOTLINE® fluid warming set is properly installed • Push the Twin-Tube Connector firmly into the socket on the right side of the HOTLINE® warmer (note: turn OFF the power switch before replacing the HOTLINE® fluid warming set) • If the alarm is not cleared, replace the HOTLINE® fluid warming set. Turn ON the power switch and verify the alarm has cleared • If the alarm is not cleared, remove the HOTLINE® warmer from service Add Recirculating Solution Alarm: • Check the level in the reservoir – turn OFF the power switch, remove the HOTLINE® fluid warming set if installed, and add recirculating solution to the maximum level
• Turn the power switch to OFF, remove the HOTLINE® fluid warming set, and gently shake the HOTLINE® warmer to remove air • Plug in the HOTLINE® fluid warming set and turn the power switch ON • If the alarm is not cleared, remove the HOTLINE® warmer from service and return for repair or replacement Electrical Interference (receiving or transmitting): • Move the HOTLINE® warmer away from the device in question • Plug the HOTLINE® warmer into a separate electrical circuit (if the problem continues, notify Smiths Medical or your local Smiths Medical distributor) If the suggested solutions do not correct the problem, discontinue use of the HOTLINE® fluid warmer, remove from service, and contact Smiths Medical.
For more information visit our website at www.smiths-medical.com PRODUCT(S) DESCRIBED MAY NOT BE LICENSED OR AVAILABLE FOR SALE IN CANADA AND OTHER COUNTRIES
Smiths Medical India Private Limited 508-509, Western Edge 2, W.E. Highway, Borivali (E), Mumbai- 400066. India T: +91 22 28705210 F: +91 22 28705211 E: csindia@smiths-medical.com www.smiths-medical.com
MPAUCA-1371
2 6
Find your local contact information at: www.smiths-medical.com/customer-support/contact-us Smiths Medical is part of the global technology business Smiths Group plc. Please see the Instructions for Use/Operator’s Manual for a complete listing of the indications, contraindications, warnings and precautions. HOTLINE, Level 1 and the Smiths Medical design mark are trademarks of Smiths Medical. The symbol ® indicates the trademark is registered in the U.S. Patent and Trademark Office and certain other countries. All other names and marks mentioned are the trademarks or service marks of their respective owners. The product referenced is CE-marked. ©2019 Smiths Medical. All rights reserved. TM194875GBIN-082019