Sontec Instruments
ALGERBRUSH II PTERYGIUM MEDIUM WHEEL BATTERY POWERED
ALGERBRUSH II Operating Instructions
2 Pages
Preview
Page 1
last modified 12/3/2018 cph
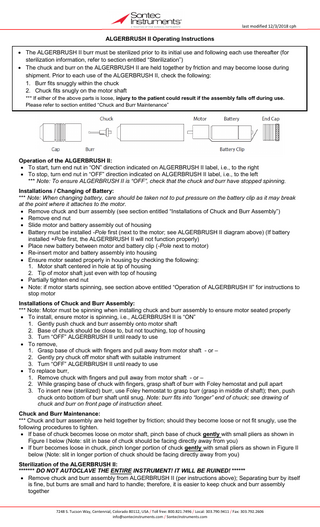
ALGERBRUSH II Operating Instructions • The ALGERBRUSH II burr must be sterilized prior to its initial use and following each use thereafter (for sterilization information, refer to section entitled “Sterilization”) • The chuck and burr on the ALGERBRUSH II are held together by friction and may become loose during shipment. Prior to each use of the ALGERBRUSH II, check the following: 1. Burr fits snuggly within the chuck 2. Chuck fits snugly on the motor shaft *** If either of the above parts is loose, injury to the patient could result if the assembly falls off during use. Please refer to section entitled “Chuck and Burr Maintenance”
Operation of the ALGERBRUSH II: • To start, turn end nut in “ON” direction indicated on ALGERBRUSH II label, i.e., to the right • To stop, turn end nut in “OFF” direction indicated on ALGERBRUSH II label, i.e., to the left *** Note: To ensure ALGERBRUSH II is “OFF”, check that the chuck and burr have stopped spinning. Installations / Changing of Battery: *** Note: When changing battery, care should be taken not to put pressure on the battery clip as it may break at the point where it attaches to the motor. • Remove chuck and burr assembly (see section entitled “Installations of Chuck and Burr Assembly”) • Remove end nut • Slide motor and battery assembly out of housing • Battery must be installed -Pole first (next to the motor; see ALGERBRUSH II diagram above) (If battery installed +Pole first, the ALGERBRUSH II will not function properly) • Place new battery between motor and battery clip (-Pole next to motor) • Re-insert motor and battery assembly into housing • Ensure motor seated properly in housing by checking the following: 1. Motor shaft centered in hole at tip of housing 2. Tip of motor shaft just even with top of housing • Partially tighten end nut • Note: if motor starts spinning, see section above entitled “Operation of ALGERBRUSH II” for instructions to stop motor Installations of Chuck and Burr Assembly: *** Note: Motor must be spinning when installing chuck and burr assembly to ensure motor seated properly • To install, ensure motor is spinning, i.e., ALGERBRUSH II is “ON” 1. Gently push chuck and burr assembly onto motor shaft 2. Base of chuck should be close to, but not touching, top of housing 3. Turn “OFF” ALGERBRUSH II until ready to use • To remove, 1. Grasp base of chuck with fingers and pull away from motor shaft - or – 2. Gently pry chuck off motor shaft with suitable instrument 3. Turn “OFF” ALGERBRUSH II until ready to use • To replace burr, 1. Remove chuck with fingers and pull away from motor shaft - or – 2. While grasping base of chuck with fingers, grasp shaft of burr with Foley hemostat and pull apart 3. To insert new (sterilized) burr, use Foley hemostat to grasp burr (grasp in middle of shaft); then, push chuck onto bottom of burr shaft until snug. Note: burr fits into “longer” end of chuck; see drawing of chuck and burr on front page of instruction sheet. Chuck and Burr Maintenance: *** Chuck and burr assembly are held together by friction; should they become loose or not fit snugly, use the following procedures to tighten. • If base of chuck becomes loose on motor shaft, pinch base of chuck gently with small pliers as shown in Figure I below (Note: slit in base of chuck should be facing directly away from you) • If burr becomes loose in chuck, pinch longer portion of chuck gently with small pliers as shown in Figure II below (Note: slit in longer portion of chuck should be facing directly away from you) Sterilization of the ALGERBRUSH II: ******* DO NOT AUTOCLAVE THE ENTIRE INSTRUMENT! IT WILL BE RUINED! ****** • Remove chuck and burr assembly from ALGERBRUSH II (per instructions above); Separating burr by itself is fine, but burrs are small and hard to handle; therefore, it is easier to keep chuck and burr assembly together 7248 S. Tucson Way, Centennial, Colorado 80112, USA / Toll free: 800.821.7496 / Local: 303.790.9411 / Fax: 303.792.2606 [email protected] / SontecInstruments.com
last modified 12/3/2018 cph
• Housing can be cleaned by wiping with alcohol • Refer to Appendix 1 for validated sterilization and cleaning procedures
Appendix 1: Cleaning and Sterilization Instructions Scope: The following is applicable before initial use and after each subsequent use. Carbide burrs are provided mechanically clean, but are not sterile (unless labeled “STERILE”). Therefore, carbide burrs should be sterilized before first use. Warnings: • Do not use chemical or dry heat to sterilize carbide burrs, as these processes have not been validated for use • Cleaning agents with chlorine or chloride as the active ingredient are corrosive to stainless steel and must not be used. Cleaning agents with neutral pH are recommended. • Do not use Cold Sterilizing Methods for the sterilization of burrs. These agents often contain strong oxidizing chemicals that may dull or weaken burrs. • Do not use enzymatic solutions for cleaning or debriding burrs. Reprocessing Limitations: • The end of life is determined by wear and damage in use. Carbide burrs should be inspected for defects (i.e. broken tips, broken sections on flutes, etc) during the cleaning process. Point of use: • Delay in reprocessing must be kept to a minimum to avoid contaminants drying thereby making cleaning more difficult. Containment/Transportation: • Carbide burrs can be transported wet or dry and should be protected from damage. If transported wet there is an increased chance of staining or corrosion. Prolonged storage in disinfectant solutions may result in degradation of the product and must be avoided. Ultrasonic Cleaning Procedure: • Prepare a fresh pH-neutral cleaning solution; place the carbide burr in the dedicated instrument block (if applicable) and then place in sonication unit. Follow the agent manufacturers’ instructions for correct concentration, exposure time, temperature, and water quality. Completely submerge the device in the cleaning solution and sonicate for at least fifteen (15) minutes. • Perform a final thorough rinse of the device and instrument block (if applicable) under running warm tap water for at least one (1) minute. • Visually inspect to confirm the removal of debris. Repeat the cycle if needed. • Dry the device using a non-shedding wipe or clean compressed air. Inspection testing: • Carefully inspect each device to ensure that all debris has been removed. • Visually inspect the device for damage/wear that would prevent proper operation: o Do not use if the tip is broken o Do not use if there is a broken section of a flute o Do not use if there is evidence of corrosion Packaging: • Singly: Pack the carbide burr in pouches validated for sterilization • In Sets: Place the carbide burrs in the dedicated instrument block Sterilization: Use the following cycle for steam sterilization Cycle Type Minimum Sterilization Minimum Sterilization Minimum Dry Time Exposure Time Exposure Temperature (minutes) (minutes) Gravity 10 135°C (275°F) 30 Pre-vacuum (4 Pulses) 3 134°C (273°F) 30 Ensure that the sterilizer manufacturer’s maximum load is not exceeded. Storage: • The carbide burr should be stored in the sterilization pouch (or instrument block) until required. Additional Information: • These processes have been validated as being capable of preparing carbide burrs for reuse. Any deviation from these instructions should be properly validated for effectiveness and potential adverse results.
7248 S. Tucson Way, Centennial, Colorado 80112, USA / Toll free: 800.821.7496 / Local: 303.790.9411 / Fax: 303.792.2606 [email protected] / SontecInstruments.com