Sports Art Industria
Sports Art C531r Owners Manual
Owners Manual
32 Pages
Preview
Page 1
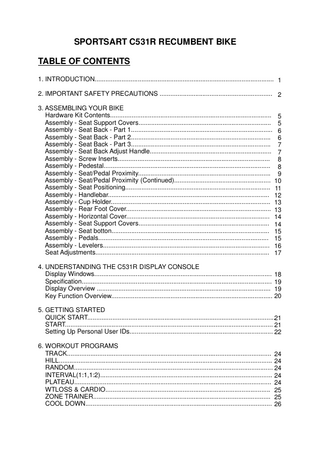
SPORTSART C531R RECUMBENT BIKE TABLE OF CONTENTS 1. INTRODUCTION... 1 2. IMPORTANT SAFETY PRECAUTIONS ... 2 3. ASSEMBLING YOUR BIKE Hardware Kit Contents... 5 Assembly - Seat Support Covers... 5 Assembly - Seat Back - Part 1... 6 Assembly - Seat Back - Part 2... 6 Assembly - Seat Back - Part 3... 7 Assembly - Seat Back Adjust Handle... 7 Assembly - Screw Inserts... 8 Assembly - Pedestal... 8 Assembly - Seat/Pedal Proximity... 9 Assembly - Seat/Pedal Proximity (Continued)... 10 Assembly - Seat Positioning... 11 Assembly - Handlebar... 12 Assembly - Cup Holder... 13 Assembly - Rear Foot Cover... 13 Assembly - Horizontal Cover... 14 Assembly - Seat Support Covers... 14 Assembly - Seat botton... 15 Assembly - Pedals... 15 Assembly - Levelers... 16 Seat Adjustments... 17 4. UNDERSTANDING THE C531R DISPLAY CONSOLE Display Windows... 18 Specification... 19 Display Overview ... 19 Key Function Overview... 20 5. GETTING STARTED QUICK START...21 START... 21 Setting Up Personal User IDs... 22 6. WORKOUT PROGRAMS TRACK... 24 HILL... 24 RANDOM... 24 INTERVAL(1:1,1:2)... 24 PLATEAU... 24 WTLOSS & CARDIO... 25 ZONE TRAINER... 25 COOL DOWN... 26
7. GUIDELINES FOR EXERCISE How long should I exercise ... 27 How often should I exercise... 27 8. MAINTAINING THE BIKE... 27 9. TROUBLESHOOTING Error Messages... 28 10. INTERNAL SETTINGS Metric/American Standard Unit... 28 Time... 28 Distance... 29 Activate and Deactivate User IDs... 29 11. WIRING SCHEMATIC... 30
SPORTSART C531R RECUMBENT BIKE INTRODUCTION Congratulations on your purchase of one of the finest pieces of exercise equipment on the market today, the SportsArt C531R Recumbent Bike. Constructed of high quality materials and designed for years of trouble-free usage, the C531R is built to become an integral part of your fitness regimen. Before using your new exercise bike, we recommend that you familiarize yourself with this manual. Understanding the correct use of this equipment will enhance your ability to achieve your exercise goals safely and successfully.
Display
Remote control Contact heart rate (HTR) grip Seat bottom
Pedestal Pedestal collar Front cover
Seat back
Pedal
Handlebar
Transport handle Left/right seat support covers (no hole) Left/right end cover
Transport wheel Power connector
Front foot cover Seat back adjust Cup holder Left/right seat support cover (with hole) Rear foot cover
1
Seat forward adjust handle Seat angle adjust handle
IMPORTANT SAFETY PRECAUTIONS Your SportsArt bike was designed and built for optimum safety. However, certain precautions apply whenever you exercise. Please read the entire manual before assembling and operating this equipment: Please read and observe the following safety guidelines: ‧Keep this owner's manual for future use and reference. ‧Read this owner's manual and follow the instructions. ‧Assemble and operate the bike on a solid, level surface. ‧Never allow children on or near the bike. ‧Check the machine before every use. Make sure all parts are assembled, and all nuts and bolts are tightened. Do not use the machine if the unit is disassembled in any way.
Warning ‧Keep your hands away from moving parts. ‧ Wear proper workout clothing. Do NOT wear overly loose clothing. Do not wear shoes with leather soles or high heels. Tie all long hair back. ‧ Do not rock the unit from side to side and take care when mounting and dismounting the unit.
2
‧Do not stand on the unit. ‧Do not use accessories that are not specifically recommended by the manufacturer as these might cause injuries or cause the unit to fail. ‧ Allow sufficient space on both sides of the bike for users to mount and to dismount the unit. ‧ If any parts fail or are defective, please stop your workout immediately and contact your authorized dealer for repairs. ‧ Work within your recommended exercise level; do NOT work to exhaustion. ‧ If you feel any pain or abnormal sensations, STOP YOUR WORKOUT. Consult your physician immediately. ‧ The weight limit for this bike is 150 kgs (330 lbs). Note: User weight limits differ in different markets.
Caution Before beginning any exercise program, you should consult your doctor. It is recommended that you undergo a complete physical examination before starting a rigorous exercise regimen.
SAVE THESE INSTRUCTIONS
3
ASSEMBLING YOUR BIKE Before assembling your new bike, please locate the following items.
1. Gas spring 2. Body 3. Hardware kit 4. Pedestal and display 5. Pedestal collar 6. Handlebar with HTR grip 7. Rear foot cover 8. Horizontal covers
9. Left/right seat support cover (front - with hole) 10. Left/ right seat support cover (rear no hole) 11. Seat bottom 12. Pedals 13. Cup holder
Note: Some screws and washers are secured in the frame. Remove them before trying to assemble the exercise bike.
4
Hardware Kit Contents 1.Open double end wrench, 1 pc 2.L-shaped Allen wrench (M5), 1 pc 3.L-shaped Allen wrench (M6), 1 pc 4. L-shaped Allen wrench (M4), 1 pc 5.Screwdriver handle (green), 1 pc 6.Double-ended screwdriver stem, 1 pc 7.Round head Phillips screws, 10 pc 8.Screw inserts, 8 pc
Assembly - Seat Support Covers
Front (with hole)
First, remove the front and rear seat support covers from both sides.
5
Rear (no hole)
Assembly - Seat Back -Part 1 1. Remove the R clip and pin at position A. 2. Insert end B of the gas spring into bracket A.
3. Secure the gas spring with the pin and R clip.
Assembly - Seat Back- Part 2 1. Set the gas spring cover into place.
2. Tighten the screws to secure the cover.
Note: Screws are in the hardware kit.
6
Assembly - Seat Back -Part 3 1. Please remove the R clip and gas spring at location C. 2. Lift the seat back to position D.
3. Insert the pin and R clip to secure the seat back.
Assembly - Seat Back Adjust Handle
1. Secure the seat back adjust handle as shown.
7
Assembly - Screw Inserts
1. Press the screw inserts into the frame. Note: Screw inserts are in the hardware kit.
Assembly - Pedestal 1. Put the pedestal collar in place.
2. Connect the data cable connectors as shown.
3. After connecting data cables, insert the pedestal into the unit frame. Secure screw/washer set B, then secure set A and set C.
8
Assembly - Seat/Pedal Proximity The seat position on C531R can be adjusted to suit people with different leg lengths The seat position can be altered in two ways: An automatic gas spring moves the seat within a set range; and the placement of the gas spring's connection to the frame changes the range of movement. The frame has front and back holes. Connecting the gas spring at the front hole makes the seat closer to the display. Connecting the gas spring at the rear connection point makes the seat farther from the display. Tall people would probably prefer a set up with the gas spring connected at the back hole.This is the position set at the factory. To adjust the proximity of the seat to the pedals, follow the instructions below.
Automatic Adjustment To use the automatic seat adjustment (gas spring activated), sit on the seat and hold up the handle marked A in the illustration. Push against the pedals and/or handle to move the seat back, or simply let the seat move forward to bring it close to the display. Once the seat moves to the desired position, release handle A. The seat will stay at that position.
Connection Point Adjustment Follow the instructions below to change t he g as sprin g con ne ctio n po int . Connecting the gas spring to the front hole will place the pedals closer to the display. First, prop up the back of the bike as shown.
Front hole Back hole 9
Assembly - Seat Pedal Proximity (Continued) Connection Point Adjustment (Continued) Then, move the shock to the front hole and secure it. Refer to the instructions and diagrams below. a. Remove the screw and washer. b. Tap out the bushing. c. Move the end of the gas spring to the front hole. d. Put the bushing through the hole in the frame and past the hole in the gas spring. Secure the washer and screw.
Use the same process to adjust the connection point again, if desired.
10
Assembly - Seat Positioning 1. Locate the handle in position E. Hold up handle F as shown. Do not release the handle.
2. The gas spring will push the seat up so that the handlebar and lower covers can be installed. Release the handle after the seat stops moving.
11
Assembly - Handlebar 1. The C531R is equipped with hand touch read-out (HTR). Avoid pinching or pulling HTR wires during handlebar installation. Insert the handlebar between the seat back and the gas spring as indicated below. Note: You cannot slide the handlebar in straight. You must tilt and move it to fit it in.
2. HTR handlebar wires are marked left and right. Match them to wires extending from the frame. Connect the wires and tuck them into the hole under the seat bottom for safety. Avoid crimping, pinching or stressing the wires.
3. Secure the handlebar with washers and screws.
12
Assembly - Cup Holder 1. Set the cup holder in place and secure the top screws.
2. Insert a screwdriver through the slots in the cup holder and secure the side screws.
Assembly - Rear Foot Cover
1. Put the rear foot cover in place.
2. Loosely secure each screw. After all screws are in place, tighten them down.
13
Assembly - Horizontal Covers 1. Put left and right horizontal covers in place.
2. Loosely secure each screw. After all screws are in place, tighten them down.
Assembly - Seat Support Covers 1. Put front and back seat support covers in place.
Front with hole
Back no hole
2. Loosely secure each screw. After all screws are in place, tighten them down.
14
Assembly - Seat Bottom
Secure the seat bottom as shown.
Flat washer Spring washer Screw
Assembly - Pedals Each pedal is marked left or right. Put pedals on the appropriate side. The bike's left/right sides are the same as the user's left/right sides. Note: The left pedal screws in counterclockwise. The right pedal screws in clockwise. Insert pedals by hand to make sure they thread properly. Then use the wrench to tighten them into place.
15
Assembly - Levelers
Put the cycle where it will be ridden. Inspect it. Does it rock from side to side? If so, level it. Rotate rubber leveler feet up or down until the cycle does not rock. Then secure this position by rotating the leveler nut against the unit frame.
16
Seat Adjustments
Up/Down Adjustment Sit on the seat. Pull up lever A. Adjust the seat position until it suits you. Push against the pedals to move back, or pull the handle to move forward. Then release the lever.
Seat Back Adjustment Sit on the seat. Pull up lever B. Adjust the seat back until it reaches a comfortable position. Then release the lever.
Seat Angle Adjustment Sit on the seat. Pull lever C up. Adjust the seat angle. Then push lever C down to secure the seat in place.
17
UNDERSTANDING THE C531R DISPLAY CONSOLE Display Illustration
65% HR TARGET
HEART RATE
80% HR TARGET
BODY AREA LED
DOT MATRIX WORKOUT ILLUSTRATION
SCAN INDICATOR
FEEDBACK WINDOW
EXERCISE PROGRAMS KEYS
18