St. Jude Medical
Merlin@home Transmitter Model EX1150 Quick Start Guide April 2014
Quick Start Guide
5 Pages

Preview
Page 1
Merlin@home™ Transmitter Model EX1150 Quick Start Guide Set up the transmitter Note. The transmitter is designed for use with direct analog telephone lines. It may be damaged by any other type of phone line. The transmitter might work with VOIP and cable services.
1 Place the transmitter on your nightstand or a table close to your bed. The transmitter should be no more than 3 meters from your bed.
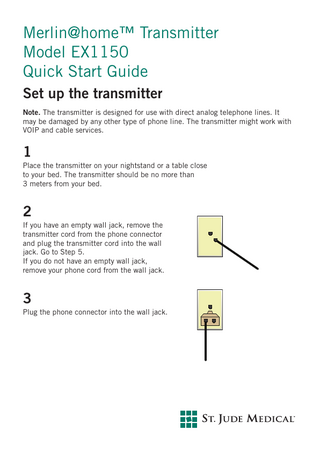
2 If you have an empty wall jack, remove the transmitter cord from the phone connector and plug the transmitter cord into the wall jack. Go to Step 5. If you do not have an empty wall jack, remove your phone cord from the wall jack.
3 Plug the phone connector into the wall jack.
4 Plug your phone cord into the phone connector’s open end.
5 Plug the power supply into the wall electrical outlet. The green power light comes on. Keep the transmitter plugged in.
6 While the transmitter is setting up, the progress lights move from left to right.
7 Do one of the following: • If this is the first time you are setting up the transmitter, wait until the Read icon lights up, progress lights blink, and beeping starts. Go to Step 8. • If you have set up the transmitter before, go to Step 12.
8 Make sure you are within 30 cm of the transmitter. Make sure no one else with a St. Jude Medical implant is nearby. Face the transmitter and quickly press and release the Start button.
9 The Read icon flashes when the transmitter searches for your implant. It will stop flashing but remains lit while the transmitter reads the implant and the progress lights will move left to right. Stay close to the transmitter.
10 The Tower icon lights up when the transmitter has read your implant. The progress lights will move from left to right when the transmitter attempts to contact your clinic. This process may take several minutes. Depending on your connectivity this can be between 5-15 minutes. Do not use your phone during this process.
11 The Stars icon lights up and the progress lights will turn off when your set up is finished. The Stars icon remains lit for a short time.
12 Leave the transmitter in place and plugged in. Make sure the front of the transmitter faces where you sleep. Your Merlin@home transmitter automatically monitors your device according to the schedule set by your clinic. Note. During first time set up, the transmitter does not send information about your implant.
How to Send Your Information Manually Your information is sent automatically while you sleep (when scheduled by your clinic). Send your information manually only if your clinician instructs you to do so. 1. Quickly press and release the Start button. The Stars icon lights up. 2. Remain in front of the transmitter. 3. Quickly press and release the Start button again. 4. The Read icon flashes when the transmitter searches for your implant. It will stop flashing but remains lit while the transmitter reads the implant and the progress lights will move left to right. Stay close to the transmitter. 5. The Tower icon lights up when the transmitter sends information about your implant. This process may take several minutes. Depending on your connectivity this can be between 5-15 minutes. You do not need to stay in front of the transmitter. 6. The Stars icon lights up when your session is finished. The Stars icon remains lit for a short time.
Troubleshooting For Technical Support, contact your clinic.
Progress Lights An error has occurred if all progress lights are lit or blinking. See below for error details. Can’t read information 1. Press the Start button to clear the error. 2. Reposition the transmitter so it is within 30 cm and level with your implant. 3. Press the Start button. The transmitter attempts to read your implant. Can’t send information 1. Check that your wall jack, phone connector, and transmitter cord are firmly connected. 2. Turn off any fax, computer, or TV that shares your phone line. Consider turning them off at night to ensure your information is sent successfully. 3. Press the Start button to continue. The transmitter attempts to redial. Note. If DSL shares your telephone line, contact your DSL service provider for a filter. Plug the filter into the wall jack and plug the phone connector into the filter.
Call your clinic 1. Press the Start button to stop the flashing lights and beeping sounds. 2. Call your clinic for more instructions.
Call Technical Support 1. If all five progress lights are lit, call Technical Support.
For additional information, see the accompanying manual.
April 2014 Art 60053259/A