Teleflex Medical
MAC™ Multi-Lumen Central Venous Access Product
6 Pages
Preview
Page 1
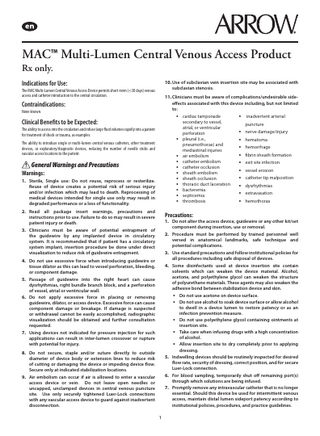
MAC™ Multi-Lumen Central Venous Access Product Rx only. Indications for Use:
10. Use of subclavian vein insertion site may be associated with subclavian stenosis.
Contraindications:
11. Clinicians must be aware of complications/undesirable sideeffects associated with this device including, but not limited to:
The MAC Multi-Lumen Central Venous Access Device permits short-term (<30 days) venous access and catheter introduction to the central circulation. None known.
• cardiac tamponade
Clinical Benefits to be Expected: The ability to access into the circulation and infuse large fluid volumes rapidly into a patient for treatment of shock or trauma, as examples.
•
The ability to introduce single or multi-lumen central venous catheters, other treatment devices, or exploratory/diagnostic devices, reducing the number of needle sticks and vascular access locations to the patient.
• • • • • • • • •
General Warnings and Precautions Warnings: 1. Sterile, Single use: Do not reuse, reprocess or resterilize. Reuse of device creates a potential risk of serious injury and/or infection which may lead to death. Reprocessing of medical devices intended for single use only may result in degraded performance or a loss of functionality.
secondary to vessel, atrial, or ventricular perforation pleural (i.e., pneumothorax) and mediastinal injuries air embolism catheter embolism catheter occlusion sheath embolism sheath occlusion thoracic duct laceration bacteremia septicemia thrombosis
• inadvertent arterial puncture
• nerve damage/injury • hematoma • hemorrhage • fibrin sheath formation • exit site infection • vessel erosion • catheter tip malposition • dysrhythmias • extravasation • hemothorax
2. Read all package insert warnings, precautions and instructions prior to use. Failure to do so may result in severe patient injury or death.
Precautions:
3. Clinicians must be aware of potential entrapment of the guidewire by any implanted device in circulatory system. It is recommended that if patient has a circulatory system implant, insertion procedure be done under direct visualization to reduce risk of guidewire entrapment.
2. Procedure must be performed by trained personnel well versed in anatomical landmarks, safe technique and potential complications.
1. Do not alter the access device, guidewire or any other kit/set component during insertion, use or removal.
3. Use standard precautions and follow institutional policies for all procedures including safe disposal of devices.
4. Do not use excessive force when introducing guidewire or tissue dilator as this can lead to vessel perforation, bleeding, or component damage. 5. Passage of guidewire into the right heart can cause dysrhythmias, right bundle branch block, and a perforation of vessel, atrial or ventricular wall. 6. Do not apply excessive force in placing or removing guidewire, dilator, or access device. Excessive force can cause component damage or breakage. If damage is suspected or withdrawal cannot be easily accomplished, radiographic visualization should be obtained and further consultation requested. 7. Using devices not indicated for pressure injection for such applications can result in inter-lumen crossover or rupture with potential for injury.
4. Some disinfectants used at device insertion site contain solvents which can weaken the device material. Alcohol, acetone, and polyethylene glycol can weaken the structure of polyurethane materials. These agents may also weaken the adhesive bond between stabilization device and skin.
• Do not use acetone on device surface. • Do not use alcohol to soak device surface or allow alcohol
to dwell in a device lumen to restore patency or as an infection prevention measure. • Do not use polyethylene glycol containing ointments at insertion site. • Take care when infusing drugs with a high concentration of alcohol. • Allow insertion site to dry completely prior to applying dressing. 5. Indwelling devices should be routinely inspected for desired flow rate, security of dressing, correct position, and for secure Luer-Lock connection.
8. Do not secure, staple and/or suture directly to outside diameter of device body or extension lines to reduce risk of cutting or damaging the device or impeding device flow. Secure only at indicated stabilization locations. 9. Air embolism can occur if air is allowed to enter a vascular access device or vein. Do not leave open needles or uncapped, unclamped devices in central venous puncture site. Use only securely tightened Luer-Lock connections with any vascular access device to guard against inadvertent disconnection.
6. For blood sampling, temporarily shut off remaining port(s) through which solutions are being infused. 7. Promptly remove any intravascular catheter that is no longer essential. Should this device be used for intermittent venous access, maintain distal lumen sideport patency according to institutional policies, procedures, and practice guidelines. 1
Kits/Sets may not contain all accessory components detailed in these instructions for use. Become familiar with instructions for individual component(s) before beginning the procedure.
locked open locked
A Suggested Procedure: Use sterile technique.
open
Prep Puncture Site: 1. Position patient as appropriate for insertion site. Figure 3 ◊ Insert tip of desired catheter through proximal end of catheter contamination shield. Advance catheter through tubing and hub at other end (refer to Figure 4).
• Subclavian or Jugular approach: Place patient in slight Trendelenburg position as tolerated to reduce risk of air embolism and enhance venous filling. • Femoral approach: Place patient in supine position. 2. Prepare clean skin with an appropriate antiseptic agent.
proximal end of catheter
3. Drape puncture site. 4. Administer local anesthetic per institutional policies and procedures. 5. Dispose of needle. distal hub
SharpsAway® II Locking Disposal Cup (where provided): The SharpsAway II Locking Disposal Cup is used for disposal of needles (15 Ga. - 30 Ga.). •
hub proximalproximal end of catheter
Figure 4 8. Slide entire catheter contamination shield to proximal end of catheter. 9. If flow directeddistal catheter is used, inflate and deflate balloon with syringe hub proximal hub to ensure integrity.
Using one-handed technique, firmly push needles into disposal cup holes (refer to Figure 1).
Precaution: Do not exceed balloon catheter manufacturer's recommended volume. Place catheter and catheter contamination shield on sterile field awaiting final placement. 10. Insert entire length of dilator through hemostasis valve into access device pressing hub of dilator firmly into hub of hemostasis valve assembly. Place assembly on sterile field awaiting final placement.
Gain Initial Venous Access:
Figure 1 •
Echogenic Needle (where provided):
Once placed into disposal cup, needles will be automatically secured in place so that they cannot be reused.
An echogenic needle is used to allow access to the vascular system for the introduction of a guidewire to facilitate catheter placement. The needle tip is enhanced for approximately 1 cm for clinician to identify exact needle tip location when puncturing the vessel under ultrasound.
Precaution: Do not attempt to remove needles that have been placed into SharpsAway II Locking Disposal Cup. These needles are secured in place. Damage may occur to needles if they are forced out of disposal cup. •
Protected Needle/Safety Needle (where provided):
Where provided, a foam SharpsAway® system may be utilized by pushing needles into foam after use.
A protected needle/safety needle should be used in accordance with manufacturer’s instructions for use.
Precaution: Do not re-use needles after they have been placed into the foam SharpsAway system. Particulate matter may adhere to needle tip.
Arrow® Raulerson Syringe (where provided): Arrow Raulerson Syringe is used in conjunction with Arrow Advancer for guidewire insertion.
6. Prepare flow-directed catheter according to manufacturer’s instructions. Wet balloon with flush solution to facilitate passage through catheter contamination shield. Precaution: Do not inflate balloon prior to insertion through catheter contamination shield to reduce the risk of balloon damage.
11. Insert introducer needle or catheter/needle with attached Sterile tape syringe or Arrow Raulerson Syringe (where provided) into vein and aspirate. Warning: Do not leave open needles or uncapped, unclamped devices in central venous puncture site. Air embolism can occur if air is allowed to enter a central venous access device or vein. Sterile tape
7. Apply Contamination Shield: a. If using a catheter contamination shield with Tuohy-Borst adapter (where provided), insert tip of desired catheter through Tuohy-Borst adapter end of catheter contamination shield. Advance catheter through tubing and hub at other end (refer to Figure 2). Catheter contamination shield
Catheter tip
Catheter Precaution: Do not reinsert needle into introducer catheter (where provided) to Tuohy-Borst adapter reduce risk of catheter embolus.
Verify Venous Access:
Utilize one of the following techniques to verify venous access because of the potential for Catheter inadvertent arterial placement: Tuohy-Borst adapter • Central Venous Waveform:
Catheter
Tuohy-Borst adapter
•
Figure 2 b. If using a catheter contamination shield with TwistLock™ adapter (where provided), ensure double TwistLock™ of catheter contamination shield is fully opened (refer to Figure 3).
• Insert fluid primed blunt tip pressure transduction probe into rear of plunger and through valves of Arrow Raulerson Syringe and observe for central venous pressure waveform. ◊ Remove transduction probe if using Arrow Raulerson Syringe. Pulsatile Flow (if hemodynamic monitoring equipment is not available): locked • Use transduction probe to open syringe valving system of Arrow Raulerson Syringe and observe for pulsatile flow. • Disconnect syringe from needle and observe for pulsatile flow. Warning: Pulsatile flowopen is usually an indicator of inadvertent arterial puncture. locked
Precaution: Do not rely on blood aspirate color to indicate venous access. 2 open
Insert Guidewire:
Precaution: Do not reinfuse blood to reduce risk of blood leakage from rear (cap) of syringe.
Guidewire: Kits/Sets are available with a variety of guidewires. Guidewires are provided in different diameters, lengths and tip configurations for specific insertion techniques. Become familiar with the guidewire(s) to be used with the specific technique before beginning the actual insertion procedure.
Warning: Do not withdraw guidewire against needle bevel to reduce risk of possible severing or damaging of guidewire. 14. Remove introducer needle and Arrow Raulerson Syringe (or catheter) while holding guidewire in place.
Arrow Advancer (where provided):
15. Use centimeter markings on guidewire to adjust indwelling length according to desired depth of indwelling device placement.
Arrow Advancer is used to straighten “J” Tip of guidewire for introduction of the guidewire into Arrow Raulerson Syringe or a needle. • Using thumb, retract “J” (refer to Figure 5).
16. Enlarge cutaneous puncture site with cutting edge of scalpel, positioned away from guidewire. Warning: Do not cut guidewire to alter length. Warning: Do not cut guidewire with scalpel. • Position cutting edge of scalpel away from guidewire. • Engage safety and/or locking feature of scalpel (where provided) when not in use to reduce the risk of sharps injury. 17. Use tissue dilator to enlarge tissue tract to the vein as required. Follow the angle of the guidewire slowly through the skin.
•
Warning: Do not leave tissue dilator in place as an indwelling catheter. Leaving tissue dilator in place puts patient at risk for possible vessel wall perforation.
Figure 5 Place tip of Arrow Advancer – with “J” retracted – into the hole in rear of Arrow Raulerson Syringe plunger or introducer needle.
Advance Device: 18. Thread tapered tip of dilator/access device assembly over guidewire. Sufficient guidewire length must remain exposed at hub end of device to maintain a firm grip on guidewire. 19. Grasping near skin, advance assembly with slight twisting motion to a depth sufficient to enter vessel. Dilator may be partially withdrawn to facilitate advancement of access device through tortuous vessel. Precaution: Do not withdraw dilator until the access device is well within the vessel to reduce the risk of damaging tip.
Figure 6
20. Advance access device assembly off dilator into vessel, again grasping near skin and using slight twisting motion.
12. Advance guidewire into Arrow Raulerson Syringe approximately 10 cm until it passes through syringe valves or into introducer needle. • Advancement of guidewire through Arrow Raulerson Syringe may require a gentle twisting motion.
21. To check for proper access device placement within the vessel, attach syringe to distal side port for aspiration. Hold access device assembly in place and withdraw guidewire and dilator sufficiently to allow venous blood flow to be aspirated into distal side port.
• Raise thumb and pull Arrow Advancer approximately 4 - 8 cm away from Arrow Raulerson Syringe or introducer needle. Lower thumb onto Arrow Advancer and while maintaining a firm grip on guidewire, push assembly into syringe barrel to further advance guidewire (refer to Figure 6). Continue until guidewire reaches desired depth.
22. Holding access device assembly in place, remove guidewire and dilator as a unit. Place sterile-gloved finger over hemostasis valve.
Precaution: Maintain firm grip on guidewire at all times.
Warning: To reduce the risk of possible vessel wall perforation, do not leave tissue dilator in place as an indwelling catheter.
Alternate Technique:
Warning: Although the incidence of guidewire failure is extremely low, practitioner should be aware of the potential for breakage if undue force is applied to the wire.
If a simple straightening tube is preferred, the straightening tube portion of the Advancer can be disconnected from the unit and used separately. Separate the Advancer tip or straightening tube from the blue Advancer unit. If the “J” tip portion of the guidewire is used, prepare for insertion by sliding the plastic tube over the “J” to straighten. The guidewire should then be advanced in the routine fashion to the desired depth. 13. Use centimeter markings (where provided) on guidewire as a reference to assist in determining how much guidewire has been inserted.
Flush and connect distal side port to appropriate line as necessary. Confirm and monitor proximal port by aspirating until free flow of venous blood is observed. Connect all extension lines to appropriate Luer-Lock line(s) as required. Unused port(s) may be “locked” through injection cap(s) using standard hospital protocol. Clamps are provided on extension lines to occlude flow through each lumen during line and injection cap changes. Precaution: To reduce the risk of damage to extension lines from excessive pressure, each clamp must be opened prior to infusing through that lumen.
NOTE: When guidewire is used in conjunction with Arrow Raulerson Syringe (fully aspirated) and a 2-1/2” (6.35 cm) introducer needle, the following positioning references can be made: • 20 cm mark (two bands) entering back of plunger = guidewire tip at end of needle • 32 cm mark (three bands) entering back of plunger = guidewire tip approximately 10 cm beyond end of needle
23. Feed catheter through access device assembly into vessel. Advance catheter to desired position.
Precaution: Maintain firm grip on guidewire at all times. Keep sufficient guidewire length exposed for handling purposes. A non-controlled guidewire can lead to wire embolus.
Warning: Hemostasis valve must be occluded at all times to reduce the risk of air embolism or hemorrhage. If catheter introduction is delayed, temporarily cover valve opening with sterile gloved finger until obturator is inserted. Use Arrow obturator, either included with this product or sold separately, to occlude hemostasis valve assembly. This will ensure that leakage does not occur and inner seal is protected from contamination.
Warning: Do not aspirate Arrow Raulerson Syringe while guidewire is in place; air may enter syringe through rear valve.
24. Hold access device in place and reposition catheter contamination shield so that distal hub is approximately five inches (12.7 cm) from hemostasis valve. 3
Secure Device:
25. Hold proximal hub of catheter contamination shield in place. Disengage distal hub from inner feed tube by pulling forward. Advance distal hub forward toward hemostasis valve assembly. Hold assembly in place.
28. Use triangular juncture hub with side wings as primary securement site. Precaution: Do not secure directly to the outside diameter of the device to reduce the risk of cutting or damaging the device or impeding device flow.
26. Press distal hub of catheter contaminationproximal shield overend assembly cap. Twist to lock of catheter proximal end of catheter (refer to Figure 7).
29. Ensure insertion site is dry before applying dressing per manufacturer’s instructions. distal hub distal hub
Precaution: Maintain the insertion site with regular, meticulous redressing using aseptic technique.
proximal hub proximal hub
30. Document procedure per institutional policies and procedures.
Care and Maintenance: Dressing:
Figure 7 • Orient slot in hub with locking pin on assembly cap. • Slide hub forward over cap and twist. 27. While maintaining catheter position lock the catheter in place:
Dress according to institutional policies, procedures, and practice guidelines. Change immediately if the integrity becomes compromised e.g. dressing becomes damp, soiled, loosened or no longer occlusive.
Catheter Patency:
a. If using a catheter contamination shield with a Tuohy-Borst adapter, grasp insertion catheter through front portion of catheter contamination shield and hold in place while repositioning Tuohy-Borst adapter end as desired. Precaution: Do not reposition Tuohy-Borst adapter end on insertion catheter Sterile tape once moved to this final position.
Maintain device patency according to institutional policies, procedures and practice guidelines. All personnel who care for patients with central venous devices must be knowledgeable about effective management to prolong device’s dwell time and prevent injury.
Catheter Removal from Access Device Procedure:
• Tighten Tuohy-Borst adapter by pressing down on cap and simultaneously turning clockwise to secure hub to catheter. Gently pull insertion catheter to verify securement. Catheter Precaution: Do notTuohy-Borst overtighten Tuohy-Borst adapter adapter to reduce the risk of lumen constriction or insertion catheter damage.
1. Position patient as clinically indicated to reduce risk of potential air embolus. 2. Unlock catheter contamination shield from access device and withdraw catheter from access device. Temporarily cover valve opening with sterile-gloved finger until obturator is inserted. Apply obturator cap.
• Tuohy-Borst adapter end of catheter contamination shield should be secured with sterile tape to inhibit insertion catheter movement (refer to Figure 8). Precaution: Do not apply tape to the transparent sheathing on the shield to reduce the risk of tearing material.
Warning: Hemostasis valve must be occluded at all times to reduce the risk of air embolism or hemorrhage.
Access Device Removal Procedure: 1. Position patient as clinically indicated to reduce risk of potential air embolus.
Sterile tape Sterile tape
2. Remove dressing. Precaution: To reduce the risk of cutting device, do not use scissors to remove dressing.
locked
3. Remove securement from device, if applicable.
Catheter Catheter
Tuohy-Borst adapter Tuohy-Borst adapter
Precaution: Be careful not to cut the access device.
open
Figure 8 b. If using a catheter contamination shield with a TwistLock adapter, twist the upper half of the distal hub in clockwise direction to lock catheter in place. Reposition proximal end of catheter shield as desired. Twist upper and lower halves in opposite directions to lock in place. Test the adapter by gently tugging on the catheter to ensure a secure grip on the catheter (refer to Figure 9). Precaution: Do not reposition proximal hub once locked in final position.
4. Ask patient to take a breath and hold it if removing jugular or subclavian insertion. 5. Remove device (and catheter, if applicable) slowly, pulling it parallel to the skin. 6. Apply direct pressure to site until hemostasis is achieved followed by an ointment based occlusive dressing. Warning: Residual catheter track remains an air entry point until site is epithelialized. Occlusive dressing should remain in place for at least 24 hours or until site appears epithelialized.
locked locked
7. Document removal procedure including confirmation that entire device has been removed per institutional policies and procedures.
open open
For reference literature concerning patient assessment, clinician education, insertion technique, and potential complications associated with this procedure, consult standard textbooks, medical literature, and Arrow International LLC website: www.teleflex.com
Figure 9
4
Symbol Glossary: Symbols are in compliance with ISO 15223-1. Some symbols may not apply to this product. Refer to product labeling for symbols that apply specifically to this product.
Caution
Medical device
Consult instructions for use
Contains a medicinal substance
Do not reuse
Do not resterilize
Sterilized by ethylene oxide
Single sterile barrier system
Keep away from sunlight
Keep dry
Do not use if package is damaged
Not made with natural rubber latex
Catalogue number
Lot number
Single sterile barrier system with protective packaging inside
Use by
Manufacturer
Arrow, the Arrow logo, SharpsAway, Teleflex and the Teleflex logo are trademarks or registered trademarks of Teleflex Incorporated or its affiliates, in the U.S. and/or other countries. © 2020 Teleflex Incorporated. All rights reserved. Date of manufacture
Arrow International LLC Subsidiary of Teleflex Incorporated 3015 Carrington Mill Blvd., Morrisville, NC 27560 USA USA: 1 866 246 6990 | International: +1 919 544 8000
K-11142-104B (2020-12) 6